Are you looking for an easy way to replace your Harley-Davidson Touring seat?
To replace a Harley touring seat, remove the mounting bolts, lift the old seat off, position the new seat, and secure it with the bolts as directed by the installation guide.
This article will walk you through the steps so that you can swap out your seat like a pro! With our simple tips and tricks, you’ll be cruising in the utmost comfort in no time. Keep reading to learn how to replace your seat quickly and easily.
Reasons to replace a Harley-Davidson Touring Seat
The journey on your Harley-Davidson Touring Bike is a quest for adventure and freedom. However, safety and comfort are important for your ride too. With time, the stock seat that comes with your Harley-Davidson bike may not provide the level of comfort you expect during those long rides. There are several reasons why you may need to replace the touring seat on your bike. Upgrading the seat can make a major difference to your riding experience. Here are some of the reasons why you may consider replacing the touring seat of your Harley-Davidson bike.
>>> Click here to read our review of the Best Harley-Davidson Touring Seat <<<
#1. Enhanced comfort during long rides
One of the primary reasons you might have to replace the touring seat would be to elevate your comfort levels during long rides. After a certain time, stock seats might lack the cushioning and ergonomic design needed for long hours of riding.
By investing in a seat that is specifically designed to provide superior comfort, you will be able to tackle long rides without any discomfort or fatigue.
#2. Personalized fit and support
Every rider’s body is unique and a stock touring seat might not cater to your individual shape and size. Upgrading to a superior seat that offers customizable features like adjustable backrests, lumbar support, or different contour options may allow you to tailor the touring seat to fit your body perfectly. A personalized fit will ensure optimal support and minimize the risk of discomfort or back pain.
#3. Relief for back and joint discomfort
Long rides can put a strain on your back and joints, especially if the seat does not provide adequate support. Seats with advanced cushioning technology and ergonomic designs can distribute your weight more evenly, reducing pressure points and providing relief for your back, hips, and knees.

#4. Customized aesthetics
Replacing your touring seat provides an opportunity to add a touch of individuality to your motorcycle’s appearance. Many aftermarket touring seat options come in a wide range of styles, colors, and materials that allow you to match your seat to your bike’s aesthetics or your personal style.
#5. Enhanced passenger comfort
If you often ride with a passenger, upgrading your seat can greatly benefit both you and your passenger’s comfort. Some aftermarket seats come with features like wider seating areas, adjustable backrests, and increased cushioning to ensure a more comfortable ride for both the rider and the passenger.
#6. Upgraded materials and durability
Stock seats end up wearing out over time due to exposure to the elements, UV rays, and regular use. Aftermarket seats often use high-quality materials that are specifically designed to withstand these factors and provide lasting comfort and support.
How do I replace a Harley-Davidson Touring Seat: Preparation
The Harley-Davidson touring experience is all about hitting the open road in comfort and style. Upgrading or modifying the touring seat by replacing it is a popular modification that can greatly enhance your riding comfort and personal aesthetic. There are many reasons why you may want to replace the touring seat on your Harley-Davidson bike. But before you can get down to the step-by-step instructions on how do I replace a Harley-Davidson Touring Seat, you will first need to gather the necessary tools and equipment. By replacing the touring seat, you will be able to transform your riding experience and enjoy the perfect balance of style, comfort, and safety.
Here are the tools and materials you will need before you can get on with replacing the touring seat –
#1. Research and choose the right seat
The first and most important tool that you will require for replacing the touring seat is the new seat itself. Harley-Davidson offers a wide variety of seats with different styles, designs, materials, and cushioning levels.
You must consider factors like your riding style, desired aesthetics, and comfort preferences. Ensure that you are choosing a seat that aligns with your comfort preferences and riding style, whether it is a solo seat or a two-up option. Once you have selected the perfect seat, make sure it is compatible with your specific motorcycle model and year. Moreover
#2. Socket set
A decent-quality socket seat will be a rider’s best friend when it comes to motorcycle maintenance. You should choose a variety of different socket sizes, including those that match the bolts and fasteners on your Harley-Davidson touring bike.
#3. Wrenches
Allen wrenches or also known as hex keys are important for removing bolts with hexagonal heads. Different sizes might be needed depending on the seat attachment points, so having a comprehensive set will ensure that you have the right tools needed for the job.
Achieving proper torque when fastening bolts will be critical for preventing overtightening and potential damage. A torque wrench will allow you to easily tighten nuts and bolts to the manufacturer’s recommended specifications, ensuring a secure fit without the need for stripping threads.
#4. Pliers and screwdrivers
Pliers can come in handy for different tasks like removing retaining clips or adjusting brackets. Needle-nose pliers are especially useful for accessing tight spaces.
Having a set of screwdrivers, both Phillips and flathead will be useful for any general maintenance tasks that might arise during the seat replacement.

#5. Ratchet straps
Ratchet straps can help secure your bike during the seat replacement process, preventing any unwanted movement when you work on the seat replacement.
#6. Safety gear for you and your bike
Safety should always come first. You must wear appropriate safety gear, including safety gloves and eye protection. This will help you ensure you are protected while working on your Harley-Davidson bike.
To prevent any accidental scratches or damage to your motorcycle’s finish, you should consider using a protective covering or a soft cloth to lay on the fenders and tank while working.
Moreover, make sure that your bike is on a stable surface and is properly secured using ratchet straps. Doing this will help you prevent any movement during the seat replacement process.
#7. Read the installation manual
Harley-Davidson provides an installation manual for its seats. Make sure that you have the instruction manual for the specific seat model on hand. It’ll come in handy and guide you through the installation process.
Before you start the work, you need to thoroughly read the instruction manual provided by Harley-Davidson. The instruction manual will contain step-by-step instructions, diagrams, and important safety guidelines specific to your touring seat model. Understanding the installation process in advance will give you a clearer and more straightforward roadmap to help prevent mistakes.
#8. Prepare your workspace
You need to clear a designated workspace where you will be carrying out the seat replacement process. Ideally, this place needs to be a well-lit and spacious area where you can comfortably work on your Harley-Davidson bike. Lay down a protective covering or a soft cloth on your motorcycle’s fenders, tank, and other vulnerable areas to prevent accidental scratches or damage.
#9. Inspect the existing seat and hardware
Before you can remove the existing seat, you should take a moment or two to inspect it for any visible damage or wear. This will also be a good time for assessing the condition of the seat mounting hardware or brackets. If any components are damaged or missing, you must consider replacing them to ensure a secure fit for the new seat.
#10. Photograph or document the connections
As you’re preparing to disassemble the existing seat, you should consider taking photographs or making notes of the existing connections, brackets, and attachment points. This documentation will serve as a reference during the installation of the new seat, ensuring that you reassemble everything correctly.

How do I replace a Harley-Davidson Touring Seat: Remove the stock seat
Once you have carried out the preparatory steps and gathered the necessary steps, you will be ready to replace the stock seat. For doing that, you will have to start by removing the stock seat to make way for an upgraded or personalized replacement. While it might seem daunting at first, this process can be rather straightforward as long as you have the right guidance. Here are the steps you will need to follow for removing the stock seat. By following these simple steps, you will be on your way to unlocking the freedom of customization.
Step 1: Unplug the electrical connections
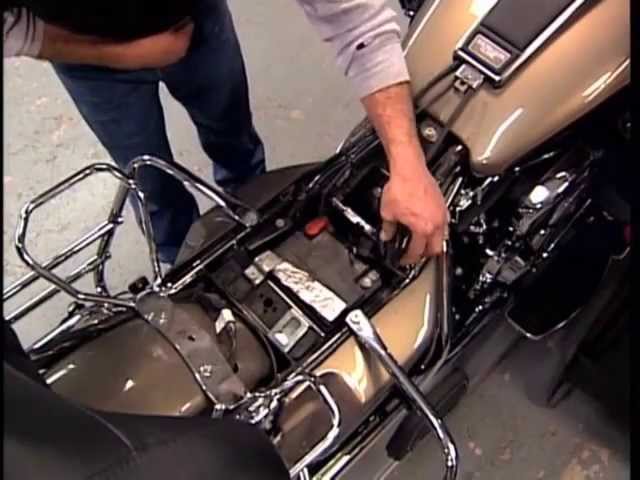
The first step will involve unplugging the electrical connections. To do that, you will need to locate the battery and disconnect it.
Start by locating the battery compartment on your Harley-Davidson Touring bike. This compartment is generally located beneath the seat and can be easily assessed by removing any necessary panels or covers.
To ensure your safety and prevent any electrical mishaps, you should disconnect the battery by removing the negative (-) terminal connection first. This will prevent any accidental electrical connections while you’re working on the seat.
Step 2: Loosen the nuts and bolts
Next up, you need to loosen the nuts and bolts on the touring seat. For that, you need to identify the seat attachment points and then use the appropriate tools for loosening the nuts and bolts.
Take a moment to identify the nuts and bolts that secure the stock seat to the bike. These attachment points are located near the rear fender and are generally covered by decorative caps.
Depending on your bike’s model and year, you might require a socket set, Allen wrenches, or other tools for removing the nuts and bolts. Make sure that you have the correct tools on hand before proceeding.
Step 3: Detach the stock seat from your touring bike
Now comes the time to detach the stock seat from your bike. To do that, you should lift the seat, unhook the electrical connections, slide the seat backward and detach it, and store the seat somewhere safe.
You need to gently lift the rear of the stock seat in your bike, ensuring that the nuts and bolts are loose enough to allow movement. If your stock seat comes equipped with any electrical connections, such as a seat heater or lighting, make sure that you unhook those connections before completely removing the seat.
After you have disconnected any electrical connections, you should carefully slide the stock seat backward and off its attachment points. Be cautious that you don’t end up scratching or damaging any part of your bike during this process.
Once the stock seat has been removed, you should set it aside in a safe and clean area. You could choose to keep it as a backup or sell it if you don’t plan on using it in the future.
How do I replace a Harley-Davidson Touring Seat: Install the new seat
The process to customize your Harley-Davidson bike and replace the seat is an exciting endeavor as it will allow you to enhance both comfort and style on your seat. Once you have arranged the necessary tools and equipment, carried out the necessary preparation, and removed the stock touring seat, now will be the time to install the new seat. Here are the steps you will need to follow for replacing the Harley-Davidson Touring Seat on your bike. By following these steps, you’ll be able to replace the touring seat easily and seamlessly and get a set that matches your style and comfort.
Step 1: Check the new seat for fitment
You should start by visually inspecting the new seat, confirming its compatibility, and making sure of the alignment and attachment points.
Before you proceed with the installation, visually inspect the new touring seat to ensure it matches your expectations. Double-check for any defects, damage, or inconsistencies in the materials or construction.
Make sure that the new seat is compatible with your Harley-Davidson touring bike’s model and year. Refer to the manufacturer’s specifications and guidelines to verify that the seat is a suitable match.
Align the new seat over the attachment points on your bike’s frame. Make sure that the seat lines up with the mounting holes and brackets where the stock seat was previously secured.
Step 2: Secure the new seat with nuts and bolts
Next up, you need to secure the new seat. You should reattach mounting points, position the seat, and secure it with nuts and bolts while following torque specifications.
If the new seat comes with its own mounting brackets or hardware, securely attach them to the designed attachment points on your bike’s frame. Carefully position the new seat over the mounting brackets and attachment points, ensuring that the touring seat’s mounting holes align with the corresponding holes on the bike’s frame.
Insert the appropriate nuts and bolts through the seat’s mounting holes and into the frame’s attachment points. You should gently tighten the nuts and bolts with the help of appropriate tools. Make sure that you don’t end up overtightening anything.
Refer to the manufacturer’s guidelines or installation manual for determining the recommended torque specifications for tightening the nuts and bolts. With the help of a torque wrench, tighten the nuts and bolts to the specified torque to ensure a secure fit without damaging the threads.
Step 3: Plug in the electrical connections
Now, you should plug in the electrical connections. To do this, you should connect electrical components, securely fasten the connections, and double-check those connections to ensure everything is secure.
If your new touring seat features any electrical components, such as lighting or seat heaters, connect the corresponding electrical connections. Follow the manufacturer’s instructions for proper connection and routing of wires.
Make sure that the electrical connections are securely fastened to prevent any accidental disconnection while riding. Tuck the wires away from moving parts to avoid interference. Moreover, you should take a moment or two to double-check all electrical connections to ensure that they are properly secured. Any loose or exposed wires could result in operational issues or safety hazards.
How do I replace a Harley-Davidson Touring Seat: Final checks
The transformation of your Harley-Davidson Touring bike through the installation of a new seat is a huge step toward a ride that is uniquely tailored to your style and comfort. The process of replacing a touring seat doesn’t end with installing the new seat. You will still need to carry out the final checks and test things. Here are the steps you need to follow to carry out the final checks and tests on your newly replaced Harley-Davidson Touring Seat.
Step 1: Ensure the new seat is securely attached
Before you hit the road, give your motorcycle’s new seat a thorough check. Make sure that all nuts and bolts used for securing the seat are tightened to the manufacturer’s recommended torque specifications. A loose seat cannot just compromise your comfort but also pose a safety risk.
Confirm that any mounting brackets or hardware are securely fastened to both the seat and the bike’s frame. If you notice any parts that appear loose or misaligned, take the time to address these issues before proceeding.
Step 2: Test ride the bike with the new seat installed
Now, you need to opt for a test ride on a route that you are familiar with and that encompasses a mix of road conditions, such as smooth highways, bumpy roads, and turns.
During the test ride, you should pay close attention to how the new seat feels in various riding positions. Assess whether the cushioning and support meet your comfort expectations, especially during extended rides.
Take note of any vibrations or discomfort that may arise from the new seat. If you notice any issues, you must address the concerns immediately as these issues could impact your overall riding experience.
Step 3: Make necessary adjustments to the new seat
If you notice any discomfort during the test ride, you must consider adjusting your riding position. Small changes in posture could significantly impact your comfort level on the new seat.
Some aftermarket seats offer adjustable features, such as the height of the rider’s position and the angle of the seat pan. Experiment with these features to find the most comfortable configuration.
Depending on your preferences, you may consider adding accessories such as a gel pad or a cushion for further enhancing comfort. These additions can be fine-tuned based on your test ride experience.
FAQs
What tools do I need to replace a Harley-Davidson Touring seat?
Replacing a Harley-Davidson Touring seat requires basic tools such as a screwdriver, pliers, and an adjustable wrench. You may also need a breaker bar to loosen any stuck bolts, as well as a ratchet, socket set, and Allen wrenches to remove the seat. If you are using a new seat, you may also need some additional hardware such as screws and nuts.
How do I remove the existing seat?
To remove the existing seat, begin by disconnecting the negative battery cable. Then, remove the seat bolts with the appropriate tools and lift the seat off the bike. You may need to remove other components such as the backrest and passenger footpegs to access the seat bolts.
What do I need to know before replacing a Harley-Davidson Touring seat?
Before replacing a Harley-Davidson Touring seat, make sure you have the correct tools and hardware for the job. Additionally, check the manufacturer’s instructions to ensure that you are installing the seat correctly. If you are using a new seat, make sure it is compatible with your bike. Finally, ensure that all the bolts are securely tightened after installation.
>>> Read more about Harley-Davidson Touring Seats <<<

