Are you a Harley-Davidson bike owner looking for ways to adjust the air-fuel mixture on your bike? If yes, then you’re definitely in the right place.
To adjust the air-fuel mixture on a Harley-Davidson, locate the mixture screw on the carburetor (for carbureted models). Turn the screw clockwise to lean the mixture or counterclockwise to richen it. For fuel-injected models, adjustments must be made using a tuner or by remapping the ECU, as they do not have manual mixture screws.
In this article, you’ll get to know all about air fuel mixture, the role of air fuel mixture, how do you adjust the air fuel mixture on a Harley-Davidson and more. Stick around to know all the answers that you’re looking for.
Adjusting the air fuel mixture
If you’re looking to adjust the air fuel mixture, you should look for the special screw on the engine’s carburetor to controls how much air is mixing with the fuel. Adjusting the screw will change how slow or fast an engine idles and how smoothly it runs. The basic process to adjust an air fuel mixture screen is essentially the same for all small engines – be it on Harley-Davidson bikes, cars, or other types of engines. You’ll need to make adjustments to the engine and get it warmed up and running. Set the screw in a position where the engine is idling smoothly and isn’t sounding rough or irregular. Then, balance out the fuel mixture such that the engine has an ideal air fuel ratio.

How to adjust the air fuel mixture on a Harley-Davidson?
Access the air fuel mixture screw
1. Start the engine and let it run
Start your Harley-Davidson bike’s engine and let it run and warm up for 5 minutes. Turn the key in the ignition for starting the engine. Warm up your engine to normal operating temperature by allowing it to idle for 5 minutes. Remember to keep the engine running even after it warms up. Make air fuel mixture adjustments with a warm engine running. This way, you’ll be able to listen to how the adjustments are affecting the engine’s idle speed. This process will be the same for any type of engine having an air fuel mixture screw. It can be a car, scooter, motorcycle, ATV, or any other vehicle with a carburetor. Moreover, you should remember that an air fuel mixture screw is also called an idle mixture screw.
2. Locate the carburetor by finding the air filter
Find the air filter of the engine, as it will help you locate the carburetor. Look at the engine and then spot the round or cone-shaped air filter. The carburetor is that part of the engine that the air filter will be attached. On a car, the air filter will be large and round, and it will sit on top of the carburetor. On Harley-Davidson bikes, the air filter will come off the side of the engine and face the rear of the bike.
3. Find the brass screw on the carburetor
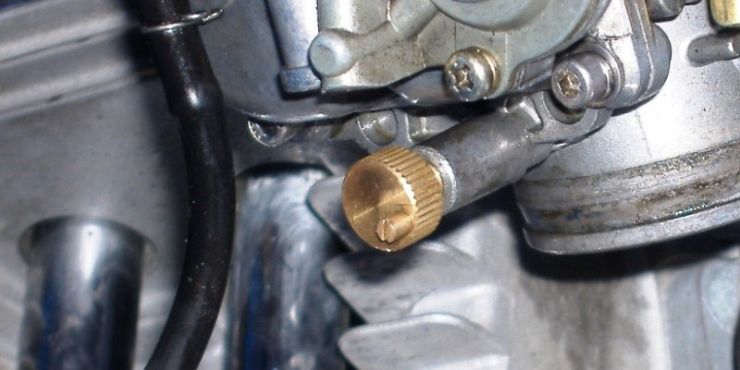
Next, you should look for the flat-headed, gold-colored brass screw on the carburetor. Look at the different screws on the carburetor until you’ve spotted the gold one with a flat slotted head. This will be the air fuel mixture screw. Most air fuel mixture screws are actually located on the side of the carburetor. However, it’ll depend on the specific engine.

Balance the fuel mixture
1. Turn the screw clockwise
Now, you should turn the screw clockwise until the engine starts sounding rough. You should use a flathead screwdriver for tightening the screw. Carefully listen to the engine’s idle sound and then start turning the screw once it starts making rough rising and falling sounds instead of the normal idling sounds.
Tightening the screw will weaken the air fuel mixture while decreasing the amount of fuel flowing to the engine. Tightening the screw is also known as making the fuel mixture leaner, which lowers the RPMs at which the bike’s engine idles. Running a lean fuel mixture will make your engine run with less fuel than what it needs for running efficiently. It can damage the engine as there’s more friction between the moving parts and the engine operating at a higher temperature.
2. Loosen the screw and then count the number of turns
Loosen the air fuel mixture screw and count the number of turns until the engine starts sounding irregular. Use a flathead screwdriver for turning the screw counterclockwise and count the number of rotations you’re making. Listen to the idling of the engine and then stop turning the screw when the engine’s idle sound starts to sound irregular like it is revving too fast.
Loosen the screw, as it’ll strengthen the air fuel mixture and increase the amount of fuel flowing to the engine. Loosening the screw is also known as making the fuel mixture richer, which increases the RPMs at which the bike’s engine idles. Running a rich fuel mixture will make your engine run with more fuel than what it needs for running efficiently. This means that it’ll burn fuel quicker than necessary, although the engine might run with more power and at cooler temperatures.
3. Set the screw in the middle
Next up, you should set the screw in the middle, between the rough and irregular-sounding spots. Turn the screw back clockwise until it’s approximately in the middle locations between where the engine’s idle sounds rough and irregular. It’ll set the engine at a regular idle speed. For instance, if you’ve turned the screw two full turns counterclockwise from the spot where the engine’s idle starts sounding rough, turn the screw clockwise one full turn.
4. Make adjustments 1/2 a turn to find the smoothest idle speed
Lastly, you should make adjustments 1/2 a turn in either direction for finding the smoothest idle speed. Turn the screw counterclockwise and then clockwise 1/2 a turn from the middle position, and carefully listen to the sound of the idle. Set the screw in a position where the engine’s idle sounds even and smooth to balance the fuel mixture.
You’ll notice that turning the screw 1/2 a turn in either direction for making the engine start sounding rougher or more irregular. In that case, you can set the screw back to the middle position. This adjustment process is known as balancing the idle mixture. Most engines feature an ideal air fuel ratio of around 14.7:1. You can find your engine’s exact air fuel radio using a special meter. However, this isn’t really necessary unless you’re looking to be extra-precise, like you’re tuning a high-performance Harley-Davidson bike.
Adjust the mixture for better performance in your bike
Mixture tuning or adjusting the air fuel mixture on your Harley-Davidson bike’s carburetor is a simple process. You can easily do it by using the basic tools and knowing the right technique. Anytime you’re changing the exhaust or air cleaner intake, you should adjust the air fuel mixture. The mixture screw or the EZ-Just will be the key to properly tuning the mixture. These tuning steps will apply to all Harley-Davidson CV carbs from 1989 to the current models that use the CV 40mm style Harley-Davidson carburetors. However, they also work well with the CVK40 found on other models. You should always start with a new set of spark plugs when tuning.
The carburetor will have to be removed from the manifold, so you should refer to your owner’s manual for this procedure. With the carburetor removed, place it upside down on a sturdy work surface. The CV-style Harley-Davidson carburetor will have a small cylindrical tower protruding from the bottom end of the spigot. The tower will be plugged with a soft metal insert that covers the mixture screw. Gaining access to the carburetor screw will be important for tuning and must be removed. The metal plug is soft and will only require a household drill and a 7/64” to 1/8” bit.
Secure the curb either in a vise or by other means, which allows the carburetor to remain steady. Drill a hole into the plug while ensuring that you’re not punching through too fast. You wouldn’t want to damage the mixture screw below the plug. Allot the drill to cut slowly into the plug instead of pushing. To prevent yourself from drilling too far into the plug, it’s recommended that you should wind electrical tape around the drill bit a few times, around 3/16” from the tip. It’ll help create a stop to keep the bit from drilling extra deep. Pry out the plug using a pick or twist a small sheet music screw into the hole. Then, use it to pull the plug out. Once the plug is removed, clean the area all around the mixture screw such that no metal fragments remain.
Adjustment method
If you’re adjusting the mixture screw instead of installing an EZ-Just, you should use a small flat head screwdriver. Then, turn the screw clockwise until it has seated gently. Don’t over-tighten the screw as it’ll damage the needle screw tip. You should keep count of how many turns it’s taking to reach the closed seated position. Turn the screw counterclockwise and stop at a 1/4 turn beyond that which you’ve originally counted. For instance, if you’re turning the screw in 1-1/2 turns, unscrew it 1-3/4 turns. This will be your base starting point, and alone it’ll allow the idle mixture to be slightly richer than its original setting.
In many instances, this will be your ideal setting. Moreover, this setting method will only apply to the carburetors that have the factory-sealed screw that you’ve uncovered. Most bikers prefer to use an EZ-Just mixture screw for easing adjustments and fine-tuning, compared to fumbling with a screwdriver under the carburetor.
If the mixture screw has been reset by the previous owner or the dealer, turn the screw clockwise until it seats. Turn the screw outward 1 and 3/4 turns for establishing a starting point. The same procedure will apply if you’re using the EZ-Just mixture screw.
Using an EZ-Just Screw
When you’re removing the original mixture screw for installing an EZ-Just, ensure that you don’t allow the mixture packing to fall out. This packing will consist of a spring, washer, and O-ring, and are important for the proper functioning of the EZ-Just or mixture screw.
Remember, the EZ-Just mixture screw needs to be threaded in completely before backing out and making final adjustments. Usually, the screw will need between 10-12 full rotations to the seat. In case you can see more than 1-2 threads after you’ve seated the screw, the screw isn’t actually screwed in completely. This can result in the screw falling off during operation. If you’re having trouble fully threading the EZ-Just, it indicates that the inside threads of the carburetor require cleaning. In some instances, they could have been damaged too. Working the screw in or out with light machine oil can help work past the carbon build-up inside the carburetor threads.
The biker or installer will be responsible for ensuring that the EZ-Just is properly installed. Should the internal threads of the carburetor get damaged or feel loose even if fully seated, the installer must take extra precautions to prevent the screw from coming loose. CV Performance cannot be responsible for damaged or lost screws, given the variances found in more than 2 million CV carburetors sold by Harley-Davidson.
Reinstall the carburetor back on your motorcycle by reversing the steps you took during the removal. Be sure that you’re replacing the cables, fuel hose clamp, and vacuum lines in the same locations. Make sure that the carburetor is firmly seated back onto the manifold boot, as having a proper seal is critical. Moreover, test the throttle for smooth operation. The air cleaner assembly needs to be installed before starting the engine, not just to hold the carburetor in place, but also to prevent having the carburetor backfire toward you when tuning. Start the engine normally and then bring it up to operating temperature before fine-tuning. Allow your bike for no more than 5 minutes.
With the engine warmed up and at idle, you can now fine-tune the idle mixture screw to get optimal performance. You should acquaint yourself with the adjustment screw location toward the bottom rear of the carburetor before running the engine. You’ll also require a small screwdriver to adjust the screw unless an EZ-Just is installed. With the engine idling slowly, you should turn the screw inward slowly until the engine starts stumbling. You’ll now work with the screw upside down, so check to ensure that you’re turning the screw inward or clockwise. Remember that not all engines stumble or have an RPM change that’s noticeable when twisting in the mixture screw. It can be due to the idle jet being too large or ignition systems like the one on Twin Cam 88s. If you’re unable to find the low adjustment point where the idle slows, just set the screw at 1-3/4 turns out and then proceed forward.
If the engine isn’t idling on its own during the procedure, adjust the idle set screw on the throttle side of the carburetor until it correctly idles. Turn the mixture screw outwards (counterclockwise) until the engine starts running smoothly, and then add 1/8th of a turn. Maintain proper idle speed and then repeat the adjustment each time you’re adjusting the idle speed. Blip the throttle a few times and observe the results. If the engine quickly responds with a smooth blast and no backfiring through the carburetor, you’ll have your idle mixture right. If any hesitation occurs, adjust the idle mixture screw another 1/8 turn. Normally, the mixture screw will only need 2 to 3 turns from being gently seated. Anything more than 4 turns will indicate that the pilot jet is too small.
Conclusion
Thank you for reading. Hopefully, now you’ll know a lot more about air fuel mixture, the role of air fuel mixture, how do you adjust the air fuel mixture on a Harley-Davidson and more. When you’re adjusting the air fuel mixture, it essentially means adjusting the mixture screw on the engine’s carburetor. This screw is responsible for controlling how much air is getting mixed with the fuel. You’ll need to set the screw-in position where the sound isn’t irregular and balance the fuel mixture to get the ideal air fuel ratio.

