Are you a Harley-Davidson enthusiast wanting to ensure your bike is running at peak performance? Knowing how to check the voltage of your Harley-Davidson battery is an essential part of keeping your bike running smoothly. In this article, we’ll show you how to safely and accurately check the voltage of your Harley-Davidson battery, so you can stay in the saddle for longer. So, if you’re ready to learn more, let’s get started!
To check the voltage of a Harley-Davidson battery, use a multimeter on the DC voltage setting. Connect the red lead to the positive terminal and the black lead to the negative terminal; a fully charged battery should read around 12.6 volts or higher.
Preparation before checking the voltage
Checking the voltage on your Harley-Davidson battery is a valuable diagnostic step for assessing its charge level and overall health. However, in order to obtain accurate readings and ensure your safety, it’ll be important to carry out the right preparatory steps. If you prepare yourself and your bike properly, you will be in a better position to carry out the procedure safely and efficiently. Here are the preparation measures you will need to take before you can check the voltage on your Harley-Davidson battery.
>>> Click here to read our review of the Best Battery For Harley-Davidson <<<
Prioritize your safety
Before you dive head-first into any battery-related tasks, you will need to prioritize your safety by following a few precautions. First, make sure your bike’s ignition is turned off and remove the key to prevent any accidental electrical surges during the voltage-checking process. Moreover, you need to wear the necessary protective gear. Put on safety goggles and a pair of gloves to safeguard yourself from any potential battery acid contact or other dangerous hazards.

Gather the required tools and equipment
To check your Harley-Davidson battery’s voltage accurately, you will need to gather a few tools and equipment such as a multimeter or voltmeter and test leads.
- You’ll be using a digital multimeter or voltmeter that is capable of measuring DC voltage to obtain precise readings
- Make sure that you have the appropriate test leads or probes that can be connected to the multimeter or voltmeter
Identify battery terminals
Locate the positive (generally marked with “+”) and negative (generally marked with “-“) terminals on your Harley-Davidson battery. Familiarize yourself with their positions before you proceed ahead. The positive terminal will either be marked with a “+” symbol or have a red cover whereas the negative terminal will be marked with a “-“ symbol or have a black cover.
Inspect and clean the terminals and cables
Before you check the voltage, visually inspect the battery connections for any signs of damage, corrosion, or loose connections. You will need to first make sure that the ignition is off and the key is removed.
Then, carefully examine battery terminals and cables for any corrosion, dirt, or loose connections. If you notice any corrosion on the terminals, make use of a mixture of baking soda and water for cleaning them. Gently scrub the terminals using a brush or cloth. Tighten any loose connections using the appropriate tools.
Check that the multimeter is in a working condition
Before you can check the voltage on the battery, you should make sure that the multimeter is working. Turn on the multimeter or voltmeter and select the DC voltage mode. Make sure that the range is suitable for the expected voltage of your battery.
Set the voltage range to a level higher than the expected voltage reading to avoid overloading the meter. Attach the appropriate test leads or probes to the multimeter or voltmeter. Connect the red lead to the positive terminal and the black lead to the negative terminal. Check and make sure that the multimeter is in working condition.
Assessing the battery before checking the voltage
Before you check the voltage on your Harley-Davidson battery, it’ll be important to assess the battery. These steps will be important for getting accurate voltage readings and efficient assessment of your battery’s condition. Here is how you can assess the battery and carry out the last few preparatory steps before getting down to checking the voltage.
Make sure that the battery is charged
Before checking the voltage, it will be important to ensure that your Harley-Davidson battery has sufficient charge. To guarantee a charged battery, you’ll need to idle your motorcycle. Start your bike’s engine and allow it to idle for several minutes. This will allow the battery to receive a charge from your Harley’s charging system.
If the battery has been unused for an extended period or isn’t receiving a full charge from regular riding, it is recommended that you should use a dedicated battery charger to bring it to an optimal charge level. Follow the manufacturer’s instructions for the charger that you are using to prevent overcharging.
Remove the seat
On most Harley-Davidson bikes, the battery will typically be located beneath the seat. To remove the seat, you’ll first need to locate the seat attachment points. Identify the fasteners or bolts securing the seat to the bike’s frame. They are usually located at the rear end of the seat.
Use the appropriate tools, such as a wrench or screwdriver for removing the fasteners or bolts holding the seat in place. Gently lift the rear end of the seat upwards for disengaging it from the motorcycle’s frame. Carefully set the seat aside in a safe place.
Locate the battery
Once you have removed the seat, you’ll be able to locate the battery on your Harley-Davidson motorcycle. First, you should identify the battery compartment. Look for the battery compartment, which will be positioned beneath the seat and might be covered by a battery box or housing.
If your bike has a battery box or housing, remove any screws, clips, or fasteners securing it. Carefully lift or slide off the box or housing to reveal the battery.
Assess battery connections
Before you proceed with voltage measurements, you should take a moment and inspect the battery connections. Check the battery terminals for any signs of dirt, corrosion, or loose connections. Corrosion could affect the battery’s performance and lead to voltage issues.
If you notice any corrosion on the terminals, use a mixture of baking soda and water for cleaning them. Gently scrub the terminals with a brush or cloth. Make sure that the terminals are clean and free from any debris.
Confirm stable battery state
Before you measure the voltage, it is essential to make sure that the battery has stabilized. For that, you will need to disconnect any load and allow the battery to rest.
If your bike has recently been running or undergoing charging, allow the battery to rest for at least 30 minutes. This will ensure that the battery voltage has settled into a stable state. Moreover, turn off any electrical accessories or components connected to the battery to eliminate any external load that might affect the voltage reading.
How do you check the voltage of a Harley-Davidson battery?
Once you have prepared yourself, your Harley-Davidson motorcycle, and the Harley-Davidson battery, you’re in a position to check the voltage. Knowing how do you check the voltage of a Harley-Davidson battery is important as it’ll help you assess the battery’s charge level and overall health. For checking the voltage, you will need a multimeter, a proper connection of the multimeter leads, and the know-how to read and record the voltage data. Here are the steps you’ll need to follow for checking the voltage of a Harley-Davidson battery.
Step 1: Set the multimeter to Volts DC
Before connecting the multimeter to your Harley-Davidson battery, you should set it to the appropriate voltage measurement mode. Switch on the multimeter, making sure that it has a functional battery or power source.
Then, select the DC voltage mode. Locate the dial or menu option on the multimeter that will allow you to choose the DC voltage measurement mode. It is usually indicated by a “V” with a straight line above it, representing a direct current (DC) voltage measurement.
Select an appropriate voltage range setting that exceeds the expected voltage of the battery. For instance, if your battery is expected to have a voltage of around 12V, you should choose a range that encompasses values higher than 12 volts.
Step 2: Connect the multimeter’s leads
Once the multimeter is set to the correct voltage measurement mode, you will have to connect the multimeter’s leads to your Harley-Davidson battery. Identify the battery terminals by locating the positive (+) and negative (-) battery terminals on the Harley-Davidson battery. The positive terminal will typically be marked with a (+) symbol or a red cover whereas the negative terminal will be marked with a (-) symbol or a black cover.
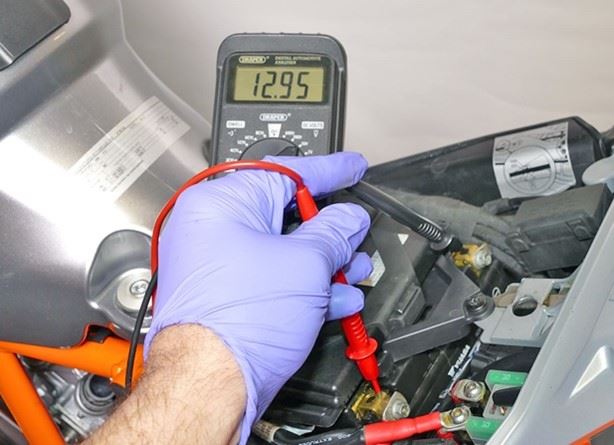
After that, you should attach the leads by connecting the multimeter’s leads to the corresponding battery terminals. Connect the red lead of the multimeter to the positive terminal of the battery. Make sure that there is a secure connection either by inserting the probe into the terminal or clamping it onto the terminal. Connect the black lead of the multimeter to the negative terminal of the battery in the same manner as the red lead.
Step 3: Read and record voltage data
With the multimeter properly connected to the battery, you’ll be in a position to read and record the voltage data. First, switch on the multimeter and observe the display to make sure it is functioning and ready for measurement.
Look at the multimeter’s display, which will now indicate the voltage reading of your battery. The reading will be shown in volts (V). Typically, the voltage reading of a healthy Harley-Davidson battery should be between 12.6 and 12.8 volts.
Make a note of the voltage reading either by writing it down or using a digital device to record the data. This information will be important for assessing the battery’s charge level and comparing it to the expected values.
Once you have recorded the voltage data, it will be time to disconnect the multimeter from the battery. Switch off the multimeter to preserve its battery life or power source. Start by disconnecting the black lead from the negative terminal, followed by the red lead from the positive terminal. Gently remove the leads, ensuring that you do not touch the exposed metal portions.

How to troubleshoot voltage readings on a Harley-Davidson battery?
Checking the voltage of your Harley-Davidson battery will give you valuable insights into the condition of your battery. Ideally, the voltage of the battery must be between 12.6 and 12.8 volts. However, occasionally you might encounter low or high voltage readings that require troubleshooting. Understanding how to diagnose and address these situations will help you maintain a reliable electrical system and keep your bike running smoothly for years to come. Here are the steps you’ll need to follow the troubleshoot low and high voltage readings after checking the voltage on your Harley-Davidson battery.
Low voltage readings
Low voltage readings indicate that your Harley-Davidson battery might be discharged or experiencing issues. For troubleshooting low voltage readings, you’ll need to start by checking the battery charge. Make sure that the battery is adequately charged. If the voltage reading is significantly lower than expected (below 12V), you should recharge the battery with a dedicated battery charger according to the manufacturer’s instructions. Monitor the charging process closely and allow sufficient time for the battery to reach a full charge.
Visually examine the battery terminals and cables for signs of corrosion, damage, or loose connections. Clean the terminals if needed using a mixture of baking soda and water and ensure there is a secure connection between the terminals and the cables. Tighten any loose connections using the appropriate tools.
A faulty charging system may result in a consistently low battery voltage. Using a multimeter set to DC voltage mode, you should measure the battery voltage while the bike’s engine is running. A healthy charging system will provide a voltage reading between 13.8 and 14.5 volts. If the reading is significantly lower, this indicates a potential issue with the voltage regulator or alternator, which must be inspected and repaired by a qualified mechanic.
Parasitic draws might also drain the battery even when the bike isn’t being used, leading to low voltage readings. Use a multimeter set to the appropriate mode (typically current or resistance mode) for identifying any excessive current flow when the motorcycle is off. Disconnect any accessories or components one by one so that you can pinpoint the exact source of the issue. Consult a mechanic or professional if you need any help with identifying and rectifying the issue.
High voltage readings
High voltage readings might indicate overcharging or other electrical system issues. If you are facing this issue, start troubleshooting by checking the charging system. Measure the battery voltage while the motorcycle’s engine is running. If the voltage reading exceeds 14.5, it will suggest overcharging. Overcharging can end up damaging the battery and other electrical components. Inspect the voltage regulator, which controls the charging system for potential malfunctions. A faulty regulator might have to be replaced or repaired by a professional.
Make sure that your multimeter is calibrated correctly and functioning accurately. Test it by measuring the voltage of a known power source to verify if the readings align with the expected values. If the multimeter is inaccurate, consider recalibrating or replacing it to obtain reliable voltage readings.
Check the wiring and connections between the battery, voltage regulator, and other electrical components. Look for signs of loose connections, frayed wires, or damage. Make sure that all connections are secure and damaged components are repaired or replaced.
If you aren’t able to identify the cause of the high voltage reading or if the issue persists despite troubleshooting attempts, you shouldn’t hesitate in consulting a qualified mechanic or Harley-Davidson dealership. They will have the expertise and diagnostic tools for accurately rectifying any issues.

Battery maintenance tips to keep in mind
Maintaining your Harley-Davidson battery is important for reliable starting power and electrical system performance. Regular battery maintenance will not only extend its lifespan but also enhance your overall riding experience. Here are some of the key steps that you should keep in mind for Harley-Davidson battery maintenance.
#1. Clean the battery terminals
Over time, battery terminals can easily accumulate corrosion, which hinders the flow of electricity. Here are the steps that you should consider for cleaning the battery terminals –
- Ensure that the ignition is off and that the key is removed
- Mix a solution of baking soda and water in a small container
- Dip a clean cloth or brush into the solution and gently scrub the battery terminals to remove corrosion
- Rinse the terminals with clean water and wipe them dry
- Apply a thin layer of petroleum jelly or dielectric grease to the terminals to prevent future corrosion
#2. Tighten the battery connections
Loose battery connections can result in voltage drops and poor performance. You should regularly inspect and tighten the battery connections to make sure everything is proper.
Turn off the ignition and remove the key. Use the appropriate tools like a wrench or socket set for tightening the bolts or nuts on the battery terminals. Make sure you get a snug fit but avoid overtightening as it can damage the terminals.
#3. Check for corrosion
Corrosion buildup on battery terminals can also impede electrical flow. Regularly check for signs of corrosion and take the necessary action. Inspect the battery terminals and cables for white or blue-green deposits.
If there is any corrosion present, you should follow the necessary cleaning steps for removing it. Consider using battery terminal protectors or corrosion inhibitors to minimize future corrosion.
#4. Recharge the battery
Harley-Davidson batteries gradually lose charge over time, especially during periods of inactivity. You should make sure that you recharge the battery when necessary. To do that, first, ensure that the ignition is off and that the key is removed.
Disconnect the battery from the motorcycle by disconnecting the negative (-) cable followed by the positive (+) cable. Use a dedicated battery charger designed for motorcycle batteries. Follow the charger manufacturer’s instructions for connecting the charger to the battery and charging times.
Once the battery is fully charged, you should reconnect it to the motorcycle, ensuring proper cable connections.
#5. Keep track of battery performance
Monitoring your battery’s performance will allow you to identify any potential issues and take proactive measures. To do that, you can record voltage readings, track battery age, and more.
Use a multimeter to periodically measure and record the battery’s voltage. Compare the readings with the manufacturer’s recommendations for optimal charge levels.
Pay close attention to any changes in your bike’s starting power. If you notice slow cranking or difficulty starting the engine, it might indicate a battery issue.
Keep track of the battery’s age. Most batteries have a lifespan of 2-10 years, with the average being 3-5 years. As it approaches this range, you should consider replacing it to avoid any unexpected failures.
FAQ
What is the best way to check the voltage of a Harley-Davidson battery?
The best way to check the voltage of a Harley-Davidson battery is to use a multimeter. Multimeters are used to measure electrical current, voltage, and resistance. To use a multimeter, first set the selector switch to DC voltage and then connect the black lead to the negative terminal and the red lead to the positive terminal. The multimeter will then display the voltage reading, which should be between 12.4-12.8 volts.
What should I do if my Harley-Davidson battery voltage is low?
If your Harley-Davidson battery voltage is low, it may mean that the battery is not charging properly or is defective. To determine the cause, you should check the battery terminals and wiring for any corrosion or damage. If the wiring and terminals appear to be in good condition, then you may need to replace the battery or have it professionally tested.
What other factors should I consider when checking the voltage of my Harley-Davidson battery?
In addition to checking the voltage of your Harley-Davidson battery, it is also important to consider the age of the battery, the condition of the battery terminals and wiring, and the temperature of the battery. Older batteries may need to be replaced more
>>> Read more about Battery for Harley-Davidson <<<

