For those of us lucky enough to own a Harley-Davidson, we understand the importance of taking care of our beloved ride. To make sure your Harley-Davidson runs as smooth as the day it came off the lot, it’s essential to maintain the battery. In this article, we’ll be discussing the various ways to maintain a Harley-Davidson battery and keep it running strong. Read on to learn the tips and tricks for keeping your Harley-Davidson battery in tip-top shape, so you can keep riding in style for years to come!
Maintain a Harley-Davidson battery by keeping it charged, cleaning the terminals, and using a trickle charger when not in use for extended periods.
Different types of batteries for Harley-Davidson motorcycles
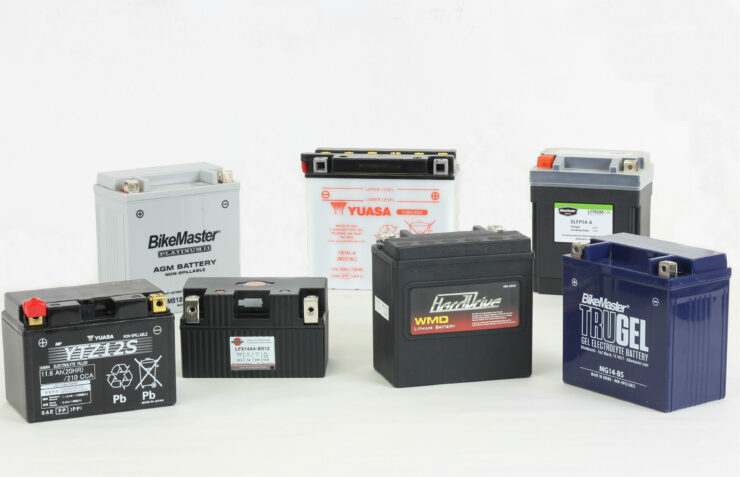
When it comes to Harley-Davidson bikes, the choice of battery plays a vital role in ensuring reliable starting power and electrical performance. There are different types of battery options for Harley-Davidson bikes. Here are some of the different types of batteries for Harley-Davidson bikes and their advantages.
>>> Click here to read our review of the Best Battery For Harley-Davidson <<<
Conventional lead-acid batteries
Conventional lead-acid batteries have long been the traditional option for Harley-Davidson enthusiasts. These batteries consist of lead plates immersed in an electrolyte solution of sulfuric acid. These batteries are robust and offer a reliable power source for starting the engine and running the electrical systems of Harley-Davidson bikes. They are affordable and widely available, which makes them a popular option.
These batteries are relatively inexpensive compared to other types of batteries, which makes them a budget-friendly option. Many riders are accustomed to lead-acid batteries, making it easier to find replacement batteries and perform maintenance. They can easily handle a wide range of environmental conditions and can be charged with conventional chargers.
These batteries need periodic maintenance, including checking the electrolyte levels, ensuring proper ventilation, and avoiding overcharging. These batteries also have a shorter lifespan compared to AGM and Li-ion batteries and might require replacement more frequently.

Absorbent Glass Mat (AGM) batteries
AGM batteries have become popular in recent times thanks to their maintenance-free design and superior performance. They make use of a fiberglass mat soaked in an electrolyte, which is absorbed between the battery plates, offering a spill-proof and vibrant-resistant solution.
AGM batteries eliminate the need for checking electrolyte levels or adding water, which makes them hassle-free and perfect for riders looking for convenience. Harley-Davidson motorcycles are renowned for their powerful engines and AGM batteries as they can withstand vibrations better than conventional batteries. These batteries can handle repeated deep discharges, which makes them suitable for riders who use additional accessories like high-powered audio systems.
These batteries are typically more expensive than conventional lead-acid batteries. AGM batteries need a specific charger for preventing overcharging, ensuring optimal performance and longevity.
Lithium-ion (Li-ion) batteries
Li-ion batteries have become pretty popular in recent years because of their high energy density and lightweight design. These batteries make use of lithium ions to store and release energy, offering numerous advantages for Harley-Davidson bikes.
Li-ion batteries are significantly lighter than their lead-acid and AGM counterparts, reducing the overall weight of the motorcycle and potentially improving performance. These batteries provide more power per unit weight and size, delivering strong cranking power for reliable starts. Moreover, they have an extended lifespan compared to lead-acid and AGM batteries, reducing the frequency of battery replacements.
These batteries are typically the most expensive option, as they need a higher initial investment. Some Li-ion batteries might need a voltage regulator or a specific charging system, which might need to be considered during installation or replacement.
How do you maintain a Harley-Davidson battery?
As a Harley-Davidson motorcycle owner, you should be aware of the importance of reliable starting power and electrical performance. The battery is the lifeblood of your ride, providing the necessary energy for igniting the engine and powering the electrical systems. To ensure a long-lasting and dependable battery, it is important to know how do you maintain a Harley-Davidson battery. Here are some of the tips to keep in mind to maintain your Harley-Davidson battery.
#1. Regular inspection
Performing regular inspections will be key to identifying potential battery issues before they escalate. There are a number of things to consider like visual inspection, cable connections, and more. Check for signs of corrosion, such as white or blue deposits on the battery terminals or cables. Clean any corrosion using a mixture of baking soda and water.
Make sure that the battery cables are connected securely and tightened. Loose connections could result in voltage drops and poor performance. Examine the battery case for signs of damage or leaks. If you notice any cracks or leaks, it’ll be important to replace the battery promptly.
#2. Maintaining proper charge
Keeping your Harley-Davidson battery adequately charged will be important for its longevity and optimal performance. Regularly using your bike will keep the battery charged. If your motorcycle sits idle for extended periods, you should consider using a battery tender or maintainer to prevent discharging.
While it is important to maintain a proper charge, you should avoid overcharging the battery as it could result in damage. Follow the manufacturer’s recommendations regarding charging times and use a charger designed specifically for Harley-Davidson motorcycles.
#3. Protect it against extreme temperatures
Extreme temperatures can have a significant impact on your Harley-Davidson battery’s life. During winter or cold conditions, you should store your bike in a temperature-controlled environment. If that isn’t possible, you should consider using a battery warmer or insulation to maintain the battery temperature.
During hot weather, make sure that the battery is adequately ventilated to prevent overheating. Parking your motorcycle in shaded areas and using a battery cover can provide additional protection.
#4. Additional precautions
You should try to avoid completely discharging your battery as it could reduce its overall lifespan. If you are using additional accessories like audio systems, consider using a deep cycle battery or a battery with a higher amp-hour capacity.
Keep the battery and its surrounding area clean and free from dirt, debris, and moisture. Regularly wipe down the battery with a clean cloth for removing any dust or grime.
If you’re planning on storing your Harley for an extended period, you should remove the battery and store it in a cool, dry location. Make sure that it is fully charged before storing and periodically recharge it during the storage period.
How to charge your Harley-Davidson battery?
A well-charged battery will be important for the smooth operation of your Harley-Davidson motorcycle. Whether you are preparing to go out for a ride or storing your motorcycle for an extended period, knowing how to charge your battery correctly will be important. Here are the steps you’ll need to follow for charging your Harley-Davidson battery safely and effectively to get optimal performance and longevity.
Step 1: Gather the necessary tools and equipment
Before you start charging your bike’s battery, you should ensure that you have a set of tools and equipment ready. You need to choose a charger designed specifically for Harley-Davidson batteries to make sure you get compatibility and safe charging. Moreover, wear protective gloves and goggles to protect yourself from any potential battery acid or electrical hazards. Have a clean cloth or towel on hand to wipe down any dirt or debris from the battery terminals.
Step 2: Find a suitable charging location
Choose a well-ventilated and dry area for charging your Harley-Davidson battery. Charging in a space with good airflow will help prevent the build-up of potentially explosive hydrogen gas that might be released during charging. Avoid charging near open flames or sparks to minimize the risk of accidents.
Step 3: Disconnect the battery
Before you connect the battery charger, disconnect the battery from your Harley. Start by turning off the ignition and removing the key. After that, carefully detach the negative (black) cable from the battery terminal, followed by the positive (red) cable. This step will ensure your safety and prevent accidental electrical surges during the charging process.
Step 4: Connect the charger
Now that you have disconnected the battery, it’ll be time to connect the charger. Refer to the manufacturer’s instructions by reading and understanding the specific instructions mentioned with your battery charger.
Then, locate the positive (+) and negative (-) terminals on the battery. Connect the positive charger cable (usually red) to the positive battery terminal and the negative cable (generally black) to the negative terminal. Make sure that you have a secure connection.
Step 5: Complete the charging
Once the charger has been properly connected, you should carry out the charging. Choose the appropriate charging mode. Some battery chargers come with multiple charging modes like regular or maintenance mode, so you’ll need to choose the one recommended for your battery type.
Set the charger to the correct voltage and amperage settings as specified for the battery. Avoid using a charger that has a higher voltage or amperage rating than recommended as this might damage the battery.
Plug in the charger and then switch it on. Monitor the charging process closely, following the manufacturer’s instructions regarding the charging times. Once the battery has been fully charged, unplug the charger and disconnect the charger cables from the battery terminals promptly. Overcharging can lead to battery damage or even explosion.
Step 6: Reconnect the battery
After you have disconnected the charger, it will be time to reconnect the battery to your Harley-Davidson bike. Start with the positive cable. Attach the positive (red) cable to the positive battery terminal while making sure there is a snug fit.
Then comes the negative cable. Connect the negative (black) cable to the negative battery terminal and tighten it securely. Double-check the connections. You should confirm that both cables are securely attached and properly tightened.

How to diagnose Harley-Davidson battery issues
A properly functioning Harley-Davidson battery will be vital for the reliable operation of your Harley-Davidson motorcycle. However, like any electrical component, batteries could encounter different issues over time. Understanding how to diagnose common battery problems will help you pinpoint the source of the issue and take appropriate action. Here are some of the common issues with Harley-Davidson batteries and how you can troubleshoot and resolve them efficiently.
Dead battery
When you attempt to start your motorcycle, the engine doesn’t crank and there is no power to the electrical components. For troubleshooting this issue, you should start off by checking the connections. Make sure that the battery cables are securely attached to the terminals. Tighten any loose connections.
Then, use a multimeter for measuring the voltage of the battery. A fully charged battery should give a reading between 12.6 and 12.8 volts. If the voltage is significantly lower, you should recharge the battery using a dedicated battery charger or consider replacing it if it fails to hold a charge.
If the battery voltage is still low despite being fully charged, the charging system might be faulty. Test the charging system by measuring the battery voltage while the motorcycle is running. A healthy charging system will provide voltage readings between 13.8 to 14.5 volts. If the reading is low or high, it might indicate a problem with the voltage regulator or alternator. This should then be inspected and repaired by a qualified mechanic.
Slow cranking or difficulty starting
Another common issue you might face is when the engine cranks slowly or you’re experiencing difficulty starting your Harley. For troubleshooting this issue, check the battery charge first. Make sure that the battery is adequately charged. If the voltage is low, recharge the battery with the help of a dedicated battery charger or replace it if needed.
Visually examine the battery terminals and cables for signs of corrosion, loose connections, or damage. Clean the terminals if necessary and ensure a secure connection between the terminals and the cables.
Use a battery load tester or take the battery to a professional for testing. A load test assesses the battery’s ability to hold a charge and deliver power. If the battery fails the load test, it might have to be replaced.
Corroded battery terminals
Sometimes, you might notice a white or blue-green buildup of corrosion on the battery terminals. To fix this issue, you should start by cleaning the terminals. Use a mixture of baking soda and water to clean the terminals.
Gently scrub the terminals with a brush or cloth for removing the corrosion. Rinse with clean water and dry thoroughly. After cleaning, you should apply a thin layer of petroleum jelly or dielectric grease to the terminals for protection against future corrosion.
Parasitic draw
In some situations, the battery might drain even when the motorcycle isn’t in use, resulting in frequent dead battery situations. To troubleshoot this issue, start by checking for accessories or components. Disconnect any aftermarket accessories or components that might be drawing excessive power from the battery. Gradually reconnect them one by one to identify the source of the parasitic draw.
If you aren’t able to identify the cause of the problem, you shouldn’t hesitate in consulting a qualified mechanic or Harley-Davidson dealership. They have the necessary expertise and specialized equipment to deal with this situation and rectify complex electrical system issues.

How to replace a Harley-Davidson battery?
Replacing the battery on a Harley-Davidson motorcycle is an important maintenance task that ensures reliable starting power and electrical performance. While the process might seem daunting at first, with the right tools and guidance, you’ll be able to replace your Harley-Davidson battery within no time. Here are the steps you will need to follow for replacing a Harley-Davidson battery on your bike –
Step 1: Preparation for battery removal
Before starting with the battery replacement, make sure you have the correct replacement battery that matches your bike’s specifications.
Moreover, you’ll also need to gather a few tools and equipment. Depending on your Harley-Davidson bike’s model, you might require a socket set or wrenches for removing the battery terminal connections and battery retaining hardware. Additionally, you should also have a clean cloth or towel, a mixture of baking soda and water for cleaning corrosion, and a wire brush for cleaning battery terminals.
You should also ensure your safety by turning off the ignition and wearing protective gear. Before starting work, remember to turn off the bike’s ignition and remove the key. Moreover, wear safety gloves and goggles to protect yourself from potential battery acid contact and other hazards.
Step 2: Remove the old battery
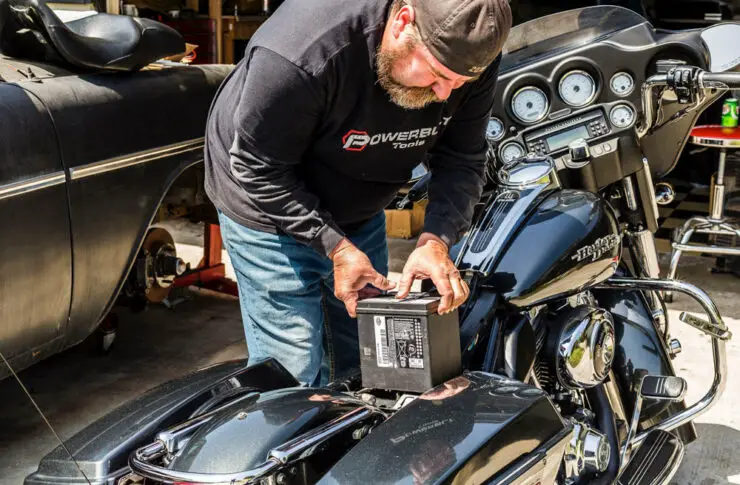
For removing the old battery, you will first need to locate the battery. Depending on your Harley-Davidson bike’s model, the battery might be located beneath the seat or in a side compartment. Consult your bike’s owner’s manual for precise instructions.
Start off by disconnecting the negative cable from the battery terminal. Loosen the bolt or nut securing the cable and carefully slide it off the terminal. Secure the disconnected cable away from the battery and avoid accidental contact. Repeat the same for the positive cable, disconnecting it from the battery terminal.
Depending on the battery mounting system, you might have to remove bolts, screws, or straps holding the battery in place. Carefully lift the battery out of its compartment, making sure that you don’t tip it excessively to avoid spills.
Step 3: Prepare to install the new battery
Before you can install the new battery, you’ll need to carry out the preparation and make it ideal to install a new battery. You will need to clean the battery compartment and battery terminals first.
Use a clean cloth or towel for wiping down the battery compartment and remove any dirt, debris, or corrosion. If you notice any corrosion on the battery terminals, mix baking soda with water to create a paste. Apply the paste to the terminals and use a wire brush to gently scrub away the corrosion. Rinse with water and dry thoroughly.
Step 4: Install the new battery
Once you have cleaned everything, you will be in a position to install the new battery. First, you need to position the new battery. Carefully place it into the battery compartment, ensuring proper alignment. If your bike has retaining hardware, reinstall it as per the manufacturer’s instructions to secure the battery in place.
Then, attach the positive (+) cable to the positive terminal of the new battery. Make sure there is a secure connection by tightening the bolt or nut. Similarly, you’ll also have to connect the negative (-) cable to the negative terminal of the new battery. Ensure that you have a secure connection.
Step 5: Do the final testing
Once the new battery is installed, you’ll need to perform a series of final checks and tests –
- Double check the connections – Verify that both the positive and negative cables are securely attached to their respective battery terminals
- Test the battery – Turn on your bike’s ignition and check for proper electrical system functionality, including lights, indicators, and the starting system
Lastly, you will need to dispose of the old battery. Safely dispose of it by taking it to a designated recycling center. Make sure that you follow local regulations.
FAQ
What are the steps to maintain a Harley Davidson battery?
Maintaining a Harley Davidson battery involves several steps, including regularly checking the battery’s charge level, keeping it clean and free of dirt and debris, and regularly lubricating the battery terminals. Additionally, it is important to use a battery charger when necessary to ensure the battery is fully charged, and to store the battery in a cool, dry place away from extreme temperatures.
What should I do if my Harley Davidson battery is not charging?
If your Harley Davidson battery is not charging, it could be due to a variety of factors, such as a faulty battery, a loose connection, or a faulty charging system. It is important to inspect the battery and its connections to ensure everything is secure. Additionally, you may need to replace the battery or check the charging system for any faults.
How often should I check the charge level of my Harley Davidson battery?
It is recommended to check the charge level of your Harley Davidson battery at least once a month. This will help ensure that the battery is in good condition and is able to provide the necessary power for your bike. Additionally, it is important to check the charge level after any long rides or if the battery has been unused for an extended period of time.
>>> Read more about Battery for Harley-Davidson <<<

