Are you the proud owner of a Harley-Davidson? If so, you probably want to ensure that it is running in tip-top shape. Regular maintenance and upkeep of your Harley-Davidson is key to keeping it going for years to come. One important part of this maintenance is changing the air cleaner. Wondering how often you should change the air cleaner on your Harley-Davidson?
Change or clean your Harley-Davidson air cleaner every 5,000 to 10,000 miles, or more frequently if riding in dusty or dirty environments.
In this article, we will explain the process of changing the air cleaner, as well as how often you should do it to keep your Harley-Davidson running smoothly. So, let’s dive in and find out how often you should change the air cleaner on your Harley-Davidson.
How often should I change the air cleaner on my Harley-Davidson?
Harley-Davidson bikes embody freedom, power, and the thrill of the open road. To ensure that your beloved motorcycle continues to perform at its best, proper maintenance will be key. Among the essential components that require your attention is the air cleaner. You need to change it from time to time to make sure it performs as expected. Now comes the question, how often should I change the air cleaner on my Harley-Davidson bike?
This is a tricky question as it differs from individual to individual. Generally, it is recommended that you change the air cleaner on your Harley-Davidson bike once every 5,000 to 10,000 miles or 6-12 months. Just to be on the safer side, you should start looking for replacements as soon as you hit the 5,000-mile or 6-month mark, whichever comes first. This will help you make sure that the engine is getting the cleanest air and will help in maintaining its optimal performance.
Here are some of the factors that must be considered as they’ll help you know how often should I change the air cleaner on my Harley-Davidson bike –
#1. Type of air cleaner
Different air cleaner types have varying filtration capacities and efficiency levels. Some air cleaners are designed to capture smaller particles while others may offer increased airflow for enhanced performance.
If you are using a high-performance air cleaner that allows for greater airflow, you may have to change the air filter more frequently as it might accumulate contaminants faster.
#2. Air quality in your area
Riding conditions have a significant impact on the rate at which contaminants accumulate in your air filter. If you frequently ride in dusty or dirty environments, your air filter might become clogged more quickly. If you often find yourself on dusty roads or off-road trials, you may have to change your air filter more frequently.
Moreover, if you ride in areas that have high levels of dust, pollen, and pollution, your air filter may become clogged faster. If you live in an area with poor air quality, you may find yourself changing the air filter more often.
#3. Visual inspection
Regular visual inspections of the air filter can provide valuable insight into its condition. A dirty or clogged air filter will hinder airflow and negatively impact your motorcycle’s performance. Perform periodic visual inspections and change the air filter if it appears dirty or clogged.
#4. Riding frequency and style
How often you ride your Harley-Davidson motorcycle can influence how quickly contaminants accumulate in the air filter. Frequent riding will mean more air passing through the filter, potentially leading to faster clogging. If you are a frequent rider, you may need to change the air filter more often to ensure optimal performance.
Aggressive riding or riding in stop-and-go traffic can lead to increased air intake and potentially more contaminants being pulled into the air filter. If you tend to ride aggressively or frequently encounter traffic, you may have to change your air filter more often.
#5. Aftermarket modifications
Aftermarket modifications like performance upgrades or modifications to the exhaust could impact the air-fuel mixture and airflow, affecting how quickly the air filter becomes dirty. If you have made significant modifications to your motorcycle’s performance, consider checking the air filter more frequently.
#6. Climate conditions
Environmental factors like temperature and humidity can influence how quickly contaminants accumulate in the air filter. In humid or extreme temperature conditions, contaminants may accumulate faster, necessitating more frequent air filter changes.
#7. Manufacturer’s recommendations
Harley-Davidson provides guidelines for air filter maintenance, including recommendations for when to change the air cleaner. Adhering to these guidelines will ensure your motorcycle remains well-maintained. Check your Harley-Davidson motorcycle’s manual for the manufacturer’s recommended intervals for air cleaner changes.

Tools and equipment needed for changing the air cleaner
Proper maintenance of a Harley-Davidson bike is important to ensure your motorcycle continues to deliver its legendary performance. Changing the air cleaner is a fundamental task that requires the right tools and supplies. Once you have the tools and equipment with you, it’ll better prepare you for the job. Here are the tools and equipment you will need to change the air cleaner on your Harley-Davidson motorcycle, allowing you to maintain peak engine performance and enjoy a smooth riding experience.
#1. Safety gear
Safety needs to be your top priority. Wear appropriate protective gear, including safety glasses and gloves to safeguard yourself during the maintenance process. Safety gear will protect you from potential hazards and ensure a secure work environment.
#2. A basic set of tools
A set of basic hand tools, including wrenches, pliers, and screwdrivers, is important for accessing and removing components. These tools are needed for loosening bolts, removing covers, and accessing the air cleaner compartment.
#3. Replacement air cleaner
Have the replacement air cleaner on hand before starting the process. Make sure it is compatible with your Harley-Davidson motorcycle’s make and model. The replacement air filter will be the heart of the operation and having it ready will ensure a seamless transition.
#4. Cleaning supplies
Cleaning supplies such as rags, a clean cloth, and a mild cleaning solution are useful for wiping down surfaces and ensuring you have a clean work area. Cleaning supplies will help maintain cleanliness during the maintenance process.
#5. Torque wrench
A torque wrench is needed for tightening bolts to the manufacturer’s specific torque values. This ensures proper installation and prevents over-tightening. Proper torque values will prevent damage to components and ensure a secure installation.
#6. Air filter oil
If your air cleaner uses an oiled filter, air filter oil is necessary for re-oiling the new filter before installation. Air filter oil will ensure proper filtration and protection of the engine.
#7. Owner’s manual
Your Harley-Davidson bike’s owner’s manual is a valuable resource that provides specific guidance on maintenance tasks, including changing the air cleaner. It includes step-by-step instructions tailored to your motorcycle’s make and model. Following the manufacturer’s guidelines will ensure proper installation and maintenance procedures.
#8. Workspace and lighting
A clean and well-lit workspace is important for performing maintenance tasks safely and effectively. A proper workspace and good lighting will enhance your ability to work with precision and avoid mistakes.

How to change the air cleaner in your Harley-Davidson Bike?
Changing the air cleaner on time is important to make sure your bike’s engine functions optimally and continues delivering smooth rides. Once you have arranged the necessary tools and equipment and prepared your bike, you will be in a position to change the air cleaner in your Harley-Davidson motorcycle. Here are the steps you need to follow for changing the air cleaner in your Harley-Davidson bike.
Step 1: Prepare your bike
Start by parking your Harley-Davidson motorcycle on a flat surface and then turn off the engine. Allow the engine to cool down if you have recently ridden the bike.
Step 2: Remove the old air cleaner
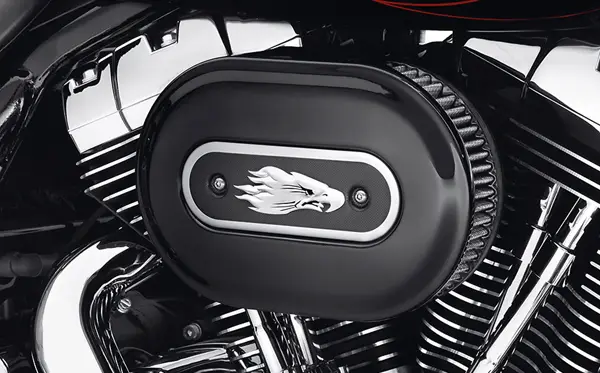
- Using the basic hand tools, you should carefully remove any components that cover the air cleaner, such as the decorative cover or cover plate
- Loosen the bolts or screws securing the old air cleaner assembly to the motorcycle’s intake manifold
- Gently disconnect any electrical connections or hoses attached to the air cleaner
- Remove the old air cleaner assembly from the motorcycle
Step 3: Clean the area
Use cleaning supplies for wiping down the area where the old air cleaner was installed. Make sure that no dirt or debris remains in the vicinity.
Step 4: Install the new air cleaner
- Place the new air cleaner assembly in position, aligning it with the intake manifold
- Attach any electrical connections or hoses to the new air cleaner as needed
- You should carefully tighten the bolts or screws for securing the new air cleaner in place and be cautious that you do not over-tighten it
Step 5: Reattach cover components and check torque
If your motorcycle has decorative covers or cover plates, reattach them using the appropriate tools.
Using a torque wrench, you should tighten the bolts or screws to the manufacturer’s specified torque values. This will ensure proper installation without causing damage.
Step 6: Check for secure installation and reinspect
Give the new air cleaner assembly a gentle tug to make sure it is securely fastened and will not come loose during rides. Perform a final visual inspection to ensure everything is properly installed, connected, and secured.
Step 7: Start the engine
Start your Harley-Davidson motorcycle’s engine and allow it to idle for a few minutes. Listen for any unusual sounds and monitor the engine’s performance.
Benefits of regularly changing the air cleaner in your Harley-Davidson motorcycle
Harley-Davidson bikes are more than just motorcycles and you will want the best performance out of your iconic bike. To maintain the legendary performance of your motorcycle, proper maintenance will be crucial. An often overlooked but important aspect of maintenance is the regular changing of the air cleaner. Here are the different benefits of consistently changing the air cleaner in your Harley-Davidson motorcycle and how this practice contributes to an optimal riding experience.
#1. Improved airflow and performance
A clean and fresh air filter allows a steady flow of clean air into the engine’s combustion chambers. This translates to improved combustion efficiency, resulting in enhanced horsepower, torque, and overall engine performance. By regularly changing the air cleaner, you ensure that the engine receives the optimal air-to-fuel ratio, enabling it to operate at its peak potential.
#2. Enhanced fuel efficiency
When the engine receives the right amount of clean air, it can achieve a more efficient combustion process. This efficiency doesn’t just result in increased power but also leads to improved fuel economy. Regular air cleaner changes contribute to a smoother and more economical ride, allowing you to get more miles out of each tank of fuel.
#3. Engine longevity and protection
Dust, debris, and contaminants are the enemies of any engine. A clogged or dirty air filter allows these harmful particles to enter the engine, leading to premature wear and potential damage to critical components. By changing the air cleaner regularly, you’ll provide a protective barrier that shields the engine from these contaminants, prolonging its lifespan and reducing the risk of costly repairs.
#4. Optimized throttle response
A clean air filter facilitates efficient airflow, leading to improved throttle response. When you twist the throttle, your Harley-Davidson motorcycle will respond more promptly and smoothly, providing you with a more enjoyable and responsive riding experience.
#5. Consistent engine sound
Regularly changing the air cleaner does not just affect performance, it can also influence the characteristic sound of your Harley-Davidson bike. A clean air filter will help maintain a consistent and satisfying engine sound that many riders associate with the exhilaration of riding a Harley-Davidson bike.
#6. Reduced emissions
A clean air filter will contribute to a cleaner combustion, which in turn leads to reduced emissions. If you are environmentally conscious, regularly cleaning the air cleaner is a small yet impactful way to contribute to a greener ride.
#7. Ease of maintenance
Changing the air cleaner is a relatively simple maintenance task that does not require extensive mechanical knowledge. By incorporating this routine into your maintenance schedule, you will be able to reduce the risk of more complex issues arising due to neglected maintenance.
Common issues with air cleaners and how to troubleshoot them
The air cleaner plays a vital role in maintaining engine health and optimal performance. However, like any other component in a motorcycle, an air cleaner can also encounter issues over time. There are a number of common issues you may experience with an air filter from time to time. Here are some of the common problems with air cleaners on Harley-Davidson motorcycles and how you can address these issues and troubleshoot them effectively.
#1. Reduced performance
If you’re noticing a decrease in your motorcycle’s performance, such as sluggish acceleration or reduced power output, the air filter may be clogged or dirty. Faulty air cleaner elements can reduce engine performance, resulting in diminished power.
If you’re facing reduced performance from your air cleaner, then you must visually check the air cleaner element for dirt, dust, clogs, or debris accumulation. If the air cleaner is visibly dirty, clogged, or damaged, then it is time for a replacement. Change the air cleaner by replacing it with a fresh, clean element designed for your Harley-Davidson motorcycle’s model. You must consider replacing or upgrading to a high-flow air filter to enhance performance.
If changing the air cleaner element does not restore performance, you must consider engine tuning or adjustments to ensure an optimal air-fuel mixture.
#2. Increased fuel consumption
If your Harley-Davidson motorcycle starts consuming more fuel than usual, then a clogged air cleaner could be limiting the air intake and affecting combustion efficiency.
If this happens, you must inspect the air filter for dirt or clogs. If the air filter is dirty, you need to replace it with a new one. Moreover, you should pay close attention to any changes in fuel consumption after replacing the air filter.
#3. Unusual engine sounds
An excessively dirty or clogged air filter could result in unusual engine sounds. This is often described as choking or wheezing. If you are facing this issue, then you need to troubleshoot it by removing the air cleaner cover and visually inspecting the air filter. If the air filter is dirty, you need to replace it to restore proper airflow and eliminate unusual sounds.

#4. Black exhaust smoke
A rich air-to-fuel ratio caused by a clogged air cleaner could result in black exhaust smoke. This indicates that there is inefficient combustion. Inspect the air cleaner for dirt or clogs. If needed, you should replace the air cleaner to correct the air-to-fuel ratio and reduce exhaust smoke according to the manufacturer’s recommendations. After you have addressed this issue, you need to monitor exhaust emissions for improvements.
#5. Poor throttle response
A dirty or faulty air cleaner can result in poor throttle response, causing delays in acceleration. If you’re noticing delay or lack of responsiveness when you’re twisting the throttle, a clogged air cleaner could be restricting the airflow.
To troubleshoot this issue you need to inspect the air cleaner for any signs of blockage, dirt, or damage. Clean or replace the air cleaner element as required to ensure unobstructed airflow. If poor throttle response persists, you must seek professional guidance for potential issues beyond the air cleaner.
#6. Engine misfires
Clogged air filters can end up disrupting the air-fuel mixture, leading to engine misfires and rough idling. If you are facing this issue, you need to troubleshoot it by checking the air filter for signs of clogging. Replace the air cleaner if needed to ensure proper air intake and combustion.
#7. Reduced horsepower and torque
If you’re feeling a significant drop in horsepower and torque, it might be due to a clogged air filter inhibiting airflow to the engine. For troubleshooting this issue, you need to visually inspect the air filter for dirt or blockages. Replace the air filter if needed to restore power and performance.
#8. Dirty or clogged air cleaner
A dirty or clogged air cleaner will restrict airflow, affecting combustion efficiency, fuel economy, and overall performance. To troubleshoot this issue, you need to first open the air cleaner cover and visually inspect the air filter for dust, dirt, and debris accumulation. If the air filter is visibly dirty or damaged, you must replace it with a new one that is compatible with your Harley-Davidson model. Make a habit of inspecting and cleaning or replacing the air filter as per the manufacturer’s recommended intervals.
#9. Faulty air cleaner element
An air cleaner element that is not functioning properly can result in inadequate air filtration, potentially damaging the engine. Examine the air cleaner element for any signs of damage, deterioration, or tears.
If you notice any visible damage or wear, you should replace the air cleaner element with a genuine or recommended replacement part. Always go for original equipment manufacturer air cleaner elements to ensure proper fit and performance.
FAQs
What is an air cleaner and why is it important?
An air cleaner is a device that filters air entering the engine of a Harley-Davidson, helping to prolong engine life and performance. The air cleaner removes dirt, dust, and other contaminants from the air, preventing them from entering the engine and causing damage. It is important to change the air cleaner regularly to ensure that the engine is getting the cleanest air possible.
How often should I change the air cleaner on my Harley-Davidson?
It is recommended to change the air cleaner on your Harley-Davidson every 5,000 miles or 6 months, whichever comes first. This will ensure that the engine is getting the cleanest air and will help to maintain its optimal performance.
What are the consequences of not changing the air cleaner regularly?
If the air cleaner is not changed regularly, dirt and other contaminants may build up in the filter, causing the engine to run inefficiently and potentially leading to engine damage. It is important to change the air cleaner regularly to protect the engine and ensure optimal performance.
>>> Read more about Stage 1 Air Cleaner For Harley-Davidson <<<

