Do you own a Harley-Davidson bike and feel the need to adjust the clutch, but don’t know how to? If so, then this article will be of great help to you.
To adjust the clutch on a Harley, loosen the clutch cable adjuster near the handlebars. Remove the derby cover and adjust the clutch pushrod screw. After setting the pushrod, retighten the cable adjuster to remove excess slack.
In this article, you’ll get to know all about adjusting the clutch, how to adjust clutch on Harley-Davidson engine, and other important tips. Continue reading to get all the answers that you’re looking for.
Adjusting the clutch on your Harley-Davidson bike
The clutch is one of the most important components of your Harley-Davidson bike’s mechanics. It’ll allow you to engage and disengage the gearbox. If the clutch uses a cable for connecting the lever to the engine cam, you’ll need to learn to control the tension of the clutch. It’ll help you discover the exact point of tension that’s neither too high nor too low. The clutch is an important component as it allows you to engage and disengage the gearbox. You’ll mainly be using it three times – when starting the bike, when shifting gears, and when coming to a complete stop.
If you’ve got a Harley-Davidson bike, adjusting the clutch cable is important. It’ll help you maintain the safety and responsiveness of the vehicle during road trips. Adjusting the clutch is a simple job that can be done quickly from the comfort of your own garage.
How to adjust clutch on Harley-Davidson bike
Step 1: Remove the bike’s clutch cable cover
Designed for protecting the clutch adjuster mechanism from water, dirt, and juicy airborne arthropods, the clutch cable cover is essentially the accordion-looking piece of rubber. It resides around halfway between the handlebars and the bottom of your bike’s frame. For most Harley-Davidson bikes with a cable clutch, you’ll have to adjust the clutch cable before getting to work on the clutch itself. The cable clutch cover isn’t actually that difficult to find. Once you’ve done that, all you’ll have to do is slide it up or down to reveal the clutch cable adjuster mechanism that’s present underneath.
Step 2: Adjust the clutch cable
Once the clutch cable cover is out of the way, you’ll have to add slack to the cable. This is essential as it’ll ensure that the cable has no effect on the clutch as it is being adjusted. By adding slack into the clutch cable, what you’re doing is collapsing the cable housing that the clutch cable pushes against. By doing so, you’re removing any tension and when complete, you’ll be able to squeeze the clutch lever all the way without much resistance.
For adding slack into the clutch cable, you’ll first have to take a wrench and lock it onto the adjuster. With the wrench secured to the cable clutch adjuster, use another wrench for loosening up the jam nut that’s directly secured to the top of the clutch adjuster. The jam nut is used for holding the adjuster in place. To proceed, you’ll have to dial the jam nut all the way back to create room for the cable adjuster to be dialed back, too. Make sure that you take the clutch cable adjuster to the point it bottoms out, releasing all tension on the clutch cable.
Step 3: Remove the derby cover
While there’s no doubt that it looks great when polished properly, it’s a purpose-driven piece of equipment with one purpose above all others. It will provide you with an easy access point for doing this job. For removing the derby cover, your job won’t require more than unscrewing a few bolts that are holding it in place. With that said, there are a few things to remember when removing the derby cover.
If your motorcycle is sitting on a jiffy stand, it’s possible that because of the angle, some of the primary fluid might leak out of it if it’s overfilled. It’s always a great idea to place a rag below your bike to guard gunking up surfaces that you don’t want to gunk up.
Moreover, you should keep your hand on the clutch cover for supporting it as you’re removing the final bolt. Some riders learn the hard way that a derby cover has a propensity to succumb to gravity immediately once the final bolt is removed.
Step 4: Loosen up the jam nut on the clutch adjuster
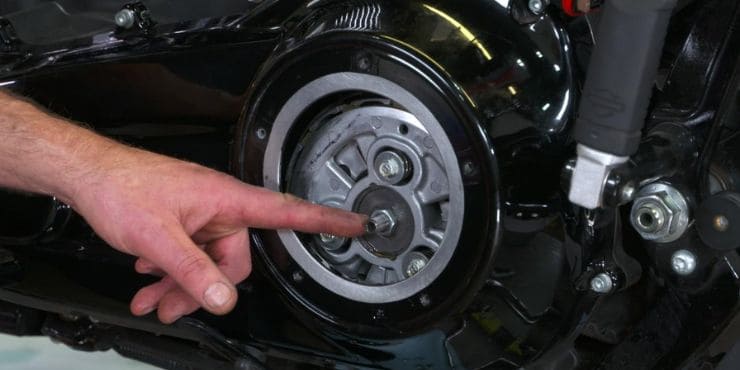
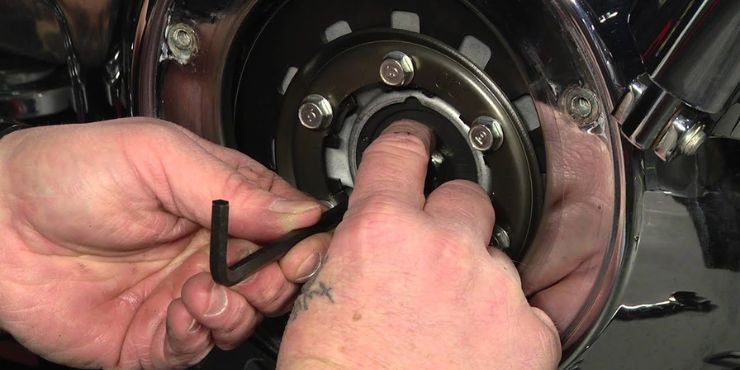
Similar to the cable clutch adjuster, the actual clutch adjuster will also use a jam nut for keeping everything in place. For breaking this free, you’ll need to use a wrench for the nut itself and a hex key to hold the clutch adjuster in place as you’re doing so. It is possible that your Harley-Davidson bike would require a screwdriver instead of an Allen key. Regardless of the tool that you’re using, before you move on to the next step, you’ll have to be sure that you loosen the jam nut all the way out.
Step 5: Adjust your bike’s clutch
At this point, you’ll be ready to adjust the clutch. With your fingers, tighten the clutch adjuster until it bottoms out. Remember, you shouldn’t torque it. Don’t pinch harder and try being sure that it is really snug. When it bottoms out, you should stop as you’ve reached your desired destination.

With the bike’s clutch adjuster bottomed out, you should insert the Allen key. You will want to check the factory service for specifics here. When you do, it’ll either give you a set point or a range. The range of a turn could vary in search of a specific feel. Here, the personal preferences and different wear levels of parts come into play.
Once you’ve made the turn, you should run the jam nut back down to tighten things back up. As you’re doing this, be sure that you keep the Allen key in position for holding the clutch adjuster steady. If you don’t, it’ll likely mean that you’ve inadvertently twisted it out of the desired position. You should finalize this step by using a wrench to fully tighten the jam nut. As with the remainder of the process, you shouldn’t over-torque.
Step 6: Put back the derby cover
With the battle against clutch malfeasance won, it’ll be time to shield back up and then reattach the clutch cover. When you’re doing this on a Harley-Davidson engine, it’ll be a pretty simple process.
You should start the process with your fingers and get the bolts going. Aside from being easier and more efficient, it’ll eliminate the chance that you’ll tighten down individual bolts too soon. With the bolts in place, use a screwdriver/torque wrench for putting the finishing touches on things. Remember, the order in which you’re doing this could make the difference. At this stage, you’ll need to tighten down bolts that are opposite each other. Similar to tightening the lug nuts on your car tires, working in this pattern will help ensure that the cover is evenly drawing down against the seal.
Step 7: Adjust the clutch cable
For this step, you’ll simply be repeating the second step but in reverse. If you squeeze the clutch lever to test the reduction of tension in the second step, you’ll start to see it creep back to its original position now. You shouldn’t fret, though, as it isn’t the work of an invisible ghost of wild rides. This is merely the effect of tension that is returning to the clutch cable.
For checking your progress, you’ll need to keep tabs on the play in the clutch lever as you’re going. Refer to the owner manual. Typically, somewhere in the range of 1/16 inch will be an appropriate amount of free play. Once you get the tension where you want it, re-tighten to jam nut to the clutch cable adjuster.

Step 8: Move down the clutch cable cover again
Now you’re finally done. While the excitement of getting back to thundering down highways and intimidating bikers with lesser roads can be immense, you shouldn’t forget the pull the cable clutch cover back into place before you’re doing so. As the pieces of rubber get older, they’ll get a bit grabby. You should hit the base with a shot of silicone for making the entire process smoother.
Conclusion
Thank you for reading. Hopefully, now you know a lot more about adjusting clutch, how to adjust clutch on Harley-Davidson engine, and other important tips. Adjusting the clutch on a Harley-Davidson engine is easy as long as you know the right steps. It’s all about removing the clutch cable cover, adjusting the clutch cable, removing the derby cover, adjusting the clutch, putting the derby cover back on, and moving the clutch cable back down. The clutch is a key component as it allows you to engage and disengage the gearbox. Adjusting the clutch cable is essential for your Harley-Davidson bike. It’ll help maintain the responsiveness and safety of your Harley-Davidson bike.

