Changing the derby cover on your Harley-Davidson motorcycle doesn’t have to be a daunting task. With the right set of tools and a bit of know-how, you can quickly and easily upgrade or replace the part.
To change a derby cover, remove the bolts holding it in place on the primary cover, then carefully lift off the old cover. Install the new cover and torque the bolts to the specified settings to prevent leaks.
Whether you’re a new rider or an experienced biker, this article will guide you through the process step-by-step. So, get ready to customize your ride and let’s get started.
Overview of Derby Cover on Harley-Davidson Motorcycle
When it comes to motorcycle brands, Harley-Davidson is certainly a name that stands out from the crowd. Harley-Davidson is a brand renowned for its powerful engines, distinctive designs, rich heritage, and undeniable presence on the road. These bikes have become a symbol of premium riding and the American motorcycle culture. Every component of a Harley-Davidson bike plays a key role in the overall performance and aesthetics of the bike. One of the lesser-known components of these bikes is the derby cover. It is a small but significant component that plays an important role in the performance of your bike.
Definition of a Derby Cover
The Derby Cover or also referred to as the clutch cover or inspection cover is a round plate that is positioned on the left side of the primary cover of your Harley-Davidson bike. It is designed to protect the clutch assembly and other internal components while offering easy access for inspection and maintenance purposes. The name “derby cover” is believed to have originated from the early days of motorcycle racing when bikers would remove the cover before a race, resembling the removal of a derby hat.
Functionality and importance of a derby cover
Even though the primary function of the derby cover is to offer a protective barrier for the clutch assembly, it’ll serve multiple purposes. It protects the clutch components from dust, debris, and other external elements that can potentially cause damage.
The derby cover also acts as a noise suppressor, reducing the mechanical sounds produced by the clutch. Moreover, it offers a convenient access point for the biker to inspect and service the clutch without requiring extensive disassembly.
Positioned on the left side of the primary cover, the derby act will act as a shield and prevent foreign objects from entering the clutch area. This ensures smooth operation and contributes to the overall performance and longevity of the bike.
Aside from offering protection, the derby cover will also offer convenient access for maintenance and inspection. By simply removing the derby cover, riders and mechanics will be able to access the clutch components. This accessibility will simplify routine maintenance tasks like checking the clutch plates, adjusting the clutch cable, or replacing the clutch springs among others.

Style and customization
While the derby cover is definitely functional, it will also present an opportunity for Harley-Davidson enthusiasts to personalize their motorcycles and make a style statement. Many bikers choose to replace the stock derby cover with aftermarket options that reflect their individual style and personality. Aftermarket derby covers come in a wide variety of designs, finishes, and materials. This allows riders to easily customize their bikes to their heart’s content.
The design options for Harley-Davidson derby covers are virtually limitless. From intricate engravings and embossed patterns to custom logos and graphics, bikers will be able to find a cover that perfectly matches their desired aesthetic. Some popular designs include Harley-Davidson logos, skulls, flames, eagles, tribal patterns, and various motorcycle-themed motifs. The ability to choose a unique derby cover will allow riders to easily express their individuality and stand out from the crowd.
Materials and finishes
Derby covers are typically made using durable materials to withstand the rigors of the road. Common materials include steel, aluminum, and billet, each offering its own set of advantages. Aluminum covers are lightweight and resistant to corrosion whereas steel covers offer strength and durability. Meanwhile, billet covers are machined from solid blocks of aluminum and they offer both strength and intricate detailing possibilities.
In terms of finishes, derby covers can be easily found in a variety of options. Polished covers offer a classic and shiny appearance whereas chrome-plated covers add a layer of elegance and reflectivity. Powder-coated covers offer a durable and vibrant finish, as they are available in a wide array of colors. Some bikers also prefer the raw and industrial look of bare metal covers, showcasing the natural beauty of the material.
Maintenance of aftermarket derby covers
Installing a derby cover on a Harley-Davidson motorcycle is a straightforward process. Most of the aftermarket covers are designed to fit specific models, ensuring a proper fit and alignment. The stock derby cover should be removed and the new aftermarket cover is secured in place using the appropriate hardware. When installing an aftermarket derby cover, follow the manufacturer’s instructions or seek professional assistance to ensure proper installation and avoid damage to the bike or its components.
Maintaining the derby cover is relatively simple. Regularly cleaning with mild soap and water or specific metal cleaners for certain finishes will help preserve its appearance and prevent corrosion. It is advised that you should periodically inspect the cover and its mounting hardware. This ensures that everything is secure and functioning properly.
Gather tools and supplies before changing a derby cover
The derby cover on a Harley-Davidson bike will not only protect the clutch assembly but it’ll also offer an opportunity for customization and personalization. Whether you’re looking to replace the stock cover or upgrade to a custom aftermarket option, changing the derby cover will require a few essential tools and supplies. Here are some of the important tools and supplies that you will need to get the job done effectively and efficiently.
#1. A socket set
A socket set is a must-have tool when you are working on your Harley-Davidson motorcycle. Ensure that you’ve got a set of metric sockets that includes the sizes commonly used for derby cover bolts, typically ranging from 3/8-inch to ½-inch.
#2. Torque wrench
A torque wrench will be important for accurately tightening the derby cover bolts to the manufacturer’s specifications. This will ensure that the bolts are tightened to the correct torque, preventing over-tightening or under-tightening.
#3. Screwdriver or Allen wrench
Depending on the specific model of your Harley-Davidson bike, you might either require a screwdriver or an Allen wrench to remove the derby cover screws or bolts. You must check the type of fasteners used on your motorcycle and ensure that you have the appropriate tool.
#4. Gasket or O-ring
When you’re changing the derby cover, it’ll be important that you replace the gasket or O-ring that offers a seal between the cover and the primary cover. The gasket or O-ring will ensure a tight fit and prevent any oil leaks. You must buy a new gasket or O-ring that is compatible with your motorcycle’s model and year.
#5. Threadlocker
To make sure that the derby cover bolts remain securely in place, it is recommended that you use a threadlocker. Threadlocker is a liquid adhesive that helps prevent bolts from loosening because of vibrations. Select a threadlocker that is suitable for the specific bolt size and strength requirements.
#6. Cleaners and lubricants
Before you install the new derby cover, it is important that you clean the mating surfaces thoroughly. Make use of a mild soap and water solution or a specific metal cleaner for removing any dirt, grime, or residue. Moreover, you might also require a suitable lubricant like an assembly lubricant or a silicone-based grease to make sure you’re getting smooth installation and proper sealing.
#7. Rags or shop towels
Having a supply of clean rags or shop towels on hand will be useful for wiping surfaces, cleaning up any skills, and ensuring a neat work area. They can be quite handy when it comes to removing excess grease or oil during the installation process.
#8. Workbench or stable surface
Find a suitable workbench or stable surface where you can place your motorcycle during the derby cover change. Make sure that your bike is stable and secure so that you can avoid any accidents or damage during the process.

How to change a derby cover on Harley-Davidson bike: Remove the old cover
When you are looking to change the derby cover on your Harley-Davidson bike, you will first need to remove the derby cover. Whether you are going to replace the stock cover or upgrade to a custom option, removing the old derby cover will be an important step. Once you have successfully removed the derby cover, you will be able to change the derby cover safely and efficiently. Here is a step-by-step guide on how to remove the old derby cover on your Harley-Davidson bike.
Step 1: Prepare the work area
The first step here would be to find a suitable work area for your Harley-Davidson motorcycle. Make sure that it is stable and secure to prevent any accidents or damage. Place clean rags or shop towels nearby so that you can keep the area tidy.
Step 2: Locate the derby cover
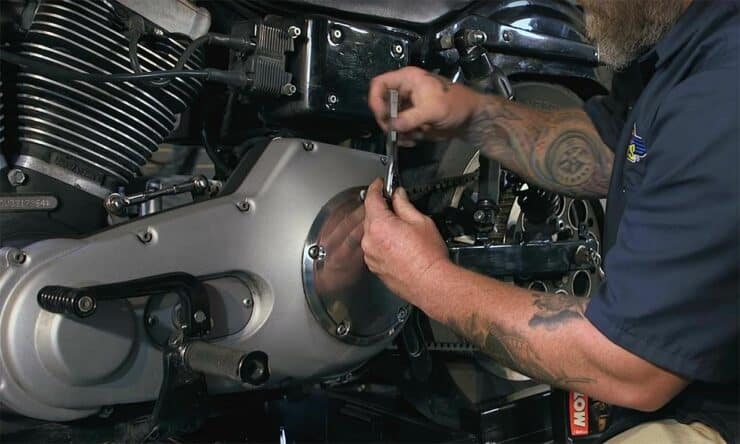
Then, you will need to identify the derby cover on your Harley. Typically, it is located on the left side of the primary cover, opposite the shifter. The derby cover might be held in place by screws or bolts depending on your motorcycle’s model and year.
Step 3: Loosen the derby cover fasteners
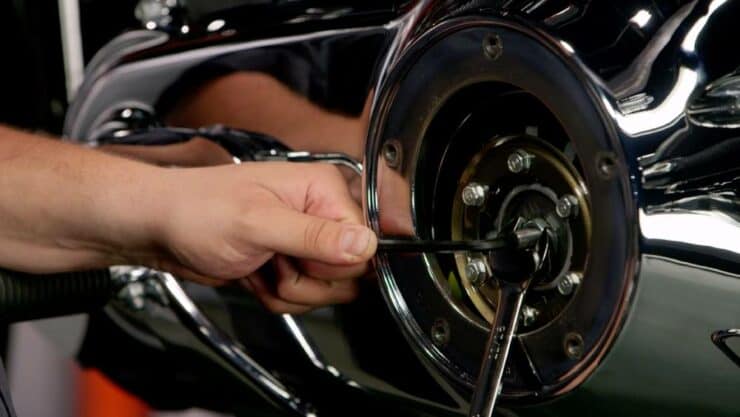
Using the appropriate tools, loosen the screws or bolts that secure the derby cover. Turn the screws or bolts counterclockwise to loosen. Be careful that you don’t drop any small components into the primary cover or onto the ground.
Step 4: Remove the derby cover
Once the fasteners are loose, you should carefully remove them from the derby cover. Keep the fasteners in a safe place to avoid misplacing them. Gently lift the derby cover off the primary cover to expose the clutch assembly.
Step 5: Use a gasket scraper
If there’s an old gasket stuck to the primary cover, you will have to use a gasket scraper to scrape it off gently. Be careful that you don’t damage the surface of the primary cover while you are doing so. Make sure that the surface is clean and smooth before you continue.
Step 6: Inspect the Gasket or O-ring
Once the derby cover is removed, you can easily inspect the gasket or O-ring that sits between the derby cover and the primary cover. If the gasket or O-ring appears damaged, worn, or flattened, it is advised that you replace it with a new one.
Step 7: Clean the surfaces
Make use of clean rags or shop towels to wipe away any oil, dirt, or debris from the mating surfaces of the primary cover and the derby cover. Make sure that both surfaces are clean and free of any residue before you proceed.
Once you have removed the old derby cover successfully, you are now ready to move on to the installation part or perform the desired maintenance or customization. Changing the derby cover on your Harley will allow you to add your personal touch while maintaining the performance and aesthetics of your bike. Enjoy the process and take full pride in customizing your motorcycle to make it uniquely yours. Make sure that you consult the owner’s manual or seek professional guidance for specific instructions and torque specializations for your bike’s model and year.
How to change a derby cover on Harley-Davidson bike: Install the new cover
Once you have successfully removed the old derby cover, you will be in a prime position to replace it with a new one. Whether you are replacing the stock derby cover or upgrading to a custom option, installing a new derby cover will be a straightforward process if you know what to do. Here are the instructions that you need to follow to successfully install a new derby cover on your Harley-Davidson motorcycle within minutes.
Step 1: Thoroughly clean the surfaces
Before you install the new derby cover on your Harley-Davidson bike, you must clean the mating surfaces of the primary cover and the new derby cover. Make use of mild soap and water or specific metal cleaners that are suitable for the finish of the derby cover. You should make sure that both of the surfaces are clean and free of any residue or debris.
Step 2: Install the Gasket or O-ring
If the new derby cover doesn’t come with a pre-installed gasket or O-ring, you must carefully place the appropriate gasket or O-ring onto the mating surface of the primary cover. You must ensure that it is sitting evenly and aligned with the bolt holes.
Step 3: Position the derby cover
Next, you should hold the new derby cover with the gasket or O-ring in place and position it over the primary cover. It needs to be aligned with the bolt holes with those on the primary cover. Ensure that the derby cover is sitting evenly and securely.
Step 4: Install the fasteners
Make use of the appropriate tools to insert and hand-tighten the screws or bolts into the bolt holes of the derby cover. Start by threading them clockwise, ensuring that they engage properly. Avoid cross-threading as it could damage the threads.
Step 5: Torque the fasteners
Make use of a torque wrench and tighten the screws or bolts to the manufacturer’s specified torque setting. Refer to your bike’s owner’s manual or look for professional guidance to determine the appropriate torque value for your Harley’s model and year. You should be tightening the fasteners in a crisscross or star pattern to make sure there is even pressure distribution.
Step 6: Apply threadlocker
To make sure the derby cover fasteners remain securely in place, you should apply a small amount of threadlocker to the threads of each screw or bolt. Threadlocker will help prevent the fasteners from loosening because of vibrations.
Step 7: Clean and inspect
Use clean rags or shop towels for wiping away any excess threadlocker or any other residue from the derby cover and surrounding areas. You must inspect the installation to ensure that the derby cover is securely in place and that the gasket or O-ring is properly seated.
Lastly, once the new derby cover has been successfully installed, you must take a moment or two to admire the fresh look and personalized touch it adds to your bike. Enjoy the ride and the pride of customizing your bike to make it uniquely yours.

Clean the area and test after installing the derby cover
Once you have installed a new derby cover on your Harley-Davidson motorcycle, it’ll be important that you ensure everything is functioning properly and that the area is clean and free of any debris. Cleaning the area, inspecting things, and properly testing your bike will be important. By properly testing the new derby cover, it will help maintain the performance and longevity of your bike. Here are the steps you will need to follow for cleaning the area, inspecting things, and testing the bike after installing the derby cover.
You can easily clean the area and inspect the situation by following these steps –
#1. Clean the area
Make use of clean rags or shop towels to wipe away any excess grease, oil, or dirt from the derby cover, primary cover, and surrounding areas. Pay close attention to the gasket or O-ring and make sure it is clean and properly seated.
#2. Inspect the gasket or O-ring
Carefully inspect the gasket or O-ring between the derby cover and the primary cover. Make sure that it is in good condition, properly aligned, and provide a secure seal. If the gasket or O-ring appears damaged, worn out, or flattened, it is advised that you replace it with a new one to prevent any oil leaks.
#3. Check fasteners
Inspect the screws or bolts that are securing the derby cover. Make sure that they are tight and properly torqued to the manufacturer’s specifications. Gently attempt to tighten them further using the appropriate tools.
#4. Verify alignment and fit
Check the alignment and fit of the derby cover. Make sure that it sits evenly and securely on the primary cover without any gaps or misalignments. Verify that the derby cover isn’t interfering with any other components or moving parts.
#5. Recheck for leaks
Once you have cleaned and inspected the area, you must recheck for any signs of oil leaks. Monitor the bike closely for a few minutes, both while idling and during a short test ride. If you notice any leaks or abnormal oil seepage, you must address the issue promptly to prevent further complications.
Once you are done with the cleaning, you will need to test the derby cover –
#1. Engage the clutch
Before you start the engine, pull in the clutch lever and make sure it engages smoothly. The clutch lever must have a firm, responsive feel when pulled in.
#2. Check clutch operation
Start the engine and shift through the gears to make sure that the clutch is operating correctly. The gears must engage smoothly without any slipping, grinding, or abnormal noises. You need to test the clutch engagement and disengagement at various speeds to ensure it functions as expected.
#3. Ensure it is leakage-free
While the engine is running, you must inspect the area around the primary cover and derby cover for any signs of oil leaks. Look for drips, seepage, or pooling oil. If you notice any leaks, you must address them promptly to prevent any potential damage and ensure the integrity of the clutch system.
By thoroughly testing the derby cover’s functionality and cleaning and inspecting the area after installation, you’ll be able to ensure the smooth operation of your bike. You should regularly monitor the derby cover region during routine maintenance to detect any potential issues early and take appropriate action. With proper care and the right steps, you’ll be able to maintain the performance, reliability, and visual appeal of your bike while also ensuring your safety on the road.
FAQs
What tools do I need to change a derby cover on a Harley-Davidson?
To change a derby cover on a Harley-Davidson, you will need a variety of tools, including a screwdriver, a wrench, a hammer, and a puller. You may also need some sealant or thread locker to ensure the screws stay in place.
What safety precautions should I take when changing a derby cover?
When changing a derby cover, it is important to take safety precautions. Always use protective gear, such as gloves and safety glasses, to protect your eyes and hands from any flying debris. Additionally, make sure to use the correct tools for the job and to follow the manufacturer’s instructions.
What is the best way to remove a derby cover?
The best way to remove a derby cover is to use a puller. This tool is designed to carefully remove the derby cover without damaging it. You should also use a wrench to loosen the screws and a hammer to gently tap the puller into place. Once the cover is off, you can install the new cover by following the manufacturer’s instructions.

