Welcome Harley riders! Do you want to learn how to change a starter on your Harley Davidson Road King? It can be intimidating to take on a major maintenance task, but with the right tools and knowledge, you can get your bike back in perfect running condition.
To change the starter, disconnect the battery, remove the primary cover, and detach the old starter from the engine case. Install the new starter, reconnect all cables, and reattach the primary cover.
Read on to unlock the secrets of how to change a starter on a Harley Davidson Road King!
Significance of the starter on a Harley-Davidson Road King
The starter is a critical component of any motorcycle and this includes the iconic Harley-Davidson Road King. It plays a key role in initiating the engine’s operation, allowing you to experience the thrill of the open road. The starter or the starter motor or cranking motor is an electric motor mounted on the engine of a motorcycle. Its primary function is to initiate the combustion process by turning the engine’s crankshaft, allowing the engine to start and run independently.
How does the starter system operate?
The starter system on a Harley-Davidson Road King operates through a series of steps –
Step 1: Ignition activation
When the ignition key is turned on or the starter button is pressed, a signal will be sent to the solenoid, initiating the starter system.
Step 2: Solenoid engagement
The solenoid receives the electrical signal and acts as a switch, allowing a high current to flow from the battery to the starter motor.
Step 3: Motor engagement
With the current flowing through it, the starter motor will engage with the flywheel or ring gear on the engine’s primary side. This engagement will create rotational movement in the engine, initiating the combustion process.
Step 4: Engine starting
As the starter motor rotates the flywheel, the engine’s pistons will start moving up and down, drawing in air and fuel, and igniting the mixture to start the combustion process. Once the engine is running independently, the starter system disengages.

Significance of the starter system
The starter system plays a key role in the overall functionality of a Harley-Davidson Road King. Its significance can be understood through numerous factors including the engine starting, safety, ease of use, and more.
The starter system will ensure consistent and reliable engine starting, eliminating the need for manual kick-starting and providing convenience for riders.
The electric starter will eliminate the need for a kickback or backfire associated with manual kick-starting, enhancing rider safety. It will allow for a controlled and predictable engine starting, making the Harley-Davidson Road King more accessible and user-friendly.
The starter system is integrated with other advanced features of the Road King, such as engine management systems and electronic fuel injection. The integration will optimize fuel delivery, ignition timing, and overall engine performance.
Prepare your Harley-Davidson Road King for changing the starter
The starter is an important component for the operation of your Road King. If it malfunctions, replacing it will be important to get your motorcycle back on the road. However, before you dive into the starter replacement process, it will be important to assess the situation, gather the necessary tools, and prepare your Road King for a smooth and successful replacement. Here are the steps that you will need to carry out to prepare your Road King for a starter replacement.
Step 1: Assess the situation
Before you get started with the replacement, you must first assess the situation to determine the extent of the repair required. To do that, you must consider carrying out a diagnostic check yourself and consulting the manual to see the ideal solution.
Performing a diagnostic check will help you confirm that the starter is indeed the source of the issue. This might involve troubleshooting electrical connections, inspecting the battery, and checking the starter relay.
You need to assess your mechanical skill level and comfort with performing those repairs. If you are not familiar with starter replacement or lack the necessary experience, it might be wise to seek professional help to avoid causing further damage. You need to refer to your bike’s owner’s manual for specific instructions and guidelines related to the starter replacement. Familiarize yourself with the recommended procedures to ensure a safe and accurate repair.
Step 2: Gather the necessary tools and equipment
To effectively carry out the starter replacement on your Road King, you need to follow certain tools and equipment –
- A socket set with various socket sizes to accommodate different bolts and nuts on the bike
- Both open-ended and adjustable wrenches in different sizes for loosening and tightening bolts
- A set of flathead and Phillips head screwdrivers for removing screws and fasteners
- A torque wrench to ensure proper tightening of bolts to the specified torque settings
- Have a pair of pliers for gripping and manipulating wires or small components during the repair process
- If needed, a battery terminal puller to disconnect the battery
- You shouldn’t forget to wear safety gear, including protective eyewear and gloves to protect yourself during the repair
Step 3: Prepare your bike
Preparing your Harley-Davidson Road King before replacing the starter will help you streamline the repair process. To do that, you must follow these steps –
- Before any electrical work, you should disconnect the negative terminal of the battery to prevent accidental short circuits or electrical shock
- Create a clean and organized workspace by removing clutter or obstacles that could impede your progress
- Make sure you have adequate lighting for better visibility during the repair
- Use a suitable cover or protective material for safeguarding painted surfaces and delicate components from scratches or damage during the repair process
- If you haven’t done so already, make sure you’ve gathered the replacement starter and any accompanying components or gaskets needed for the installation

How to change a starter on a Harley-Davidson Road King: Remove the old one
When it comes to replacing the starter on your Harley-Davidson Road King, removing the old one will be the first step in the process. Here, you will get to know how you can remove the old starter on your Road King. Once you know how to change a starter on a Harley-Davidson Road King after removing the old one, it’ll allow you to proceed with a smooth and efficient starter replacement.
Step 1: Disconnect the battery
Safety needs to be your first priority when working with electrical components. You must follow certain steps to disconnect the battery before you proceed with the starter removal.
Ensure that the ignition switch is in the “OFF” position for preventing any accidental electrical mishaps during the removal process. Locate the battery on your Harley-Davidson Road King. It will typically be located beneath the seat or in a battery compartment.
Using an appropriate wrench or socket, loosen and remove the bolt or nut securing the negative terminal (-) of the battery. Carefully lift the terminal of the battery post and set it aside, making sure it doesn’t make contact with the battery.
Step 2: Remove the coverings and bolts
To access the starter, you will need to remove the coverings and bolts. You will have to remove the coverings, loosening the bolts, and you’ll be in the right position for what needs to be done.
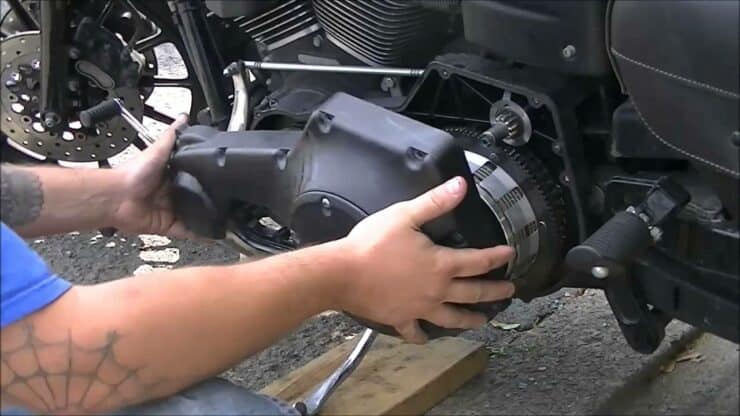
Depending on the model of your Harley-Davidson Road King, you might have to remove any necessary components such as the air cleaner cover or primary cover to gain access to the starter.
Using an appropriate socket or wrench, carefully loosen and remove the bolts securing the starter to the engine casing. Take note of the specific bolts and their locations as they might vary depending on the model year and configuration of your Road King.
Step 3: Disconnect the wires
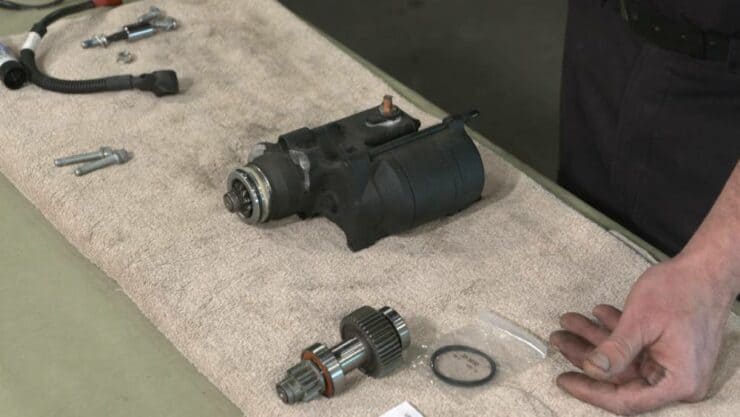
Before you fully remove the starter, it will be important to disconnect the wires. To do that, you should locate the wires connected to the starter. Typically, there will be a positive wire and a smaller wire connected to the solenoid.
Using a pair of pliers or an appropriate tool, you must carefully remove the connections from the starters. Pay close attention to the specific wiring configuration and note the positions to ensure correct reconnection during the installation of the new starter.
Step 4: Use a puller to remove the starter
The starter might be secured tightly and require the use of a puller to extract it. To do that, you will need to attach the puller, apply pressure, and remove the starter.
First, you should secure the puller to the starter by aligning it with the appropriate holes or attachment points. Make sure that it is securely fastened. Then, slowly and evenly tighten the puller, applying a bit of pressure to pull the starter away from the engine casing. Take caution to avoid any sudden movements or excessive force that might damage the starter or other components.
Once the puller has loosened the starter, you must carefully remove it from the engine casing. Keep the starter in a safe place for disposal or further examination.
How to change a starter on a Harley-Davidson Road King: Install the new one
Installing a new starter will be a crucial step in getting your Harley-Davidson Road King back on the road. Here, you will get to know the essential steps to install a new starter on your Road King. It will allow you to complete the replacement process with confidence and ensure the proper functioning of your bike.
Step 1: Position the new starter
Proper positioning of the new starter will be important for a secure and efficient installation. Carefully, align the new starter with the mounting holes on the engine casing. Make sure that the starter is correctly positioned. It must be done according to the manufacturer’s instructions and any alignment marks on the starter or engine casing.
Gradually, insert the starter into the mounting holes, taking care that you do not damage any surrounding components. Make use of gentle pressure to guide the starter into place until it fits snugly against the engine casing.
Step 2: Reattach the wires
Once the new starter has been positioned correctly, reattaching the wires will be the next step. First, you should identify the positive wire and the smaller wire that connects to the solenoid. You must refer to the service manual or any markings on the starter for accurate identification.
Using pliers or an appropriate tool, you should carefully reconnect the wires to the respective terminals on the starter. Ensure a secure connection by tightening any fastening mechanisms like nuts or screws.
Step 3: Replace the bolts and coverings
Properly securing the starter with bolts and replacing any coverings will be essential for its stability and protection. Start by inserting the bolts through the mounting holes on the starter and into the corresponding holes on the engine casing. Gradually tighten the bolts with the help of an appropriate socket or wrench, ensuring that they are snug but not overly tightened.
If any coverings or components were removed during the starter removal process, you should reinstall them according to the manufacturer’s instructions. Make sure that all fasteners and screws are securely tightened to prevent any loose or rattling parts.
Step 4: Test the new starter
Testing the functionality of the new starter will be the final step in installing the new starter on your Road King. To do that, you should first reconnect the negative terminal (-) of the battery to restore power. Make sure that the terminal is securely tightened and ensure proper contact with the battery post.
Turn the ignition switch to the “ON” position and listen for any clicking or abnormal sounds. This indicates that the electrical connection is established. Then, activate the starter by engaging the ignition switch or pressing the starter button. Listen for the smooth operation of the starter motor, indicating the proper functionality.
Potential signs that your Road King’s starter needs changing
With the starter being such an integral component, over time, wear and tear can greatly affect its performance. This can result in potential starting issues and frustrations. It’ll be important that you recognize the signs that indicate it is time to change the starter. Timely changes will help you ensure the safer and smoother operation of your bike. Here are some of the potential signs that indicate it is time to replace the starter on your Harley-Davidson Road King.
#1. Intermittent starting issues
One of the most noticeable signs of a failing starter will be intermittent starting problems. You might experience difficulty starting the engine or notice that it cranks slowly or inconsistently. If you find yourself frequently encountering starting issues, even after verifying the battery and other related components, it could be a sign that the starter motor is wearing out and has to be replaced.
#2. Frequent clicking sounds
When you attempt to start your Harley-Davidson Road King and instead of the engine roaring to life, you hear repeated clicking sounds, this is an indication of a faulty starter. The clicking noise could be caused by a worn-out solenoid or weak electrical connections within the starter motor. If you hear these clicking sounds and the engine fails to start, it is a sign that the starter isn’t engaging properly and has to be replaced.
#3. Grinding on whining noises
Unusual grinding or whining noises when starting the engine can indicate a failing starter. These noises typically occur when the starter gear teeth are not correctly meshing with the flywheel or ring gear. Over time, the teeth on the starter gear might become worn or damaged, resulting in a grinding or whining sound. Ignoring these noises could result in further damage to the flywheel, necessitating more extensive repairs. If you notice these sounds during starting, it is advised that you should have the starter inspected and replaced if necessary.
#4. Frequent need for jump-starting
If your Harley-Davidson Road King frequently requires jump-starting even with a fully charged battery, it might be a sign of a faulty starter. While jump-starting can temporarily provide the power needed to start the engine, it is not a long-term solution. Continuously relying on jump-starting can result in further strain on the electrical system and potential damage to other components. If you find yourself jump-starting your bike more often than not, it is time to consider replacing the starter.
#5. Starter motor failure
In some cases, the starter motor might fail completely, resulting in no response or noise when attempting to start the engine. If you turn the key or press the starter button and there’s no sound or activity from the starter, it is a clear indication of a failed motor. At this point, replacing the starter will be necessary to restore the functionality of your Road King.

Troubleshoot common problems with the Road King’s starter
After you have installed a new starter on your Harley-Davidson Road King, it is important that you ensure that it functions properly. If your Road King’s starter isn’t working properly, troubleshooting common problems will help you identify and resolve the problem. Here, you will get to know some of the common problems, allowing you to address and troubleshoot any issues that might arise with your new starter on the Harley-Davidson Road King.
Step 1: Check the wiring
Proper wiring will be critical for the functioning of the starter. To check the wiring, you will need to visually inspect, check for corrosion, and test the continuity.
You must inspect the wiring connected to the starter, making sure that all connections are secure, free from damage, and properly attached. Look out for any loose, frayed, or disconnected wires.
Examine the wiring for any signs of corrosion, such as greenish deposits or rust. Corrosion could disrupt the flow of electricity and cause starter problems. You need to clean or replace any corroded connectors.
Make use of a multimeter that is set to the continuity or resistance mode to test the wiring connections. Check for continuity between various wires and connections to ensure they are properly conducting electricity.
Step 2: Check the battery
A healthy battery will be important for the proper functioning of the starter. Perform different checks to assess the condition of the battery. Examine the battery for any signs of leakage, damage, or corrosion on the terminals. Clean any corrosion using a wire brush and a mixture of baking soda and water.
Use a voltmeter for measuring the voltage of the battery. A fully charged battery needs to read around 12.6 V or higher. If the voltage is significantly lower, you should charge or replace the battery as needed. If the battery appears to be low, you must perform a load test using a battery load tester. This test will assess the battery’s ability to deliver power under load conditions and identify any potential issues.
Step 3: Check the connections
Faulty connections can result in starter problems. You need to verify different connections like starter connections, battery connections, ground connections, and more.
- You should make sure that all connections to the starter, such as the positive wire (+) and smaller wire connected to the solenoid are secure and properly tightened
- Double-check the battery connections, ensuring that the positive (+) and negative (-) terminals are securely fastened and making proper contact with the battery posts
- Check the grounding connections, including the connection between the battery negative terminal and the frame of the bike to ensure they are clean, tight, and free from corrosion
- If your Harley-Davidson Road King has a starter relay, you must inspect the connections and ensure that they are securely fastened and free from corrosion or damage
Also read: Harley-Davidson Road Glide vs Indian Challenger
FAQs
What tools are needed to change a starter on a Harley Davidson Road King?
To change the starter on a Harley Davidson Road King, you will need a socket set, a ratchet, a screwdriver, a pair of pliers, and a torque wrench. You may also need some lubricant or penetrating oil to help loosen any seized bolts.
How long does it usually take to change a starter on a Harley Davidson Road King?
Changing a starter on a Harley Davidson Road King usually takes around 1-2 hours, depending on your experience and the condition of the starter. It’s important to take your time and ensure that all bolts are tightened correctly.
What should I do if the starter doesn’t start after I’ve replaced it?
If the starter doesn’t start after replacing it, it may be due to a wiring issue or a problem with the battery. Check the wiring connections and make sure the battery is fully charged. If the issue persists, you may need to take the bike to a qualified mechanic for further diagnosis and repair.

