Are you a proud Harley Davidson owner? Do you want to ensure that your motorcycle is well maintained? Checking your oil is an important part of motorcycle maintenance, and it’s easy to do with the right tools and knowledge.
To check the oil, warm up the engine, place the bike on level ground, remove the dipstick, wipe it clean, reinsert it, and remove it again to check the level. Ensure oil falls between the “Full” and “Add” marks.
In this article, you will learn how to quickly and easily check your Harley Davidson motorcycle’s oil. With these tips and a few simple steps, you can make sure your Harley is running smoothly and safely. Keep reading to learn more!
Role of oil in your Harley-Davidson motorcycle
Oil is often referred to as the lifeblood of a motorcycle engine. This statement holds especially true for a Harley-Davidson motorcycle. The oil in a Harley plays a crucial role in maintaining optimal performance, ensuring smooth operation, and extending the longevity of the bike. It cannot be understated how important oil is for your Harley-Davidson bike and its engine.
Lubrication and heat dissipation
One of the primary functions of oil will be to lubricate the different moving parts within your Harley-Davidson bike’s engine. As the engine components such as the pistons, camshaft, and crankshaft move at high speeds, oil forms a thin film between them, reducing friction and minimizing any wear and tear. This lubricating action will prevent metal-to-metal contact, which can result in premature engine failure.
Moreover, oil also helps dissipate heat generated by the engine. The high temperatures produced during combustion and the friction between engine components can cause overheating if not managed properly. The oil circulates through the engine, absorbs heat, carries it away, and maintains the engine’s operating temperature within a safe range.
Removes any contaminants
Over time, small particles, dirt, and debris can find their way into the engine of your Harley-Davidson bike. The oil in your motorcycle contains additives and detergents designed for capturing and suspending these contaminants, preventing them from settling on critical engine components. This prevents the formation of sludge and deposits that can hinder performance and potentially cause engine damage.
Regular oil changes will ensure that fresh, clean oil is circulated throughout the engine. This helps remove any contaminants and keeps the internal components clean and protected.
Prevents corrosion
The oil in your Harley-Davidson bike also serves as a protective barrier against corrosion and rust. It forms a thin coating on the internal surfaces of the engine, protecting them from moisture and oxidation. This is especially important if you are riding in wet or humid conditions where moisture can infiltrate the engine and cause damage over time. Regular oil changes will ensure that the engine is consistently coated with fresh oil, providing ongoing protection against corrosion.
Seal and gasket maintenance
Properly functioning seals and gaskets are important for maintaining engine integrity and preventing oil leaks. The oil in your Harley-Davidson motorcycle helps keep these seals and gaskets supple and pliable, reducing the risk of leaks. Oil will also act as a sealant, filling small imperfections, and preventing oil from escaping.

Improved overall engine performance and longevity
Maintaining the correct oil level and using the recommended oil type and viscosity specified by Harley-Davidson will be important for optimizing your motorcycle’s performance and extending its lifespan. The right oil will ensure smooth and consistent engine operation, reduce friction, minimize wear and tear, and help maintain proper engine temperature.
Regular oil changes and following the manufacturer’s recommendations will help you ensure that the oil in your bike remains clean, effective, and capable of performing its functions. Neglecting oil maintenance could result in increased friction, reduced engine efficiency, increased fuel consumption, overheating, and potential engine damage.
Preparation before checking the oil in your Harley-Davidson motorcycle
Regularly checking the oil level in your Harley-Davidson bike will be a crucial maintenance task. It will help you ensure optimal engine performance and longevity. Before you start with this complex procedure, it will be important that you prepare for it first. By carrying out the necessary preparation, you will be able to make the entire task a whole lot easier. This includes basic tasks like gathering the necessary supplies and setting up your bike in an ideal position to check the oil levels.
Step 1: Gather the necessary tools
Before you can start checking the oil levels in your Harley-Davidson motorcycle, you should make sure that you have the necessary tools and supplies readily available. Some of the tools and supplies you will require include –
- Owner’s manual – Locate your Harley-Davidson motorcycle’s owner’s manual as it’ll provide specific instructions, oil capacity, recommended oil type, and other essential information for the oil check procedure
- Clean rag or paper towels – You will also require clean rags or paper towels to wipe any oil spills or excess oil during the oil check so make sure that they are lint-free to prevent debris from getting into the engine
- Gloves – You’ll need to be wearing a pair of disposable or mechanic gloves to keep your hands clean and protect them from any hot components
- Flashlight – Having a flashlight will come in handy, especially if you’re checking the oil level in low-light conditions or if your motorcycle has limited visibility in the oil inspection area
- Pen and paper – Keep a pen and paper handy to note down the oil level readings and any observations for future reference
Step 2: Look for a safe and level parking location
To make sure you’re getting an accurate oil level reading and your safety during the process, it’ll be important that you find a suitable parking location. You should look for a level surface away from traffic where you’ll have enough space to comfortably maneuver around your bike. A stable and level parking spot will help in preventing any inaccuracies in oil level readings caused by uneven surfaces.
Step 3: Turn off the engine and allow it to cool down
Before you start checking the oil, you will need to turn off your Harley-Davidson bike’s engine and allow it to cool down for a few minutes. Checking the oil when the engine is important can result in inaccurate readings and the risk of burning yourself on hot engine components. You must make sure that your Harley is completely switched off before you proceed.
Step 4: Park your Harley and engage the side stand or center stand
You must carefully park your Harley-Davidson bike on the chosen level surface. Engage either the side stand or the center stand depending on your bike’s model and year. This will help ensure stability and prevent the bike from tipping over during the oil check.

How to check oil in Harley-Davidson motorcycle
Once you have managed to gather the necessary tools and supplies, found the ideal spot, and let the engine cool down, it’ll be time to access the dipstick and check the oil level. But before you’re able to do that, you will need to locate the dipstick in your Harley-Davidson bike. Regularly checking the oil level is important for maintaining optimal engine performance and longevity. This is why you need to know how to check oil levels in your Harley. The steps mentioned below will guide you through the process of how to check oil in Harley-Davidson motorcycle safely and efficiently.
Step 1: Locate the oil dipstick
Different Harley-Davidson bikes have dipsticks located in different regions. You need to refer to your bike’s owner’s manual to identify the exact location of the oil dipstick. In most Harley-Davidson motorcycles, the oil dipstick is located on the side of the engine, somewhere near the exhaust system. It is usually marked with a bright-colored handle or cap for easy identification. You must take time to locate the dipstick and ensure that you have a clear view of it.
Step 2: Remove the dipstick
With the dipstick located, use your fingers to carefully unscrew or pull it out from its housing. The dipstick might have a threaded cap or simply pull out directly, depending on your bike’s model. You should take note that you do not drop the dipstick or allow any dirt or debris to enter the engine through the dipstick opening.
Step 3: Wipe the dipstick clean
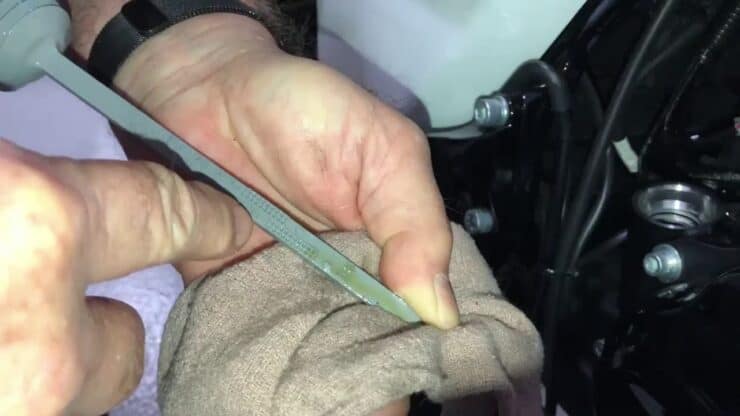
Using a clean rag or paper towel, you must wipe the oil dipstick clean from top to bottom. Make sure that there is no residual oil or debris on the dipstick as this could affect the accuracy of the oil level reading. You must take your time to ensure that the dipstick is completely clean before you proceed.
Step 4: Reinsert the dipstick
Once the oil dipstick is clean, you should reinsert it back into its housing. Make sure that it is properly seated and screwed in. Further, you should also ensure that the oil dipstick is inserted all the way to obtain a more accurate oil level reading.
Step 5: Remove the dipstick once more and check the oil level
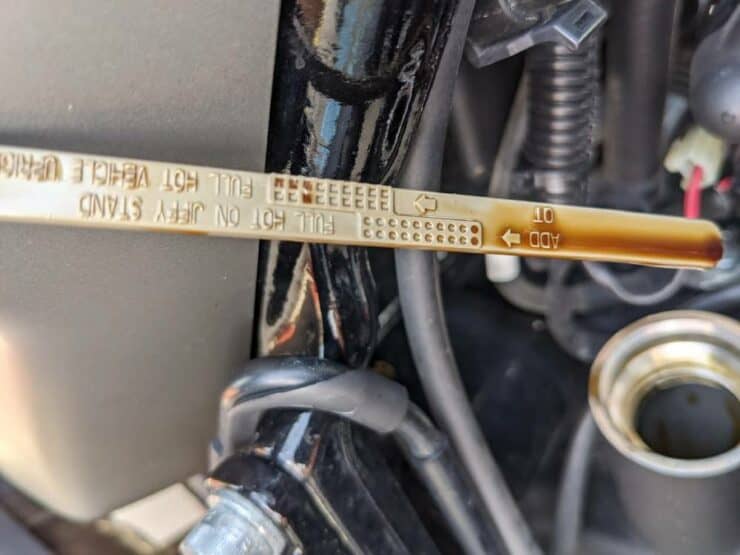
With the dipstick reinserted, you must carefully remove it once again. Observe the oil level markings on the dipstick. Typically, the dipstick will come with indicators such as “Full” or “Add” or other types of markings indicating the appropriate oil level range. The oil level must ideally fall between these markings.
Step 6: Analyze the oil level reading
As you remove the oil dipstick, you need to observe the oil level on it. The oil must appear within the acceptable range indicated on the oil dipstick. If the oil level is below the “Add” mark or significantly below the recommended range, it is an indication of a low oil level. This means your bike is in need of an oil top-up. If the oil level exceeds the “Full” mark, then it means there is overfilling of oil. You will need to drain or adjust the oil level to bring it into the acceptable range.
Step 7: Take note of the oil level and observation
With the help of a pen and paper, you should write down the oil level reading and any observations you make during the process. This will serve as a reference for future maintenance and help you keep track of any changes or patterns in the oil level over time.
Step 8: Reinsert the dipstick and secure it
Once you have noted the oil level, you need to reinsert the oil dipstick back into its housing. You should make sure that it is fully seated and secured. Further, you must also make sure that it is tightly screwed in.
How to change the oil in a Harley-Davidson motorcycle?
Over time, the engine oil in your Harley-Davidson bike becomes contaminated and loses its lubricating properties. Regularly changing the oil in your Harley-Davidson motorcycle is an essential maintenance task that must be carried out from time to time. This is important for ensuring optimal performance while also making sure you’re able to enjoy riding your Harley for a long time. This is why you will need to drain the old oil and refill with fresh oil. If you are struggling with changing the oil in your Harley-Davidson bike, then these steps will help you with that. These instructions will walk you through the process of changing the oil in your Harley.
Further, these instructions are general guidelines. It is important that you consult your Harley-Davidson bike’s owner’s manual for specific details and recommended oil types and capacities for your particular Harley model.
Step 1: Prepare your bike
Before you drain the oil, make sure that your bike is parked on a level surface. Moreover, the engine should be cooled down to prevent any burns. Make sure that you have the necessary clearance to access the oil drain plug and oil filter.
Step 2: Drain the old oil
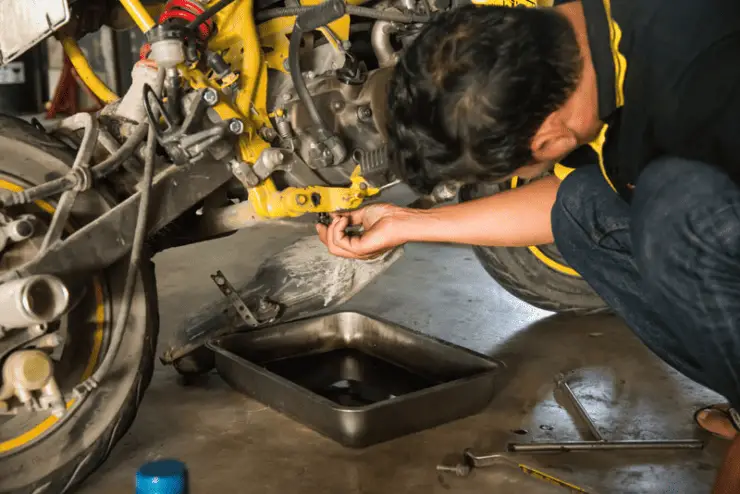
You will need to locate the oil drain plug on the bottom of the engine. You should place the drain pan beneath the drain plug for catching the old oil. Then, make use of an appropriate wrench or socket to carefully loosen and remove the drain plug. Allow the oil to drain into the pan completely.
Step 3: Replace the oil filter
While the oil is draining, you need to locate the oil filter on your bike. Make use of an oil filter wrench or your hands to carefully loosen and remove the old oil filter. Take note of any gaskets or seals that might come off with the filter and make sure that they are replaced with the new ones included with the new oil filter.
Before you install the new oil filter, apply a thin layer of fresh oil to the rubber gasket to make sure you get a proper seal. Carefully install the new oil filter by hand, turning it clockwise until it is snug. Moreover, avoid overtightening the filter.
Step 4: Refill with fresh oil
You must refer to the owner’s manual to determine the proper oil capacity and type for your bike. Using a funnel, you need to pour the recommended amount of fresh oil into the oil fill port on the engine. Take care that you do not overfill oil. It is advised that you should pour in smaller amounts and periodically check the oil level using the dipstick until it reaches the proper range.
Step 5: Check the oil level
Once you have filled the oil, you must reinsert the dipstick and make sure it is secured properly. Start the engine and allow it to idle for a few minutes to allow the oil to circulate properly. After that, turn off the engine and wait for a few minutes to allow the oil to settle. Then, you should remove the dipstick, wipe it clean, reinsert it, and check the oil level. The oil needs to be within the recommended range on the dipstick.

Clean up and proper disposal of the oil
Once you have successfully changed the oil in your Harley-Davidson bike, it’ll be important that you properly dispose of the used oil and clean up any spills or mess you have left behind. Responsible disposal of used oil and ensuring a clean bike will not only help protect the environment but it’ll also maintain the appearance and performance of your Harley. Here is how you need to carry out proper disposal and cleaning up after changing the oil in your Harley.
Cleaning up your Harley and work area
Changing the oil can be quite a messy task. However, with proper cleaning, you will be able to restore your bike’s appearance and prevent oil from damaging components. Here are the steps you will need to follow to clean up your bike after an oil change –
#1. Wipe down the exterior
Make use of clean rags or paper towels and wipe down the exterior surfaces of your Harley. Remember to pay close attention to areas that might have come in contact with oil or debris. This will include the engine, exhaust pipes, frame, and any other accessible parts. For stubborn stains and oil residues, you should use a mild detergent or motorcycle-specific cleaner. Remember to follow the manufacturer’s instructions.
#2. Inspect for leaks
When you are cleaning, you should inspect the area around the drain plug and oil filter for potential signs of oil leaks. If you notice any leaks or drips, you must address them immediately by ensuring proper tightening or seeking professional assistance.
#3. Check for oil spills
You must look for any oil spills or drips on the ground under your bike. If you find any spills, you need to clean them up promptly using an absorbent material, such as cat litter or oil absorbent pads. Dispose of the used absorbent material in accordance with local regulations.
#4. Dispose of cleaning materials responsibly
You must dispose of the used rags, paper towels, or other cleaning materials that came in contact with oil in a safe manner. If they are not recyclable, you should seal them in a plastic bag and dispose of them.
Proper disposal of used oil
Used oil is considered to be hazardous waste. It needs to be disposed of properly to prevent environmental contamination. Here are the steps you will need to follow for handling and disposing of used oil safely.
#1. Use a suitable container
You must transfer the used oil from the drain pan to a clean, leak-free container with a tightly sealed lid. Make sure that the container is specifically designed for storing used oil.
#2. Take it to a recycling facility
Check with your local recycling center or service station for info on used oil recycling. You will find many places in your city with collection points or designated drop-off locations where you can safely dispose of your used oil. You should never dispose of used oil in the trash, down drains, or in the environment.
#3. Follow local regulations
You must adhere to any local regulations regarding the proper disposal of used oil. Different areas might have specific guidelines or restrictions. This is why it is important that you research thoroughly and comply with the rules in your region.
FAQs
What are the steps for checking the oil in my Harley Davidson motorcycle?
To check the oil in your Harley Davidson motorcycle, you will need to locate the oil drain plug and the oil filter. Then, you can drain the oil, replace the filter, and refill the oil tank. It is important to use the correct grade and amount of oil for your model of motorcycle.
What type of oil should I use in my Harley Davidson motorcycle?
The type of oil you should use in your Harley Davidson motorcycle depends on the model and year of your bike. You can find the recommended oil type in your owner’s manual or you can contact your local Harley Davidson dealer. It is important to use the correct type of oil, as it can affect the performance of your motorcycle.
What are the signs of low oil in my Harley Davidson motorcycle?
The signs of low oil in your Harley Davidson motorcycle can include a decrease in engine power, engine noises, and smoke coming from the exhaust. If you notice any of these signs, it is important to check the oil level in your motorcycle as soon as possible. Low oil levels can cause serious damage to your engine if left unchecked.

