Are you ready to check the oil level in your Harley Softail? Owning a Harley Softail means you have to take care of your bike to ensure it runs properly. Checking the oil is an essential part of regular maintenance, and it’s not as hard as you think. Keep reading to discover a step-by-step guide to checking the oil in your Harley Softail. You’ll be ready to hit the open road in no time!
To check the oil on a Harley Softail, warm up the bike, place it on a level surface, remove the dipstick, and check the oil level against the indicators on the stick.
Tools needed for checking the oil on a Harley-Davidson Softail
Regular oil changes are important for maintaining the performance and longevity of your Harley-Davidson Softail. Performing this task yourself will not only save money but it’ll also allow you to develop a deeper understanding of your motorcycle’s maintenance needs. To ensure a smooth and efficient oil change process, it is important to have the right tools at your disposal. Here are some of the tools needed for checking the oil on your Harley-Davidson Softail.
#1. Oil dipstick
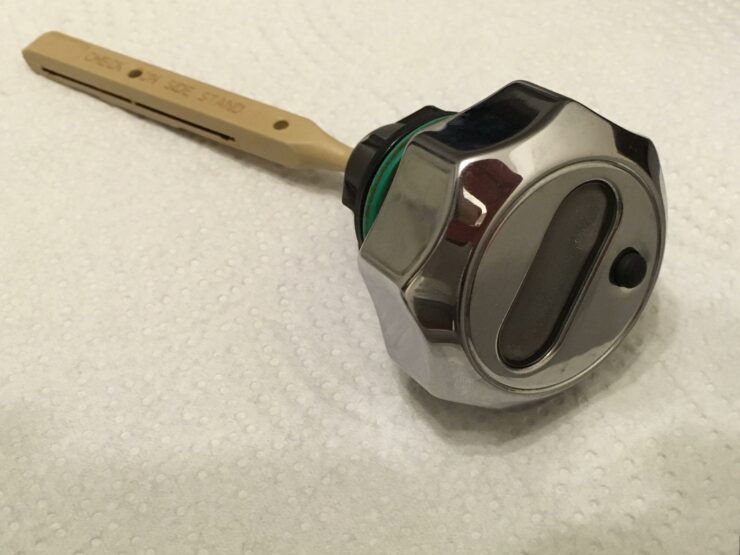
The primary tool you will require for checking the oil level on your Harley-Davidson Softail is an oil dipstick. The dipstick is designed for measuring the oil level within the engine. A Harley-Davidson Softail typically comes with a built-in dipstick located on the oil tank. The dipstick needs to have clear markings indicating the proper oil level range. You should ensure that you are using the correct dipstick for your specific Softail model to ensure accurate readings.
#2. Oil filter wrench
An oil filter wrench will be an important tool for removing and installing the oil filter on your Harley-Davidson Softail. Since oil filters can become tightly secured during use, a properly-sized wrench will help ensure a firm grip and prevent damage to the filter. Select a wrench that fits snugly around the filter to ensure a secure grip and easy removal.
#3. Rags or shop towels
Having a supply of clean rags or shop towels will be important for maintaining cleanliness during the oil-checking process. Use the rags for wiping off any oil residue on the dipstick, ensuring accurate readings and preventing contamination. Moreover, they can be used for cleaning up any spills or drips that might occur during the oil check.
#4. Flashlight
A reliable flashlight will be invaluable when checking the oil on your Harley-Davidson Softail, especially if the oil tank isn’t visible or accessible. Some Softail models come with oil tanks located in slightly obscured areas. A flashlight will help illuminate the oil tank, making it much easier to read the dipstick and ensure accurate oil level measurements.
#5. Oil drain pan
An oil drain pan will be important for collecting the old oil as it drains from your Softail. You should look for an oil drain pan that has the capacity to hold all the oil from your Softail’s engine, ensuring there are no spills or messes during the oil change process. Some drain pans come equipped with a built-in funnel, making it much easier to transfer the used oil to a disposal container.
#6. Funnel
A funnel is needed for the clean and precise pouring of new oil into your Softail’s engine. Opt for a funnel that has a wide mouth and a long, flexible neck to reach the oil fill port easily. This will minimize the risk of spills and allow you to pour the oil accurately without creating a mess.

Preparation before checking the oil on a Harley-Davidson Softail
Before you dive into the oil change process, it’ll be important to prepare your Harley-Davidson Softail and workspace adequately. You should take the time to prepare as it’ll ensure a smooth and efficient oil change experience without minimizing the risk of mistakes or accidents. Here are some of the essential steps you will need to follow to prepare yourself and your Softail for an easy and efficient oil check.
How to Change a Drive Belt on a Harley Softail – A Step-By-Step Guide
#1. Review the owner’s manual
You need to familiarize yourself with the info provided in your Harley-Davidson Softail’s owner’s manual. Pay close attention to the recommended oil type, oil capacity, torque specifications, and any specific instructions or precautions related to the oil check process. Following the manufacturer’s guidelines will ensure that you are able to use the correct oil and perform the oil check correctly.
#2. Choose a suitable workspace
You must select a well-ventilated and well-lit area for performing the oil check. If possible, you should choose a location with a smooth and level surface for ensuring stability and ease of access to your Harley-Davidson Softail. You should be placing a protective covering or tarp under your Softail to catch any spills or drips.
#3. Safety gear
Safety should always be a priority when you’re working on your Softail. Wear protective gloves to shield your hands from oil and other chemicals. Moreover, you should consider using safety glasses or goggles for protecting your eyes from any potential splashes or debris during the oil change process.
#4. Allow the bike to cool down
Before starting the oil check process, you should allow your Harley-Davidson Softail’s engine to cool down. Performing an oil check or oil change on a hot engine can be extremely dangerous and result in burns. Give the engine sufficient time to cool off, ensuring a safe working environment.
#5. Prepare the oil drain pan
Place the oil drain pan under your Harley-Davidson Softail’s oil drain plug. Make sure that it is positioned correctly to catch all the oil as it drains. You should consider using a pan with a built-in funnel or an additional funnel for minimizing spills and make it easier to transfer the used oil to a suitable disposal container.
#6. Warm up the engine
While it isn’t mandatory, warming up the engine for a few minutes before the oil change will help facilitate the draining process. Warm oil flows more freely, which allows it to drain more effectively. However, you should exercise caution when working with a warm engine as some components might still be hot.

How to check the oil on a Harley Softail
Monitoring the oil level in your Harley-Davidson Softail is important for ensuring proper engine lubrication and performance. Regularly checking the oil level will allow you to identify any potential issues and maintain your motorcycle’s optimal running condition. Here are the step-by-step instructions on how to check the oil on a Harley Softail and carry out the task safely and effectively.
Step 1: Locate the oil dipstick
The oil dipstick on your Harley-Davidson Softail is typically located on the right side of the engine, near the front or middle of the bike. You should refer to your Harley-Davidson Softail model’s owner’s manual to identify the precise location. The dipstick is a long, slender metal rod with a handle or knob on the top.
Step 2: Unscrew the oil dipstick
Once you have successfully located the oil dipstick, gently unscrew it from the engine. Twist the dipstick counterclockwise for loosening it from its housing. Be cautious that you don’t drop the dipstick or allow any dirt or debris to fall into the engine.
Step 3: Wipe the oil dipstick clean
Once you have removed the dipstick, use a clean cloth or paper towel for wiping off any residue from its entire length. Make sure that the dipstick is free from any debris or contaminants that might affect the accuracy of the oil level reading.
Step 4: Reinsert the oil dipstick
Once the oil dipstick is clean, you should insert it back into the dipstick tube. You should ensure that it is fully seated and screwed in securely. Avoid overtightening the dipstick to prevent damage.
Step 5: Check the oil level
With the dipstick inserted, you need to wait for a few seconds to allow the oil to settle. After that, you should carefully remove the dipstick once more. Examine the oil level indicator on the dipstick, which is typically marked with two lines or crosshatching.
If the oil level is between the two lines or within the crosshatched area, it indicates that the oil level is within an acceptable range. Your Harley-Davidson Softail has sufficient oil and you’ll be able to proceed with riding plans.
If the oil level is below the lower line or crosshatching, it’ll signify that the oil level is too low. In this case, it’ll be important to add the appropriate amount of oil to bring the level up to the recommended range. You need to consult your Harley-Davidson Softail’s owner’s manual for the specific oil type and quantity required.
If the oil level exceeds the upper line or crosshatching, it’ll mean that the oil level is too high. Excess oil must be drained to bring the level back within the recommended range. Consult the owner’s manual for instructions on how to safely drain excess oil.
Step 6: Maintain the oil dipstick
After you have checked the oil level, you should clean the dipstick once more. Make sure that it is free from any oil or debris. Recap the dipstick securely, screwing it back into the engine. This will help prevent any contamination or leaks.
How to add new oil to your Harley-Davidson Softail
Adding oil to your Harley-Davidson Softail is a rather straightforward process that ensures optimal lubrication and performance. Here are the step-by-step instructions on how to add new oil to your Harley-Davidson Softail. Following these steps will allow you to add new, fresh oil to your Harley-Davidson Softail easily and within a matter of minutes.
Step 1: Locate the oil fill cap
The oil fill cap on your Harley-Davidson Softail is typically located on the top of the engine, near the front or middle of the bike. You should be referring to your Harley-Davidson Softail’s owner’s manual to find out the precise location. The oil fill cap will usually be marked with the word “oil” or an oil can symbol.
Step 2: Unscrew the oil fill cap
Once you have located the oil fill cap, you should gently unscrew it counterclockwise. Make sure that the engine is cool before proceeding. This will release the process and allow for a smooth oil flow.
Step 3: Prepare the oil
Before you pour oil into your Harley-Davidson Softail, you should ensure that you have the correct type and viscosity recommended by the manufacturer. Consult the owner’s manual or contact a Harley-Davidson dealer for determining the appropriate oil for your specific Softail model. It is important to use high-quality oil designed for bikes.
Step 4: Pour oil into the tank
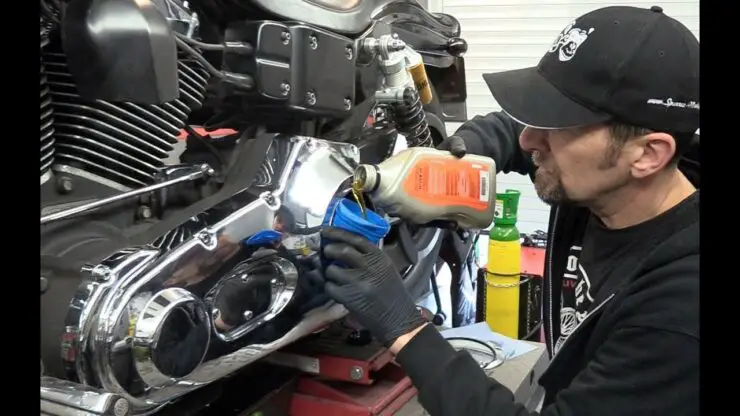
With the help of a funnel, you should carefully pour the recommended amount of oil into the oil tank. Be cautious that you don’t spill oil onto the engine or any other components. Pour slowly and monitor the oil level to prevent overfilling.
Step 5: Reattach the oil fill cap
Once you have poured the desired amount of oil, you should securely attach the oil fill cap by screwing it clockwise. You should ensure that it is tightened properly but avoid overtightening. A snug fit is sufficient to prevent any leaks.
Step 6: Check the oil level
After adding oil to your Harley-Davidson Softail, wait for a few minutes to allow the oil to settle. Use the oil dipstick to check the oil level. Insert the dipstick, remove it, and then examine the oil level indicator for ensuring that the oil level falls within the recommended range.
Step 7: Clean up any oil spills
Clean any spills or drips around the oil fill area with the help of a clean cloth or paper towel. Dispose of any waste oil responsibly by collecting it in a suitable container and taking it to a designated oil recycling center.
How to dispose of used oil on your Harley-Davidson Softail
After you have performed an oil change on your Harley-Davidson Softail, it’ll be important to dispose of the used oil properly. Used oil is typically considered to be hazardous waste and should never be dumped or improperly discarded. Here are the necessary steps you’ll need to follow for connecting used oil and disposing of the oil to ensure safe and eco-friendly disposal.
Step 1: Collect used oil in a container
Immediately after draining the used oil from your Harley-Davidson Softail, you should place a suitable oil collection container beneath the drain plug for catching the oil. Make sure that the container s clean, leak-proof, and specifically designed for collecting used oil. Make use of a funnel if needed to avoid spills.
Step 2: Secure the container and label it
Once the used oil has been collected, seal the container tightly to prevent any leaks during transportation. Make sure that the lid is securely fastened. Moreover, you should label the container clearly as “used oil” to ensure proper identification and handling.
Step 3: Transport the used oil
You should carefully transport the sealed container of used oil to a designated oil recycling or disposal site. Check with your local authorities or waste management facilities for more information on the nearest collection centers or authorized recycling facilities. Make sure that the container is placed securely in your vehicle to prevent any spills or accidents during transportation.
Step 4: Follow disposal instructions
At the disposal site, you should follow the specific instructions provided by the facility. They might have specific guidelines for proper drop-off times, collection procedures, and any additional requirements. It is important to adhere to these instructions to ensure the safe and legal disposal of the used oil.
Step 5: Hand over the used oil
After arriving at the disposal site, you should inform the person that you’ve got used oil for disposal. They’ll guide you through the appropriate procedure, such as where to place the container or if they need any additional info. Hand over the container to the authorized personnel responsible for handling used oil.
Step 6: Clean up and prevent contamination
In the event of any drips or spills during the collection or transportation of used oil, you should clean up the affected areas promptly using absorbent materials like oil-absorbent pads. Avoid washing the oil down the drains or into the soil as it could contaminate water sources and harm the environment.

Symptoms that you need to check and change the oil in your Softail
By regularly checking and changing the oil in your Sportster, you’ll have a better chance of ensuring performance and longevity. Over time, oil can break down and ultimately become contaminated, resulting in reduced lubrication and potential damage to important components. Here are some of the symptoms that will tell you it is time to check and change the oil in your Harley-Davidson Softail. By recognizing these signs, you’ll be able to ensure that your bike’s engine continues to run smoothly.
#1. Dark and dirty oil
One of the most apparent signs that you have to check and change the oil in your Harley-Davidson Softail is that the oil appears dark and dirty. Fresh oil will typically be amber in color but as it ages, it becomes darker and might appear black. Moreover, if you notice particles or debris in the oil, it is an indication that the contaminants have accumulated, compromising its lubricating properties.
#2. Engine noises and increased friction
As oil loses its effectiveness, you might notice an increase in engine noise. Insufficient lubrication can result in increased friction and wear on an engine component, resulting in increased friction and wear on engine components, leading to louder operation. If you’re noticing any unusual or excessive engine noise, it is important to check the oil level and condition promptly.
#3. Reduced engine performance
If your Harley-Davidson Softail’s engine seems sluggish or lacks its usual power and responsiveness, it might be a symptom of old or degraded oil. Impaired lubrication can cause increased friction and hinder the engine’s ability to perform optimally. Changing the oil can restore proper lubrication and help regain lost engine performance.
#4. Overheating
Oil plays an important role in cooling the engine by dissipating heat. When the oil becomes old or contaminated, it loses its ability to dissipate heat effectively, resulting in increased engine temperatures. If you notice your Harley-Davidson Softail’s engine running hotter than usual, it might be an indication that an oil change is needed.
#5. Increased fuel consumption
Old or degraded oil can contribute to increased fuel consumption. Inadequate lubrication can cause the engine to work harder, resulting in reduced fuel efficiency. If you find that you’re having to visit the gas station more frequently than usual, it’ll be worth considering an oil change to restore optimal engine performance and fuel efficiency.
#6. Oil warning light
Many Harley-Davidson Softail models come equipped with an oil pressure warning light on the instrument cluster. In case the oil warning light illuminates while riding, it will be a clear indication that the oil pressure is low or the oil level is insufficient. You need to promptly address the warning by checking the oil level and condition and performing an oil change if needed.
FAQs
What is the purpose of checking the oil on a Harley Softail?
Checking the oil on a Harley Softail is important to ensure the engine is running efficiently and safely. Oil helps to lubricate the engine parts, reduce wear, and keep the engine cool. Regularly checking the oil on a Harley Softail will help to ensure the engine is in good condition and running properly.
What type of oil should I use for a Harley Softail?
Harley Softail engines require motorcycle oil specifically designed for V-Twin engines. It is important to use the correct oil type to ensure the engine is properly lubricated and running optimally.
What steps do I need to take when checking the oil on a Harley Softail?
When checking the oil on a Harley Softail, make sure the engine is turned off and the bike is on a level surface. Remove the oil filler cap, dip the dipstick into the oil tank, and wipe off the oil. Re-insert the dipstick and read the oil level. If the oil level is low, add oil until it reaches the full mark on the dipstick.

