If you’re a Harley owner, you know that customizing your bike is half the fun. But sometimes, customizing can be daunting. Installing Chrome Switch Caps on your Harley shouldn’t have to be a hassle, so we’ve put together this easy how-to guide. With clear instructions and helpful tips, you’ll be switching to Chrome Switch Caps on your Harley in no time. So what are you waiting for? Let’s get started and get your Harley looking its best!
To install Harley chrome switch caps, carefully pry off the old caps using a plastic tool, then press the new chrome caps into place until secure.
Benefits of installing Chrome Switch Caps on your Harley-Davidson bike
When it comes to customizing your Harley-Davidson motorcycle, adding chrome accessories can significantly enhance its style and appearance. One such accessory that can make a major difference is chrome switch caps. These small but impactful additions can greatly transform the look of your handlebar switches, giving your motorcycle a sleek and polished aesthetic. Here are some of the benefits of chrome switch caps and how they can elevate the overall appeal of your bike.

#1.Enhance visual appeal
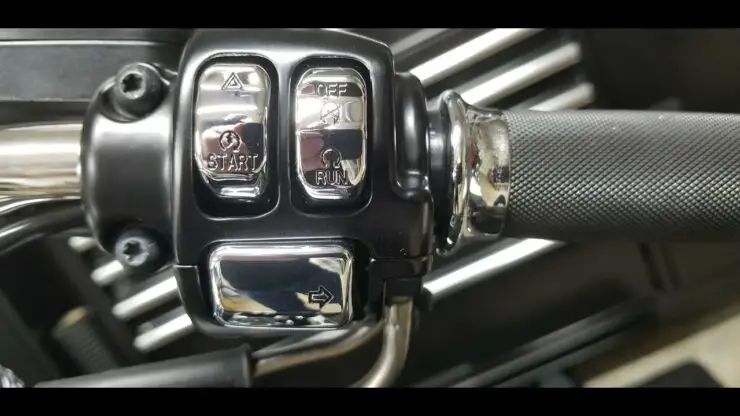
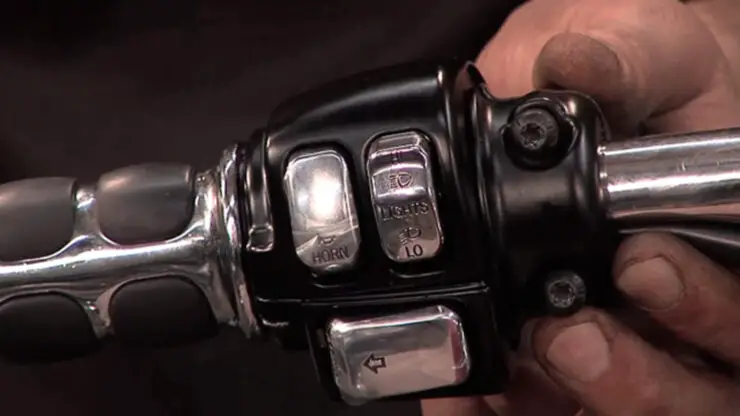
Chrome switch caps are designed to replace the stock plastic caps that come with your Harley-Davidson motorcycle’s handlebar switches. The chrome finish adds a touch of luxury and sophistication, instantly upgrading the look of your bike. The reflective properties of chrome give the switch caps a glossy and lustrous appearance, making them stand out on your handlebars. Whether you are going for a classic vintage look or a modern and sleek design, chrome switch caps can complement various styles and add a touch of elegance to your motorcycle’s overall aesthetics.
#2.Durability and longevity
In addition to their visual appeal, chrome switch caps are built to last. Chrome plating is known for its durability and resistance to corrosion, ensuring that the switch caps will maintain their shiny and pristine appearance for a long time. Unlike plastic caps that can fade, crack, or become discolored over time, chrome switch caps offer superior longevity even when they’re exposed to the elements. This durability will make them a worthwhile investment, providing both style and functionality to your bike.
#3.Easy installation
Installing chrome switch caps is a rather straightforward process that can be done by most Harley-Davidson owners. The caps are designed to fit snugly over the existing switch housings and they come with easy-to-follow instructions. With its basic tools and a little patience, you’ll be able to effortlessly replace the stock plastic caps with chrome ones. This will elevate the appearance of your handlebar switches.
#4.Customization options
Chrome switch caps come in a wide variety of styles and designs, allowing you to customize your bike to your preferences. Whether you prefer a minimalist look having sleek and simple caps or you want more intricate and detailed designs, there are options available to suit your taste. Some switch caps might also feature engraved logos, embossed patterns, or additional accents like crystals or colored inserts. With a wide range of choices available, you’ll be able to switch caps that perfectly complement your motorcycle’s overall style.
Necessary tools and safety gear for installing chrome switch caps
Installing chrome switch caps is a popular customization option for Harley owners who want to enhance the look of their handlebar switches. While the installation process is rather simple, it is important to have the right tools and safety gear available to ensure a smooth and secure installation.
Here are the tools you will need for installing new chrome switches on your Harley-Davidson bike –
#1.Screwdriver set
A set of screwdrivers with different sizes and types (flathead, Philips) will be needed for removing the existing switch caps and installing the new chrome ones.
#2.Allen wrenches
Many Harley-Davidson motorcycles use Allen head screws for securing the switch caps. Having a set of Allen wrenches in different sizes will ensure that you’ve got the right tools for the job.
#3.Pliers
Pliers can be quite helpful for gripping and maneuvering small components during the installation process. They will help in removing or securing the screws while also providing extra leverage when needed.
#4.Torque wrench
A torque wrench is important for tightening screws to the recommended torque specifications. This will ensure that the switch caps have been installed securely without overtightening and damaging the components.
Here is the safety gear needed for installing new chrome switch caps on your Harley-Davidson motorcycle, allowing you to customize your bike with confidence –
#1.Safety glasses
When you are working with tools, it will be important to protect your eyes from potential flying debris. Safety glasses will help shield your eyes from any accidental debris or small metal fragments that might occur during the installation process.
#2.Nitrile gloves
Wearing nitrile gloves is often recommended to protect your hands from grease, dirt, and any sharp edges during the installation. They provide a barrier between your skin and any potential hazards, ensuring a safer and cleaner working environment.
#3.Work mat or soft cloth
Having a work mat or soft cloth to place your motorcycle components during the installation will help protect the paint finish. Moreover, it will also prevent any scratches or damage to the surfaces.
#4.Safety clothing
You must wear appropriate safety clothing that covers your body and offers protection. Avoid wearing loose-fitting clothing as it might get caught in moving parts or tools. Go for closed-toe shoes for protecting your feet during the installation process.
Preparation for installing new chrome switch caps

Installing new chrome switch caps on your Harley-Davidson bike will help you customize your motorcycle and personalize it to your preferences. However, before you dive deep into the installation process, it is important to properly prepare as it’ll help you ensure a smooth and successful installation. Here are some of the essential preparatory steps that you should take before you start installing new chrome switch caps on your Harley-Davidson motorcycle, helping you achieve a professional and polished result.
#1.Read the instruction manual
You must carefully read the manufacturer’s instruction manual provided by the chrome switch caps. Each set might have specific installation steps and guidelines that you need to follow. Familiarize yourself with the instructions for understanding the process and any specific requirements for your particular model of Harley-Davidson bike.
#2.Inspect the existing switch caps
Before you remove the existing switch caps, you must take a moment to inspect their condition. Check for any signs of wear, damage, or corrosion. This inspection will help you identify any potential issues that might have to be addressed during the installation process. If you notice any problem, such as damaged or corroded components, you must consider replacing them before proceeding with the installation.
#3.Clear the work area
You must create a clean and organized work area before you start the installation process. Clear any clutter or obstacles that might be hindering your work or causing damage to your motorcycle. Lay down a protective mat or soft cloth to place the removed parts and tools on to prevent scratching or damaging any surfaces.
#4.Clean the switch housings
Before you install the chrome switch cap, you should clean the switch housings to ensure a proper fit. Make use of a mild cleaning solution and a soft cloth for removing any dirt, debris, or residue from the switch housing. This step will help promote a secure and seamless installation.
#5.Remember to take reference photos
You should take reference photos of the existing switch caps before removing them as it can be helpful during the installation. These photos will serve as a visual guide, ensuring that you correctly position the new chrome switch caps. Pay close attention to the orientation and alignment of the switches and wires to ensure accurate placement.
How to remove old chrome switch caps on your Harley-Davidson motorcycle
If you are looking to update the look of your Harley’s handlebar switches, removing the old chrome switch caps will be a necessary step. Removing the existing switch caps will allow you to prepare the switches for the installation of fresh, stylish chrome replacements. Here are the steps you need to follow for removing old chrome switch caps from your Harley-Davidson motorcycle, ensuring a smooth and successful transition to new ones.
Step 1: Disconnect the battery
Before working on any electrical components, it’ll be important to disconnect the battery to prevent any accidental electrical contact or short circuits. Follow the instructions mentioned in your motorcycle’s owner’s manual to safely disconnect the battery.
How to Easily Charge Your Harley-Davidson Sportster Battery?
Step 2: Identify and remove screws or fasteners
Examine the existing switch caps to identify the screws or fasteners that secure them in place. Typically, they will be one or two screws on the underside of the switch cap. Make use of an appropriate screwdriver or Allen wrench to carefully remove these screws. Keep the screws in a safe place for later use.
Step 3: Gently remove the switch caps
Once the screws have been removed, you should gently pry off the old switch caps using your fingers or a small flathead screwdriver. Take care that you do not apply excessive force or damage the surrounding components. You need to apply slow and gentle pressure to release the switch caps from the housing.
Step 4: Disconnect wires
In some cases, the switch caps might be connected to wires. If this is the case, you should carefully disconnect the wires by gently pulling them apart. Take note of the wire connections and their corresponding locations for reinstallation later.
Step 5: Inspect the switch housings
Once the old switch caps have been removed, you should take a moment to inspect the switch housings. Check for any signs of wear, damage, or corrosion that might require attention before installing the new chrome switch caps. If needed, you should clean or address any issues before processing.
How to install Harley chrome switch caps?
Once you have successfully removed the old switch caps on your Harley, the next step would be to install the new ones. As long as you know the right steps, you will be able to install the new chrome switch caps. Here are the steps that you need to follow as they’ll answer your question about how to install Harley chrome switch caps. These steps will ensure a secure and polished installation within a matter of minutes.
Step 1: Prepare the switch housing
Before you install the new switch caps, you should prepare the switch housing by ensuring it is clean and free from any debris or residue. Make use of a mild cleaning solution and a soft cloth for gently cleaning the switch housing surfaces. This step will help ensure a secure fit and a clean, polished appearance.
Step 2: Align the switch cap
Carefully align the new switch cap with the switch housing. Pay close attention to the orientation and positioning of the switch cap to ensure it is correctly aligned with the switches beneath. Reference the photos that you took during the removal process to guide you in correctly placing the new switch cap.
Step 3: Secure the switch cap
Once the switch cap has been aligned, you should gently press it into place on the switch housing. Make sure it fits snugly and securely without any gaps or misalignments. Some switch caps might require screwing them into place using the screws or fasteners you removed during the removal process. If so, make use of the appropriate screwdriver or Allen wrench for tightening the screws until they are secure.
Step 4: Reconnect the wires
If your switch caps have been connected to wires, carefully reconnect the wires as per their respective connections. Make use of the reference photos you took earlier to guide you in connecting the wires correctly. Take care that you are not working the connections and make sure that they are fastened securely.
Apply the finishing touches after installing the new chrome switch caps
Once you have successfully installed the new chrome switch caps on your Harley-Davidson motorcycle, it’ll be time to add the finishing touches to ensure a complete and polished installation. Reattaching the handlebar grips and testing the switch cap are important final steps that contribute to the overall functionality and aesthetics of your bike. Here are the steps you need to follow for applying the finishing touches to the installation and enjoying the full benefits of your new chrome switch gaps.

Step 1: Reattach the handlebar grips
Start by removing any adhesive or grip residue from the handlebars and the inside of the handlebar grips. Clean the handlebar surface using a mild solvent or grip glue remover, followed by a soft cloth for ensuring a clean and smooth surface to reattachment.
Next up, you need to apply a thin layer of grip glue or adhesive to the inside of the handlebar grips. Be careful that you don’t use excessive glue as it might cause the grips to slip or become difficult to remove in the future. Align the grips with the handlebars and slowly slide them into play, ensuring that they are positioned evenly and securely.
Once the grips are in position, you must hold them firmly for a few minutes to allow the adhesive to set. Follow the specific instructions provided by the grip manufacturer regarding curing time.
Step 2: Test the switch cap functionality
After you have reattached the handlebar grips, it’ll be important to test the functionality of the switch caps to ensure that they’re working properly. Press each switch for verifying that it engages smoothly and activates the intended function. Pay close attention to the responsiveness and consistency of the switch operation.
Check for any abnormal or sticking behavior that might require adjustment. If you notice any problems, such as switches not functioning or inconsistent operation, you should carefully review the installation and troubleshoot the problem accordingly. It’ll be better to address any concerns before taking your bike out for a ride.
Step 3: Inspect the overall installation
Take a moment to inspect the overall installation of the new chrome switch caps. Make sure that the switch caps are attached securely, aligned properly, and visually appealing. Double-check that the handlebar grips are snugly in place and that there are no loose components.
Examine the wiring connections, ensuring that they are securely fastened and free from any potential hazards or interference with other motorcycle components.
Troubleshoot common issues with Chrome Switch Caps
Chrome switch caps can be a stylish and functional addition to your Harley-Davidson motorcycle. These additions enhance the overall look and feel of the handlebar switches. However, like any other components, issues might arise with the chrome switch caps that need troubleshooting. Here are some of the common problems that you might encounter with chrome switch caps on your Harley-Davidson motorcycle as well as troubleshooting tips to resolve these issues.
Loose or misaligned switch caps
One of the common problems is that switch caps might become loose or misaligned over time. This can result from vibrations, inadequate installation, or regular wear and tear. Loose or misaligned switch cabs can affect the functionality and aesthetics of your motorcycle.
To fix this issue, start by inspecting the switch caps for any visible signs of looseness or misalignment. If the caps are loose, try to tighten the screws or fasteners that secure them in place. Ensure that the caps are aligned carefully with the switches beneath. If needed, you should remove the caps, clean the surface, and reinstall them, paying close attention to alignment and securing them tightly.
Stuck or unresponsive switches
Another common issue that might pop up is stuck or unresponsive switches. This can occur due to dirt, debris, or moisture buildup around the switches or improper installation of the switch caps.
To fix this issue, begin by cleaning the switches and the surrounding area with a mild solvent or electrical contact cleaner. Make use of a small brush or compressed air for removing any dirt or debris that might be affecting the switch’s movement. Make sure that the switch caps are properly aligned and not obstructing the operation of the switches. If the issue persists, you must consider replacing the switch caps or looking for professional help.
Fading or discoloration of chrome finish
Over time, chrome finishes on switch caps might fade or develop discoloration due to exposure to the elements or improper maintenance.
To prevent fading and discoloration, make sure that you regularly clean and polish the chrome switch caps using appropriate cleaning problems specifically designed for chrome surfaces. You must follow the manufacturer’s instructions and recommendations for cleaning and maintenance. If the riding or discoloration is severe, you should consider replacing the switch caps with new ones.
Electrical issues
In some situations, electrical issues might arise after installing chrome switch caps. This can include malfunctioning switches, flickering lights, or intermittent electrical problems.
To fix this issue, you should check all the electrical connections, ensuring that they are securely fastened and free from corrosion or damage. Verify that the wiring connections within the switch caps are correct and tight. If the problem still persists, you must consult a qualified mechanic or electrician to diagnose and resolve any electrical issues.
FAQs
What tools are needed to install Harley chrome switch caps?
You will need a few basic tools to install Harley chrome switch caps, such as a Phillips head screwdriver, a flat head screwdriver, pliers, and a pair of needle nose pliers. You may also need a wire stripper and some electrical tape, depending on the type of switch caps you are installing.
What is the process for installing Harley chrome switch caps?
The process for installing Harley chrome switch caps is fairly straightforward. First, you will need to locate the screws that hold the switch caps in place and remove them using a Phillips head screwdriver. Next, carefully remove the switch caps, being careful not to damage the wiring. Once the switch caps are removed, you can install the new caps by reattaching the screws. Make sure the screws are tightened securely and that all of the wiring is connected properly.
Are there any safety precautions to take when installing Harley chrome switch caps?
It is important to be careful when working with electrical components and to keep your hands away from any sharp edges. Make sure that all of the wiring is connected properly and that the screws are tightened securely. Wear protective gloves and eye protection when working with electrical components. Additionally, be sure to read

