Welcome Harley Davidson riders! If you’re looking to upgrade your bike with heated grips, you’re in the right place. Heated grips can make a cold winter ride much more enjoyable, and you don’t need to be a professional mechanic to install them.
To install heated grips, remove the old grips, install the new heated grips onto the handlebar, connect them to the bike’s electrical system, and secure all wiring along the handlebars. Use the on/off switch to test function.
This easy step-by-step guide will walk you through the process of installing heated grips on your Harley Davidson. So what are you waiting for? Read on and learn how you can make your winter rides a little more comfortable.
Tools and equipment needed when installing heated grips
Heated grips, as the name suggests are handlebar grips that provide warmth to the biker’s hands. They’re designed to compact the discomfort caused by cold weather. Thanks to these grips, the rider will be able to maintain a firm grip on the handlebars while keeping their hands cozy and functional. Whether you’re riding through the cold morning breeze or encountering the extreme winter landscape, heated grips will make sure that your hands remain comfortable, reducing the risk of numbness and improving overall control.
While the process to install grips on your Harley-Davidson motorcycle might seem straightforward, it is important that you approach it with the right tools and equipment to ensure you’re getting a successful installation without compromising your safety.
Here are some of the key tools and equipment you will require to install heated grips on your Harley-Davidson bike –
#1. Screwdriver
Depending on the model of your Harley-Davidson motorcycle, you will require a screwdriver for removing the existing handlebar grips. Make sure that you have the appropriate screwdriver, whether it is a flathead or Philips. This will allow you to effectively loosen or remove the screws holding the old grips in place.
#2. Lubricant
Applying a small amount of lubricant like soapy water or grip glue will facilitate the installation of new heated grips. The lubricant will help the grips easily slide onto the handlebars smoothly, making the process much easier and preventing any potential damage.
#3. Wire cutter and stripper
As heated grips require electrical connections, it will be important to have wire cutters and strippers handy. These tools will allow you to trim and strip the wires accurately, ensuring proper connections and minimizing the risk of electrical issues.
#4. Electrical tape
Electrical tape is important to secure the wiring connections and protect them from exposure to moisture, which could cause short circuits. Make use of electrical tape for wrapping the connections securely, ensuring they remain intact and well-insulated.
#5. Heat gun or hair dryer
A heat gun or hair dryer can be quite useful when it comes to activating the adhesive on the heated grips. Applying heat to the grips after installation will help them bond firmly to the handlebars. This will ensure a secure fit.

How to install heated grips Harley-Davidson: Disassemble the handlebars
If you are planning to install heated grips on your Harley, one of the first things you need to do is disassemble the handlebar to remove the existing grip. This process will allow you to prepare the handlebar for easy installation of the new heated grips. Here are the steps you need to follow to disassemble the handlebars to ensure a smooth and successful installation of heated grips –
Step 1: Disconnect the battery
Before you start working on any electrical components, including grips and handlebars, it’ll be important to disconnect the battery of your bike. This precautionary measure will eliminate the risk of electrical mishaps or short circuits during the disassembly process. You should ensure that you follow the manufacturer’s instructions for disconnecting the battery, which typically involves removing the negative terminal.
Step 2: Remove the bar ends
Bar ends are usually found at the ends of handlebars and they can be secured using screws or bolts. Make use of an appropriate tool such as a screwdriver or Allen wrench for loosening and removing the screws holding the bar ends in place. Once the screws have been removed, gently slide or twist the bar ends to detach them from the handlebars.
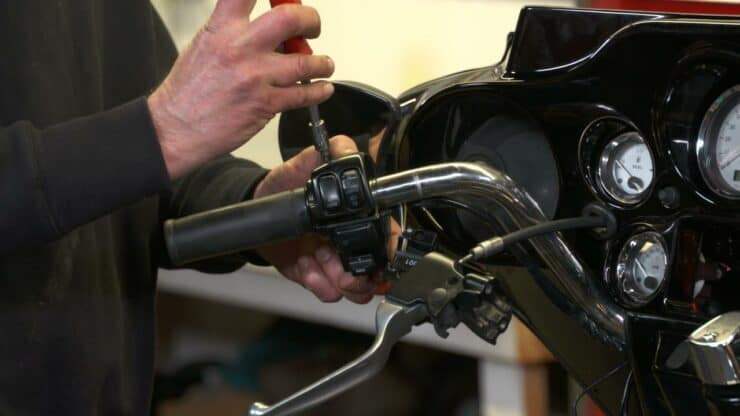
Step 3: Unscrew the existing grips
The existing grips will typically be secured to the handlebars using screws or adhesive. For unscrewing the grips, you must locate the screws at the ends or under the grips. Make use of the appropriate screwdriver for loosening and removing the screws. In some cases, you might have to peel back or cut away the grip material for accessing the screws. Be careful that you do not damage the handlebars when doing this.
Step 4: Remove the existing grips
Once the screws have been removed, you will be able to start removing the existing grips from the handlebars. Gently twist and pull the grips away from the handlebars, applying even pressure throughout. If the grips are held in place with adhesive, you might have to use a lubricant like soapy water or grip glue for loosening the grip’s bond with the handlebars. Slowly work your way around the grip, applying the lubricant as required, until you can remove the grip from the handlebar completely.
How to install heated grips Harley-Davidson: Secure the heated grips
Once you have disassembled the handlebars and prepared them for installation, the next step would be to secure the heated grips. Here are the steps you will need to follow the secure the heated grips in your journey to installing new heated grips on your Harley.
Step 1: Place the controller unit
Before you start the installation process, you must locate a suitable position on your motorcycle to mount the controller unit for the heated grips. The controller unit will be responsible for adjusting the heat settings and controlling the operation of the grips. It should be easily accessible and within reach while riding. Some common mounting locations for the controller unit include the handlebar clamps, the top triple clamp, and the dash area. You should ensure that the chosen location doesn’t interfere with other components or hinder your ability to operate the bike safely.
Step 2: Attaching the wires
You must carefully read the manufacturer’s instructions and identify the wiring harness or wires included with the heated grips. These wires will connect the controller unit to the heated grips and the bike’s electrical system. Begin by routing the wires along the handlebars, ensuring that they are secured and protected from any potential damage. Use zip ties or adhesive clips for securing the wires along the handlebars or existing wire harnesses on your motorcycle. Avoid placing the wires near any moving parts or areas that generate excessive heat.
Step 3: Connect the wires to the controller unit
Once the wires have been routed, you’ll be able to connect them to the appropriate terminals on the controller unit. The wires should have clear indications or color-coding for easy identification. You should be referring to the manufacturer’s instructions or wiring diagram to make sure you get the correct connections. Typically, the wires will include connections for ground, power, and control. You must ensure that each wire is securely connected to its designated terminal on the controller unit, using the recommended method like soldering or crimping. You must verify that all the connections are tight and properly insulated.
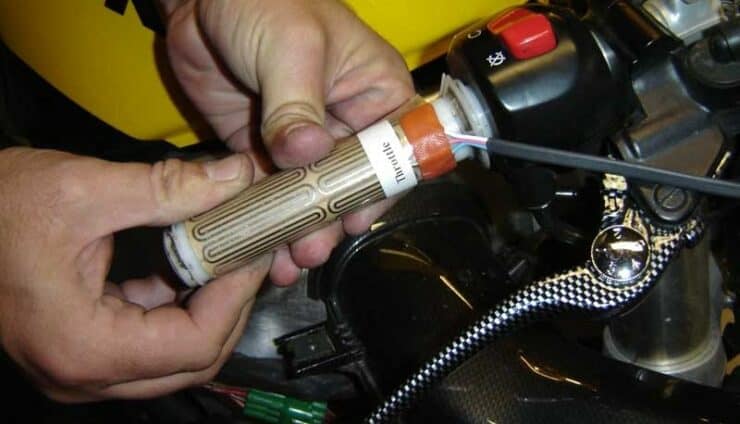
Step 4: Install the heated grips
Once the wires are properly connected to the controller unit, it will be time to install the heated grips. Apply a small amount of lubricant, such as grip glue or soapy water, to the handlebars for facilitating the installation. The lubricant will help the grips slide onto the handlebars smoothly and ensure a secure fit. You must gently slide the heated grips onto the handlebars, aligning them with the desired hand positions. You must ensure that the grips are positioned evenly on both sides of the handlebars and provide a comfortable grip for your hands.
Step 5: Activate the adhesive and carry out the final adjustments
Once the heated grips are in place, you will need to activate the adhesive to ensure a secure bond. Some heated grips come with adhesive-backed strips or patches that require heat to activate the adhesive. Make use of a heat gun or a hairdryer for warming the grips evenly. This step will help the grips adhere firmly to the handlebars and prevent them from sliding or rotating during use. Once you have activated the adhesive, make the necessary final adjustments to the grip positions to ensure optimal comfort and alignment.

How to install heated grips Harley-Davidson: Reassemble the handlebars
Once you have installed the heated grips on your motorcycle, it’ll be time to reassemble the handlebar and ensure everything is properly secured. Reassembling the handlebars is an important step when installing heated grips on your Harley. Further, it will also ensure that the grips are in the optimal position for comfortable and safe riding. Here are the steps you will need to follow to install heated grips on your Harley-Davidson bike.
Step 1: Position the handlebar
Start by positioning the handlebar in the desired riding position. You must take into account your personal riding style and comfort preferences. Adjust the handlebar to an ideal height and angle that delivers an ergonomic riding position. It should also allow for relaxed arm and hand positioning. You must consider the reach of the controls, including the throttle, clutch, and brake. Make sure that they’re easily accessible without straining your wrists or arms. Take time to find the optimal position that suits your riding needs.
Step 2: Align the handlebar controls
After positioning the handlebar, you must align the controls, including the throttle grip, clutch lever, and brake lever. Make sure that the controls are properly aligned and parallel to the ground. Moreover, check that the throttle grip rotates smoothly without any interference or binding. Aligning the controls easily will ensure optimal functionality and ease of operation while riding.
Step 3: Tighten the handlebar clamps
Once the handlebar is in the desired position and the controls are properly aligned, it’ll be time to secure the handlebar using the clamps. Start off by tightening the handlebar clamps gradually and evenly. Make use of appropriate tools, such as a wrench or Allen key for tightening the clamp bolts. Initially, have a snug fit before gradually increasing the torque to the manufacturer’s recommended specifications. Make sure that the clamps are tightened uniformly to prevent any imbalance or slippage of the handlebar during riding.
How to install heated grips Harley-Davidson: Verify and test the heated grips
Once you have successfully installed heated grips on your Harley, it’ll be important to test the functionality before you hit the road. Verifying and testing things will ensure that the grips are connected properly and that the heat settings are ideal. Once everything is in order, you will be able to enjoy a comfortable and warm ride in colder weather. Here is how you can verify and test that the heated grips are installed properly and working as expected –
Step 1: Verify electrical connections
Begin by double-checking all electrical connections related to the heated grips. Inspect the wires and make sure that they are securely connected to both the grips and the power source. Verify that the wiring harness is routed properly and not interfering with other components. Check for loose connections or exposed wiring that might pose a safety risk. Further, ensure that the connections are tight, and if needed, make use of zip ties or electrical tape to secure the wiring and prevent it from moving or rubbing against other parts of the bike.
Step 2: Activate the heated grips
Using the controller unit or designated buttons, activate the heated grips. Most heated grips come with multiple heat settings, allowing you to easily adjust the temperature according to your preference and the weather conditions. Begin with the lowest heat setting and gradually increase it to test the functionality of the grips. Pay close attention to any indicators or lights on the controller unit that show the grips are heating up.
Step 3: Monitor grip temperature
Allow the heated grips to warm up for a few minutes and touch them with your bare hands to check the temperature. Ensure that both grips are heating evenly and giving the desired level of warmth. Remember that the grips might feel slightly cooler near the outer edges because of heat dissipation. If you notice any significant temperature differences or uneven heating, consult the instructions mentioned in the owner’s manual or look for professional assistance.

Step 4: Adjust heat settings
You should test the functionality of the heat settings by adjusting them up and down. Confirm that the grips respond to the changes in the heat settings and adjust accordingly. It is important that you find the ideal temperature that provides comfort without becoming too hot or uncomfortable during extended use. Moreover, you should experiment with different heat levels to determine the ideal setting.
Step 5: Check for proper grip operation
When testing the heated grips, pay close attention to the overall operation and functionality of the grips. Make sure that the grips remain securely attached to the handlebars and do not rotate or slip during use. Test the grip’s texture and ensure that it provides adequate grip and control while riding. If you encounter any problems with the grips or their operation, troubleshoot them or consult a professional.
Step 6: Perform the final safety checks
Once you have verified the connections and tested the heat settings, you must perform a final safety check before riding. You must make sure that all the wires and connections are secure and not obstructing any moving parts. Double-check that the grips are attached properly and functioning correctly. Further, ensure that the controls, such as the throttle, clutch, and brake are not impeded by the grips or wiring. You should also be confirming that all bolts and fasteners are tightened to the manufacturer’s specifications.
Troubleshoot common issues with heated grips
Heated grips certainly provide great comfort and better control for Harley-Davidson bikes during cold weather conditions. However, like any other electrical system, even heated grips can often encounter issues that need troubleshooting. Once you know the root cause of the problem, you will be able to carry out the steps to resolve it. Here are some common issues that you might encounter with heated grips on your Harley-Davidson bike and how to troubleshoot them.
No heat from the grips
If you notice that the heated grips are not producing any heat, there are multiple reasons to investigate. For starters, you need to check the power source. Make sure that the power source, typically the battery, is connected properly and has a sufficient charge. Check the battery terminals for any corrosion or loose connections.
Make sure that the controller unit is functioning correctly and sending power to the grips. Check for error codes or indicators on the controller that might provide insight into the issue. Examine the wiring connections from the controller unit to the grips. Look out for any loose or disconnected wires and ensure that they are properly connected. Check for potential signs of damage or frayed wires.
If one of the grips is not producing heat, it can indicate a problem with that particular grip. Disconnect and inspect the wiring for that grip, ensuring a proper connection.
Uneven heat distribution
Uneven heat distribution across the heated grips can be uncomfortable and might indicate an underlying issue. You should make sure that the heated grips are installed correctly and evenly on the handlebars. Adjust the grip positions if needed to achieve better heat distribution.
Verify that the wiring connections for both grips are secure and properly connected. Loose or poorly connected wiring could result in uneven heat distribution. The controller might have different heat settings for each grip. Check if the heat settings are properly balanced or if one of the grips is set at a different temperature.
Make use of a temperature gun or an infrared thermometer to measure the temperature across the grips. If there are any significant temperature differences, it might indicate a problem with the grip or the heating element.
Grip overheating or excessive heat
Excessive heat from the grips can be uncomfortable or even potentially dangerous. There are different ways you can address this issue and troubleshoot it. Make sure that the heat settings are not set too high. Experiment with different heat levels to find the optimal setting that provides ample warmth without excessive heat.
Inspect the grips and wiring for any signs of insulation damage or wear. Damaged insulation can cause the heat to escape and make the grips hotter than intended. Make sure that the grips are properly installed, with the heating element positioned correctly within the grip. Improper installation can result in excessive heat in localized areas.
You should also consider ambient temperature. You must keep in mind that the ambient temperature can affect the perceived heat from the grips. In cold weather, the grips might feel warmer than usual.
Also read: Harley-Davidson vs. Yamaha
FAQs
What tools are required to install heated grips on a Harley Davidson motorcycle?
The tools required to install heated grips on a Harley Davidson motorcycle include a T-27 Torx bit, a Phillips head screwdriver, a flathead screwdriver, a pair of pliers, and a 10mm socket. Depending on the model and year of your bike, you may also need an additional Torx bit, wire cutters, and a wire crimper.
What is the process for installing heated grips on a Harley Davidson motorcycle?
The process for installing heated grips on a Harley Davidson motorcycle begins with disconnecting the negative battery cable. Then, the old grips are removed and the heated grips are installed in their place. The wiring harness is then connected to the heated grips and routed to the battery, and the connections are made and secured with the appropriate tools. Finally, the battery is reconnected and the heated grips are tested.
What safety precautions should I take when installing heated grips on a Harley Davidson motorcycle?
When installing heated grips on a Harley Davidson motorcycle, it is important to take safety precautions to ensure that the job is done correctly and safely. Make sure to disconnect the negative battery cable before beginning the installation process and wear protective gloves to protect against any sharp edges

