Are you looking to customize your Harley Sportster? This quick and easy guide will show you how to remove the primary cover, the first step in making your motorcycle look and feel exactly the way you want it! Whether you’re an experienced mechanic or a complete novice, this guide will get you started on the right path towards giving your bike a truly unique look. Read on to find out how to remove the primary cover from your Harley Sportster.
To remove the primary cover on a Harley Sportster, drain the primary fluid, unscrew the primary cover bolts, and carefully detach the cover.
Necessary tools and preparation before removing the primary cover
The primary cover of a Harley-Davidson Sportster is an important component that houses the primary drive, clutch, and transmission. At times, it’ll be important to remove the primary cover for maintenance, repairs, or customization. To make sure you have a smooth and efficient process, it’ll be important to have the right tools and carry out the right preparatory steps before starting the process. Here are some of the tools and preparatory steps you’ll need to follow before you can start removing the primary cover on your Harley-Davidson Sportster.
#1. Gather the necessary tools
Before starting the process, you should make sure that you have the necessary tools and equipment readily available. These typically include a socket set, wrenches, torque wrench, Allen keys, screwdrivers, gasket scraper, sealant, and more. Refer to your bike’s service manual to determine the specific sizes required for your particular Sportster model. With these tools and equipment on hand, you’ll be well-equipped to tackle the task with precision and confidence.
#2. Safety gear
Working on a motorcycle will involve handling small components, removing bolts and screws, and potentially encountering sharp edges. Wearing safety gear like safety glasses will help protect your eyes from debris or accidental contact whereas gloves will protect your hands from cuts, burns, or harmful substances.
#3. Choose the right working area and position your bike securely
Select a clean and well-lit working area that offers sufficient space for the disassembly and organization of parts. Ideally, you should use a designated workbench or a clean garage floor covered with a soft mat or blanket for protecting your bike’s finish.
Place your Sportster on a stable and level surface. If possible, you should use a motorcycle lift or center stand for providing stability and ease of access to the clutch assembly.
#4. Disconnect the battery
To ensure safety and prevent accidental electrical issues, disconnect the battery by removing the negative terminal connection. This step will protect both you and your bike from potential electrical hazards during the removal process.
#5. Document and label connections
Before disconnecting any wires or hoses attached to the primary cover, you should take clear photos or make detailed notes of their location and routing. This documentation will serve as a reference when reassembling the components later. Moreover, labeling connections with tape or small tags will further facilitate an organized reassembly process.

How to remove primary cover on Harley Sportster
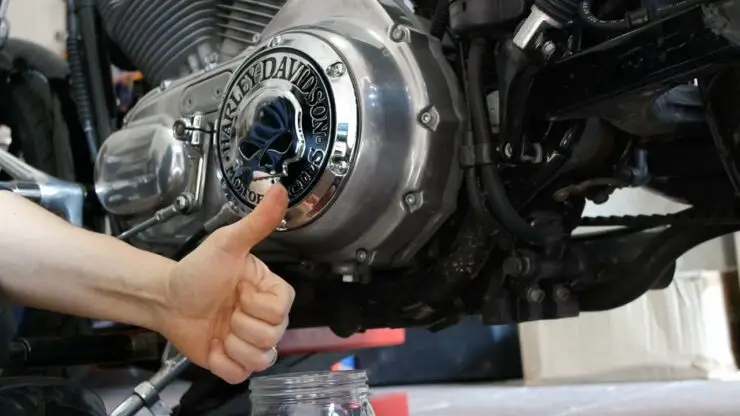
Removing the primary cover is an important task for Harley-Davidson Sportster owners who want to perform maintenance and repairs on their bikes. This process will allow you to access different internal components. Here are the steps you’ll need to follow to remove a primary cover on your Harley-Davidson Sportster.
Step 1: Identify and remove necessary components
Before removing the primary cover, it’ll be important to remove certain components that obstruct access. This can include the footpeg, shifter linkage, derby cover, and other parts specific to your Sportster model. Consult the service manual for the correct procedures and precautions associated with removing these components.
Step 2: Loosen the primary cover bolts
Using a socket or wrench, start loosening the bolts securing the primary cover. It is important to follow the specific bolt loosening sequence outlined in the service manual for ensuring an even release of pressure. Loosen each bolt gradually, working in a crosswise pattern, until all the bolts have been loosened sufficiently. Take care that you don’t strip the bolt heads or damage the surrounding areas.
Step 3: Tap and pry the primary cover
After you have loosened the bolts, lightly tap the primary cover using a rubber mallet or soft-faced hammer. This will help break any residual sealant or gasket adhesion. Once loosened, you should use a flathead screwdriver or a suitable prying tool to gently pry the primary cover away from the engine casing. Exercise caution to avoid damaging the mating surfaces.
Step 4: Remove the primary cover
With the primary cover sufficiently separated from the engine casing, you should carefully lift it away, ensuring that any remaining wires, hoses, or electrical connections are detached safely. Keep track of any small components or gaskets that might come off with the cover.
How to remove the clutch cable on your Harley-Davidson Softail
The clutch cable on a Harley-Davidson Sportster plays a key role in engaging and disengaging the clutch mechanism. There are occasions when it becomes necessary to disconnect the clutch cable, such as replacing the cable, performing maintenance on the clutch assembly, or customizing your bike. Here are the steps to follow for removing the clutch cable on your Harley-Davidson Sportster.
Step 1: Locate the clutch cable
Identify the clutch cable, which runs from the clutch lever on the handlebars to the primary cover on the engine casing. You should familiarize yourself with the cable routing and any fasteners or retaining clips securing the cable along its path.
Step 2: Remove the clutch cable
Using an appropriate-sized wrench, you should loosen the locknut securing the clutch cable adjustment screw located on the primary cover. Once the locknut is sufficiently loosened, you should rotate the adjustment screw in a counterclockwise direction to create slack in the cable.
Next up, you’ll need to locate the cable end within the primary cover. It’ll typically be attached to the clutch release mechanism. Release any retaining clips or fasteners holding the cable end in place. With the slack created, you should gently pull the cable end out of the primary cover, ensuring that the cable is free from any obstructions or entanglements.
Step 3: Disconnect the clutch cable from the clutch lever
Moving to the clutch lever on the handlebars, you should locate the cable’s connection point. Loosen the retaining bolt or nut securing the clutch cable to the clutch lever assembly using the appropriate wrench. Once loosened, you should carefully slide the cable end out of the lever assembly.
Step 4: Inspect and replace if needed
You should take this opportunity to inspect the clutch cable for any signs of wear, damage, or fraying. If any issues are identified, it is advised that you should replace the cable for maintaining optimal clutch performance and safety.

How to remove the clutch spring retaining pin on a Harley-Davidson Sportster
The clutch spring retaining pin on a Harley-Davidson bike is an important component that holds the clutch springs in place. There might be instances where you’ll have to remove the clutch spring retaining pin, such as clutch maintenance, replacement, or customization. Here are the steps you’ll need to follow for removing the clutch spring retaining pin on a Harley-Davidson Sportster.
Step 1: Locate the clutch assembly
Identify the clutch assembly on your Harley-Davidson Sportster, which is typically located on the left side of the engine. You should familiarize yourself with various components, including the clutch pin, clutch springs, and pressure plates. Locate the clutch spring retaining pin, which is a small cylindrical pin securing the clutch spring in place.
Step 2: Remove the clutch cover
For accessing the clutch assembly, start by removing the clutch cover. Refer to your bike’s owner’s manual for specific instructions on removing the clutch cover as the process might vary slightly between different Sportster models.
Typically, the clutch cover is held in place by a series of bolts or screws. Use the appropriate socket or wrench for loosening and removing these fasteners, allowing you to lift the clutch cover away from the clutch assembly.
Step 3: Locate the clutch spring retaining pin
With the clutch cover removed, the clutch assembly will get exposed. Look for the clutch spring retaining pin, which should be visible near the clutch hub or pressure plate. The pin is often positioned through holes in the clutch hub and is secured by circlips or retaining rings on each end.
Step 4: Remove the circlips or retaining rings
For removing the clutch spring retaining pin, you should first remove the circlips or retaining rings on each end. Use a pair of circlip pliers or small screwdrivers to carefully compress and remove the circlips or retaining rings. Take caution to prevent them from flying off or getting lost during removal.
Step 5: Tap and remove the clutch spring retaining pin
Once the circlips or retaining rings have been removed, you can go ahead and remove the clutch spring retaining pin. Lightly tap the pin with a soft-faced hammer, applying gentle pressure to coax it out of the clutch hub or pressure plate. Make sure that you tap evenly to avoid damaging the surrounding completely.
As you’re tapping, the clutch spring retaining pin will slide out gradually. Use your fingers or a pair of pliers to grip the pin and pull it out completely.

How to remove the clutch hub and pressure plate on a Harley-Davidson Sportster
Removing the clutch hub and pressure plate will be another critical task for Harley-Davidson Sportster owners who have to perform clutch maintenance, repairs, or customization. This process will allow you access to the clutch plates, clutch basket, and other components within the clutch assembly. Here are the steps you should follow for removing the clutch hub and pressure plate on a Harley-Davidson Sportster.
Step 1: Loosen the clutch hub bolts
Locate the clutch hub bolts within the clutch assembly. Make use of an appropriate socket or wrench and start loosening the bolts securing the clutch hub to the main shaft. It is important that you follow the specific bolt loosening sequence outlined in the owner’s manual to ensure an even release of pressure. Loosen each bolt gradually, working in a crosswise pattern, until all the bolts are loosened sufficiently. Take care that you don’t strip the bolt heads or damage the surrounding areas.
Step 2: Use a clutch hub-holding tool
To prevent the clutch hub from rotating while loosening the pressure plate bolts, it is advised that you should use a clutch hub-holding tool. This tool holds the clutch hub stationary, allowing you to loosen the pressure plate bolts without resistance. You need to follow the manufacturer’s instructions for properly using the clutch hub holding tool and ensure it is securely in place before proceeding.
Step 3: Loosen the pressure plate bolts
Once the clutch hub is securely held in place, make use of the appropriate socket or wrench to loosen the bolts securing the pressure plate to the clutch hub. Similar to the clutch hub bolts, you should follow the specified bolt loosening sequence outlined in the owner’s manual. Loosen each bolt gradually, working in a crosswise pattern, until all the bolts are loosened sufficiently. Take care that you don’t strip the bolt heads or damage the surrounding areas.
Step 4: Remove the clutch hub and pressure plate
With both the clutch hub and pressure plate bolts loosened, carefully lift the pressure plate away from the clutch hub. Pay close attention to any springs or clutch plates that might be present and take note of their positioning for reassembly.
Once the pressure plate has been removed, you’ll be able to lift the clutch hub away from the main shaft, exposing the clutch plates and clutch basket. Handle the components with care to avoid damage.
How to reattach the primary cover on your Harley-Davidson Sportster
After you have performed maintenance, repairs, or modifications on the clutch assembly of your Harley-Davidson Sportster, it’ll be important to properly reattach the primary cover. The primary cover will not only protect the internal components but also deliver a polished and finished look to your bike. Here are the steps you need to follow for reattaching the primary cover on your Harley-Davidson Sportster.
Step 1: Reposition the clutch cable and pressure plate
Start off by repositioning the clutch cable. Now, insert the cable end into the primary cover through the designated opening. Make sure that the cable is properly seated and free from any obstructions or entanglements.
Next up, you’ll need to position the pressure plate on the clutch hub, aligning the bolt holes. Take note of any springs or clutch plates that were removed during the disassembly process and make sure they are properly positioned.
Step 2: Reattach the clutch spring retaining pin
Locate the clutch spring retaining pin and carefully slide it back into place. Make sure that the pin is aligned with the corresponding holes on the clutch hub and pressure plate. Once aligned, you need to insert circlips or retaining rings on each end of the pin to secure it in place. You should double-check that the pin is fastened securely.
Step 3: Reconnect the clutch cable
Moving to the clutch lever on the handlebars, you should reconnect the clutch cable. Slide the cable end into the clutch lever assembly and secure it with the retaining bolt or nut. Make sure that the cable is properly seated and tightened, allowing for smooth clutch operation.
Step 4: Replace the primary cover
Position the primary cover over the clutch assembly, aligning it with the mounting points on the engine casing. Take care that you don’t damage any gaskets or seals during the process. Make sure that the clutch cable and other components are positioned properly within the primary cover.
Step 5: Tighten the bolts
Beginning with the primary cover bolts, you should use the appropriate socket or wrench to tighten them in a crosswise pattern. You should gradually tighten the bolts, ensuring that they are evenly torqued to the manufacturer’s specifications. Overtightening might cause damage while undertightening might result in loose components.
Step 6: Torque the bolts
Using a torque wrench, verify that the primary cover bolts are tightened to the specified torque value provided in your bike’s owner’s manual. Following the recommended torque settings will be important to ensure proper fastening and prevent damage to the primary cover or engine casing.
How to test your Harley-Davidson Sportster after reinstalling the primary cover
After you have reinstalled the primary cover on your Harley-Davidson Sportster, it’ll be important to thoroughly test the bike to ensure everything is functioning correctly. This includes starting the engine and performing a clutch lever test for verifying proper clutch engagement and disengagement. Here is how you can test your Harley-Davidson Sportster after reinstalling the primary cover.
#1. Sit on the bike and prepare to start
Take a seat on your Sportster, ensuring you’ve got a clear and open area in front of you. Make sure that your bike is in neutral and both your feet are firmly on the ground. You should familiarize yourself with the location and operation of the clutch lever and the ignition switch.
#2. Engage the clutch lever
Using your left hand, you should pull in the clutch lever all the way toward the handlebar grip. Make sure that the lever moves smoothly and without any resistance. This action will disengage the clutch, allowing you to start the engine without the bike moving.
#3. Turn on the ignition
Insert the key into the ignition switch, typically located on the right side of the handlebars or near the fuel tank. Turn the key clockwise to the “ON” position. You will hear the bike’s electrical systems activate, including the fuel pump priming.
#4. Start the engine
With the clutch lever pulled in, make use of your right hand to press the starter button or engage the starter switch. Ideally, the engine should start up smoothly. Then, release the starter button once the engine is running.
#5. Listen for smooth operation
As the engine idles, you should listen for any unusual sounds or vibrations. A well-maintained Sportster should deliver a steady, even idle without any roughness or irregularities. Pay close attention to any abnormal noises that might indicate a problem with the clutch or other components.
#6. Test the clutch lever operation
With the engine running, you should slowly release the clutch lever while in neutral. Observe how the engine responds as the clutch engages. The engine RPM will drop slightly, indicating that the clutch is engaging the transmission. Make sure that the clutch lever movement is fairly smooth and that there are no jerky or rough transitions.
#7. Shift through the gears
While keeping the clutch lever pulled in, you’ll need to shift your Sportster into first gear. Gradually release the clutch lever while applying the slight throttle. Your bike will move forward smoothly without any slippage or hesitation. Shift through all the gears, testing each gear engagement, and ensuring a smooth transition.
#8. Test the clutch disengagement
With your Sportster in gear, you should pull the clutch lever in completely and apply the brakes. Your bike should come to a complete stop without any clutch slippage or the engine stalling. Repeat this process for all gears, verifying that the clutch disengages properly.
#9. Final checks and adjustments
After you have tested the clutch lever and confirmed proper clutch engagement and disengagement, you should turn off the engine. Double-check the connections, bolts, and components for tightness and proper installation. You must look for any signs of leakage or unusual wear.
FAQs
What tools are needed to remove the primary cover on a Harley Sportster?
In order to remove the primary cover on a Harley Sportster, you will need a few tools, including a socket wrench, a screwdriver, and a puller. You will also need a few items to protect the motorcycle, such as a drop cloth, a pair of gloves, and a pair of safety glasses.
What steps should I take when removing the primary cover?
When removing the primary cover, the first step is to disconnect the battery and drain the oil. Next, you should remove the screws that secure the primary cover and then use the puller to remove the cover. Once the cover is removed, you can then inspect the components inside for any signs of damage or wear.
What should I do if the primary cover does not come off easily?
If the primary cover does not come off easily, you may need to use a pry bar to loosen it. You should also be careful not to force the cover off, as this could cause damage to the motorcycle. If you are still having trouble, it may be a good idea to seek professional help from a certified Harley mechanic.

