Do you own a Harley-Davidson motorcycle and feel held back due to the speed limiter and want to remove it? If so, then you’re definitely in the right place.
Removing the speed limiter on a Harley-Davidson is illegal in most regions and can void warranties. It typically involves reprogramming the ECU using a fuel tuner, but this can affect safety and legal compliance.
In this article, you’ll get to know all about speed limiters, how to remove speed limiter on Harley-Davidson bikes, why did speed limiters get introduced, and how to increase the rev limiter on your Harley-Davidson bike, among others. Continue reading to get all the answers that you’re looking for.
What is a speed limiter?
A speed limiter is a safety device that is fitted to a Harley-Davidson bike. It prevents the bike from exceeding certain pre-set speed limits assigned by the government. Even though it might sound like cruise control, speed limiters will allow you to accelerate and decelerate as normal. However, it’ll act as a speed warning system when you’re driving above the limit that has been set.
Why did speed limiters get introduced?
Speed limiters got introduced to help improve road safety by making efforts to reduce the number of road accidents. According to the European Transport Safety Council (ETSC), this move could help reduce collisions by 30% while saving almost 25,000 lives in 15 years. Speed limiters prevent the biker from going above the speed limit set by the government. This doesn’t just help reduce the number of potential accidents, but also limits the fines and speeding penalties.
It is also believed that speed limiters have many other benefits for bikers. They offer better fuel efficiency, fewer CO2 emissions, and potentially lower insurance premiums. In fact, not just Harley-Davidson bikes, but other vehicles sold in 2022 are set to come with automatic speed limiters installed.
How do speed limiters work?
Speed limiter technology or also known as Intelligent Speed Assistant works by using speed sign recognition software cameras and GPS data to detect the maximum speed limit in a particular area. IAS systems don’t actually apply the brakes, but instead, they limit the engine power to reduce your speed.
You will also get audio and visual warnings until you begin driving at or below the speed limit. You’ll get to override the limit, by pressing down hard on the accelerator. However, it’ll restart each time your Harley-Davidson bike is restarted.
How to remove speed limiter on Harley-Davidson bikes
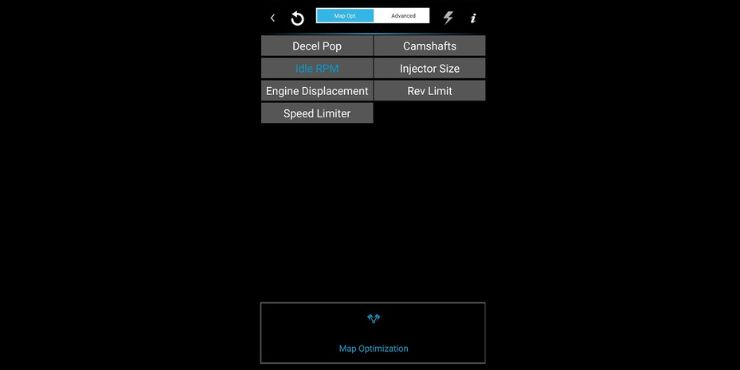
- In the Speed Limiter Tool, open the main menu and press Map Optimizations
- Press Speed Limiter
- Click the switch to “Off”
- Return back to the Map Optimizations menu
- This will go ahead and flash the new values to your Harley-Davidson bike

There’s also an alternate way to remove the speed limiter on your Harley-Davidson bike, and it goes something like this.
- Open the main menu in the Speed Limiter Tool
- Select View/Edit Maps
- Press the highlighted map
- Go down to the General button at the bottom and tap on it
- You’ll see the Speed Limiter option
- Toggle the switch to “Off”
- You’ll get a pop-up stating that you’ve made changes to the map, select “Continue” to apply the changes
Is it mandatory to have the speed limiter switched on?
Under current regulations, you’ll be able to switch off the speed limiter function on your Harley-Davidson bike. However, this can easily change in the future if stricture rules get imposed. Moreover, you should remember that it’s always dangerous to exceed the speed limit on the road. Not just that, it’s also illegal to drive above the speed limits that have been set.
How to increase the rev limiter on your Harley-Davidson bike?
Even though the parameter is commonly referred to as the rev limiter, it’s more accurately known as the RPM limit. This is actually the function of the electronic ignition. A stock Harley-Davidson comes with a limit of 5,500 revolutions per minute. On a Big Twin, around the time you hit 60-65 miles per hour in second gear, the engine starts to splutter and miss. Crusty old bikers who remember mechanical points often mutter about hitting the rev limiter, but there’s no rev limiter. You can change the RPM limit by easily installing an electronic ignition with a programmable RPM limit. By installing an RPM limiter, you can make ignitions that can go as high as 9,900 RPM.
Remove the old ignition of your bike
Step 1
Remove the seat by easily loosening the Allen or Phillips screw in the fender tab on the back of the seat. You should make use of an Allen wrench or a Phillips screwdriver.
Step 2
Disconnect the negative battery terminal from the negative battery post by utilizing an open-end wrench.
Step 3
Disconnect the spark plug wires from the coil. After that, remove the two remaining fires – positive and negative, from the front of the coil using a small open-end wrench.
Step 4
Disconnect the plug known as the VOES connector. It attaches the wiring harness of the vacuum-operated electrical switch to the front wiring harness.
Step 5
After that, drill out the rivets on the points cover on the lower-right side of the bike with an electric drill. Now, you should remove the points cover.
Step 6
Loosen out the two flat-head screws present inside the points cover. You should also remove the gasket and inner cover.
Step 7
Disconnect the sensor plate cable plug using needle-nose pliers. You should pull the sensor plate cable through the hole present at the bottom of the timing cover.
Step 8
A line should be drawn from the V-notch on the sensor plate right down to the ignition housing using a grease pencil.
Step 9
Remove the sensor plates and washers using a flat-head screwdriver. Then, remove the sensor plate.
Install the new ignition on your bike
Step 1
Install a Crane Hi-4 ignition or any equivalent ignition instead of the sensor plate. Push the new ignition cable through the hole located at the bottom of your timing cover.
Step 2
Now, align the V-notch of the ignition with the grease pencil mark on the ignition housing. After that, loosely attach the new ignition with the original sensor plate screws and the lock washers that come with the ignition.
Step 3
You should then route the new ignition wiring harness with the frame rails to the coils. Screw the new harness to the frame using cable ties.
Step 4
Connect the white (negative) and black (positive) coil wires from the new ignition wiring harness to the negative and positive terminals of the coil by using a small open-end wrench. Now, reconnect the negative battery cable to the negative battery post by using an open-end wrench.
Step 5
Replace the seat and then fasten the seat tab to the rear fender using a Phillips screwdriver or an Allen wrench. After that, attach the green wire of the new ignition wiring harness to the VOES connector.
Step 6
You should be setting the “mode select” dial on your new ignition to “6”. After that, set the two RPM limiter switches to the desired setting. Moreover, the “advance” slope dial should be at “6”.
Step 7
Set the two RPM selector dials to your desired RPM limit, divided by 100. For instance, you’ll achieve an RPM limit of 5,500 by setting the two dials to “5”. For an RPM limit of 6,800, you should set the first dial to “6” with the second dial set to “8”.

Static timing on your new ignition
Step 1
Put your Harley-Davidson bike in top gear. Raise the bike on a motorcycle jack until the bike’s rear wheel is off the ground.
Step 2
Remove the front spark plug using a socket wrench and a spark plug socket. You should then peer into the spark plug hole.
Step 3
Rotate the rear wheel and engine of your bike until the front cylinder reaches the top of its stroke. Remember not to move the rear wheel.
Step 4
Remove the timing hole plug of the crankcase using a hex socket and a socket wrench. Screw the timing view plug into the same hole of the crankcase.
Step 5
Confirm the double line, which will be the top-dead center timing mark. It’ll be visible in the timing view plug.
Step 6
You should then turn on the ignition. Confirm that the LED of the new electronic ignition has been illuminated.
Step 7
Then, rotate the new ignition module manually until the LED has gone out. Tighten the sensor plate screws using a flat-head screwdriver.
Step 8
Turn off the ignition and then reinstall the front spark plug.
Step 9
Lower the bike jack and remove it. Remove the timing view plug and then reinstall the timing hole plug using a hex socket and a socket watch.
Step 10
Reattach the points cover while including the gasket with the ignition kit. Secure the points cover to the bike’s ignition that is housed with two self-threading screws, including in the ignition using a screwdriver.
Conclusion
Thank you for reading. Hopefully, now you know a lot more about speed limiters, how to remove speed limiter on Harley-Davidson bikes, why did speed limiters get introduced, and how to increase the rev limiter on your Harley-Davidson bike, among others. Removing the speed limiter on Harley-Davidson bikes is not that complicated, and it’ll allow you to exceed the speed limitations of your bike. A speed limiter is a safety device fitted into your bike to prevent it from exceeding the pre-set speed limits. You can remove the speed limiter by using the speed limiter tool and then toggling off the speed limiter option in the tool.

